Search models, users, collections, and posts

Lithophane Lightbox (for Bambu LED MH001)

Print Profile(1)

All
A1
P1S
P1P
X1 Carbon
X1E
X1
A1 mini
H2D
H2D Pro
H2S
P2S
H2C
X2D
A2L

0.2mm layer, 6 walls, 25% infill
Designer
4.3 h
1 plate
5.0(12)

Open in Bambu Studio
Boost
121
269
27
21
188
73
Released 

Bill of Materials

Maker's Supply Kits and Parts
Select all
LED Lamp Kit (1pcs) - MH001

Description

Lithophane Lightbox – A Beautiful Way to Illuminate Memories


Boost Me (for free)

If you dig this model, throw me a Boost! The 3d gods will reward you.


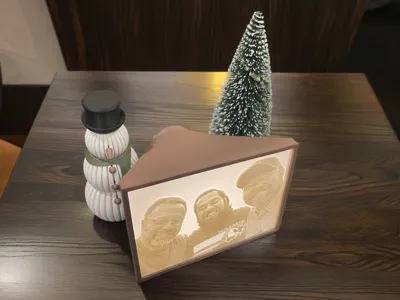
Showcase your favorite lithophanes in a warm, captivating glow with this elegant lightbox design. The Lithophane Lightbox is crafted to perfectly fit lithophanes with dimensions of 156mm wide x 112mm tall. Please ensure your image is cropped to fit this size (±0.5mm) for the best results.


This design pairs seamlessly with the Bambu Lab LED Lamp Kit MH001, which provides bright, even lighting to enhance the details of your lithophane. You can find the lamp kit here.


Features:

Elegant Design: A minimalist shape that complements any space.

Perfect Fit: Designed for 156mm x 112mm lithophanes with precise mounting grooves.

Versatile Lighting: Compatible with the Bambu Lab LED Lamp Kit MH001 for optimal illumination.

PETG Recommended: Print in PETG to allow the plastic to stretch slightly when snugly sliding the lithophane in from the bottom.


Assembly Instructions:

1. Create Your Lithophane: Use the Bambu Lab lithophane maker. Select the Mono Litho without Frame template, upload your photo, and adjust or crop if needed. Ensure the final dimensions are 156mm x 112mm.
2. Print Your Lithophane: Use a white PLA filament, such as Ivory White or Jade White, or any similar white tone that enhances light diffusion.
3. Prepare the Lithophane: Break off the side supports and clean up the edges using a deburring tool.
4. Install the LED Light: Carefully wedge the light into place in the back, ensuring the electric cord is fitted securely in the provided slot.
5. Insert the Lithophane: Gently slide the lithophane into the lightbox. It will be a snug fit, so work carefully to avoid damage.
6. Turn On and Enjoy: Once assembled, switch on the light to bring your lithophane to life.


Please consider boosting this model if you like this!

Comment & Rating (27)

(0/1000)

Print Profile
0.2mm layer, 6 walls, 25% infill
Printed really well! I was a bit worried that I would have to clean up after removing the supports but the print just snapped right off! I don't remember if the original print profile has the "On build plate only" support option enabled, but that was the only change I MAY have made (if any). Ty for the design!
The profile uploader has replied
0
Reply
excellent! I'm not sure you noticed, but I almost always change the top Z distance to .3 or .4 instead of the default .2. This allows for the tree supports to pop off very easily. :) Great work btw, looks awesome!
(Edited)
1
Reply
Replying to @colonelcufflink :
I did not notice, but that is a wonderful tip for a beginner like myself! Thank you (:
(Edited)
profile
1
Reply
Thanks for the nice design! The only thing is the front came off the print when I wanted to remove the brim and supports. I printed it on the front, otherwise the printing time was much longer. I did it with glue but it is not perfect since I had not much place for the glue, but it is fine. The space for the led lamp is perfect. Thanks!
(Edited)
The designer has replied
0
Reply
thanks for the feedback, i may readjust a few things then
0
Reply
Print Profile
0.2mm layer, 6 walls, 25% infill
bello
0
Reply
Print Profile
0.2mm layer, 6 walls, 25% infill
Perfect, printed in white PLA and everything fits perfectly. Perhaps I would make the hole for the light 0.5 mm smaller as it protrudes slightly. Super cool! Thanks for the design.
Show original
0
Reply
Boosted
thanks for detailed expalanation. worked well. but I had to use a smaller led and so I had to cut cardboard and stick it in the hole. is it possible to have a part like a cover for smaller leds that I can stick the led to and attach it to the frame?
The designer has replied
designer
1
Reply
maybe in a future version. i can't account for all LED's tho. I tried to make it simple by using a very popular LED that a lot of Bambu Lab users get.
0
Reply
Boosted
Loved the idea and the implementation :-)
The designer has replied
0
Reply
thanks!
0
Reply
I'd love it for a 1:1 aspect ratio
designer
1
Reply
What type of light can be used
The designer has replied
Show original
0
Reply
does the Bambù Puck light fit in it instead of the LED?
The designer has replied
0
Reply
Print Profile
0.2mm layer, 6 walls, 25% infill
perfectly fine
0
Reply

License

This user content is licensed under a Standard Digital File License.

You shall not share, sub-license, sell, rent, host, transfer, or distribute in any way the digital or 3D printed versions of this object, nor any other derivative work of this object in its digital or physical format (including - but not limited to - remixes of this object, and hosting on other digital platforms). The objects may not be used without permission in any way whatsoever in which you charge money, or collect fees.