Search models, users, collections, and posts

Saint Seiya clock

Remixed by
IP Report

Print Profile(3)

All
X1 Carbon
P1P
P1S
X1E
H2D Pro
X1
H2D
H2S
A1
H2C
P2S
X2D
A2L
A1 mini

0.16mm layer, 2 walls, 15% infill
Designer
77.1 h
4 plates
5.0(3)

0.16mm layer, 2 walls, 15% infill
Designer
73.3 h
5 plates
5.0(2)

0.2mm nozzle, 0.12mm layer, 4 walls, 30% infill
27.6 h
2 plates
5.0(1)

Open in Bambu Studio
Boost
374
784
39
24
528
59
Released 

Bill of Materials

Bambu Filaments
Select all
White Marble (13103) / Filament with spool / 1 kg
Clear (66400) / Filament with spool / 0.5 kg
PVA
x1
Black (10101) / Refill / 1kg
List other parts
  • arduino x 1:
  • led ringsRGB x 4:
  • RTC module x 1:

Description

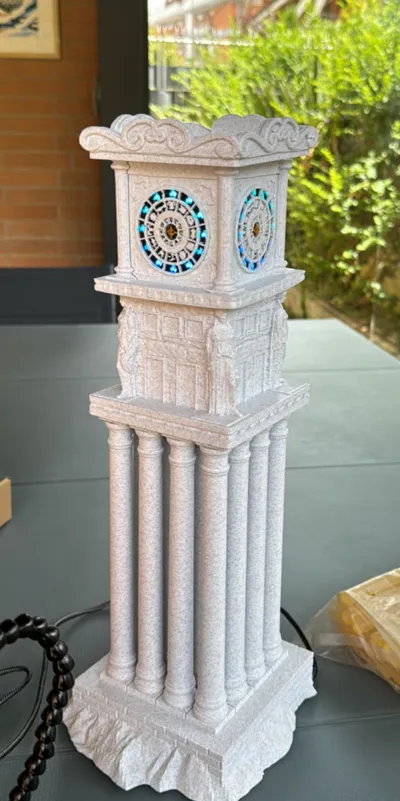
this is a remix of the model https://www.thingiverse.com/thing:4460987/files. In this version, the clock will have lights lit up corresponding to the current hour. For example, at 2 AM or PM, the lights for the Aries and Taurus houses will be off, at 3 the third house will turn off, and so on. This represents the most complicated and expensive project I’ve ever made. In fact, even though I completed it months ago, I wasn’t sure about publishing it—but here I am.


To make sure there are lights with flames that turn off at every hour of the day, several additional parts and an Arduino Uno are required. Below, I’ll list all the parts and the code I wrote. It’s my first time using Arduino or similar tools, so there’s definitely a smarter way to achieve the same result, but this is how I did it.


You’ll need to separately purchase an Arduino Uno, an RTC module to get the correct current time, and 4 RGB LED rings. (Links to the ones I used are provided below.)


Regarding the 3D model:


I modified the positions of the houses so they rotate clockwise, making it easier to read the time. I added 2 negative parts to allow the power cable to pass through. Additionally, I strongly recommend using PVA filament for the supports on the colored part of the clock. I used BambuLab Marble filament for the marble effect.


Once printing is finished and the connections are made, simply upload the code to the Arduino board and plug it in.


P.S. If you’re as crazy as I am about getting involved in this project, you might be interested in the work of https://makerworld.com/it/@zeros2024, who I believe is working on completing all twelve houses — currently they’ve reached the House of Libra. I haven’t tried printing them yet, but they look great.


link:


 RTC https://www.amazon.it/AZDelivery-RTC-Arduino-Raspberry-Microcontroller/dp/B01M2B7HQB/ref=sr_1_3?__mk_it_IT=ÅMÅŽÕÑ&crid=32TOMM0ZEOGBK&dib=eyJ2IjoiMSJ9.y6x1H_5Wm9FU1SwnPMbDlz8eVkPOpXdotut8MGhyotKpAIyPOj8bSvOFOE3FJ6SH7rk3H47iYZlvtnmDGtQqQt5u9vx94s0JyjTXS73HcYbhHQm-ITw8mIH1YnhXsBr_RbEFysuXkV7w8_bAGxoq28EQZwrSXftsoVVgdSOA-a7dOHWpud6yyft6grH89iyFtNJQaWd9lLbbWgB5dIfVHwY78ZdlwWUl51JYHAktoaGU0_Ocy4NXV3NaN4ePvCQTsXzQ32eInNrvwsEhIyQikBXpLlH3Nhch8BOobE2dP0FxJazMSeMSNz3ttYN48xtxbAxsn9ZdaqjH72mMnIK2BgsmyFWGI_zgOwkPn2hpbng.KqfTanOx13u6QRvHFTn-e-OURM43lqoL9ae1L0PRSh0&dib_tag=se&keywords=modulo+RTC&nsdOptOutParam=true&qid=1735564502&s=pc&sprefix=modulo+rtc+%2Ccomputers%2C86&sr=1-3


led ring RGB: https://www.amazon.it/AZDelivery-WS2812B-Tecnologia-Neopixel-Arduino/dp/B07TZK8JTQ/ref=sr_1_8?__mk_it_IT=ÅMÅŽÕÑ&crid=2HAO8MYHH2NP6&dib=eyJ2IjoiMSJ9.PfZIr8Z0H9zMk-Cb7-nfxFNyJwEIcihQDAa1ecslDfFoCTWexKOgtk7IZhWKsz_y4R5u_BEV571PBKvrq2sI48nW12zfliEr1-QiPgXjeAUOMGDNSQdve7p6IwpFjRghJFYEI92PHmC4ESmQycvTJQW7zmnx3m_kp8PZjo0vLbyfT6neUY7Kze5oVQltvQdHD2dtWQAEU3d9NoRGt7JM5hdwrTwA51gbPUTrMIXDkpXGqLtfGQmI1gVVFMQUCxQhI-0WT9JkXcJVOuUMb5Gbsp1P_hzp2D7g6DmwbL7CD9UVYmiBdTf9EhEKn49b0DQEYE6yxrUuJU9DfV_qS7WnxlqvRQX9Vbuhf_kt-HXv38rO-YpLFzfUut4o7pyGuNh71yjMQnkB2d50M_73brRvBbS2onv9OwVv-VnLabxJKyN3Ibkw6RyThjUpeLP4j55C.p_hhapLJDUC2__w5VUcG1VKQmXZggHdR_vzSK1W36vg&dib_tag=se&keywords=12%2BRGB%2BWS2812%2BLEDs&nsdOptOutParam=true&qid=1735564337&sprefix=12%2Brgb%2Bws2812%2Bleds%2Caps%2C79&sr=8-8&th=1


arduino starter kit  https://www.amazon.it/Arduino-Starter-principianti-K010007-Italiana/dp/B00FDW8JJE/ref=sr_1_6?adgrpid=52665048876&dib=eyJ2IjoiMSJ9.TTQ2MVXKxwI25LceGrKjsHnJYedKj2kmeZbzIXq9x_T1CEWqYEO2nIIvDn_orK9KeKTywKnWnOLeWQHJnrGKiLOBjgl23sVDZk8_u0hagK5CR9qIsNJ3lTDQGFgBZ1eCP_0tG-1nMgI_LzuCE9UHEoF6OaGrvDnf4gSn4eVikw6AOm93YxehCPjcplj4lg-VKXgdGNqG3L6kya9ubm0vk17B6XMNHXw8rcQqtThhzlFLO_Vvf6i4b4_f2tdV6jRsJCQUD7h-W-YLNWQrXx-IbpDHPdKZqvl9slqqKsOuBEg79cpJuicM7ypHM5T1vu5kNH0WqB4UegxL7nwG8Gm2OPZSS9VvK65yleqmL1B-Gb0FlPvCc8cEoimIZs7f2BhRlTh8IPRjNAmogxBEhv1Pp99IIG0VG-M_kV1G2GmxP-vk7jTIoWbYsisYG2hY0cHZ.xDw5bCJ-3b3XbOyg7SJJmfgZ9_Zj15SM57fmULu4aU8&dib_tag=se&hvadid=255196983346&hvdev=c&hvlocphy=9209322&hvnetw=g&hvqmt=e&hvrand=17499187673916179189&hvtargid=kwd-298157573661&hydadcr=18608_1737178&keywords=arduino+uno+starter+kit&nsdOptOutParam=true&qid=1735564404&sr=8-6 


Documentation (1)

Assembly Guide (1)
led_clock_instructions.pdf

Comment & Rating (39)

(0/1000)

Boosted
Hi, great work the tower is amazing, As mentioned by @hummingprinter the profile between the supports and the colour changes generates a lot of waste. I’ve cut the circles as best I could to make the printing easier. I’ve also posted the profile, which should be available shortly.
The designer has replied
2
Reply
hi, great!! thanks for sharing
1
Reply
Hello, could you share those Pokeball models you have in the background
Show original
0
Reply
Boosted
Replying to @user_667601895 :
Hi i find them on this patreon : https://www.patreon.com/cw/N3DMelbourne
0
Reply
Great Job Indeed. I added a twitch in the code so the flames looks like flaming now. It's fantastic. I recommend an Arduino Nano for this, the Uno is good but bigger. Also I will add a remix for this, the color printing for the clock takes about 2 days and a lot of waste, I will cut the walls, so they can be printed layed down. Again amazing job! Greetings from Argentina.
The designer has replied
designer
5
Reply
Excellent idea to cut the colored part for a flat print, and also the flickering lights idea is superb Honestly I had thought about it too, but I couldn't implement it in the code 😖😬 If when you make your remix you also share the code, I will surely update it Thanks to you and excellent print
Show original
0
Reply
Hello @hummingprinter I'm Guido from Argentina too. Could you please share the modified Arduino code that implements the blinking lights. Thank you very much! 💪🏼
(Edited)
Show original
0
Reply
Hello, good! Could you share the code? Thanks!
Show original
0
Reply
Print Profile
0.16mm layer, 2 walls, 15% infill
amazing design!
The profile uploader has replied
profile
1
Reply
bellissimo
0
Reply
It's beautiful, but without a PC, I can't print the base because it's not available on Bambu Handy 🥺
The designer has replied
Show original
0
Reply
Why not? I tried opening it from Bambu Handy, and the base is in the first plate out of four. Let me know if you have any problems!😎
Show original
1
Reply
Replying to @marco1234567 :
Sorry I should have specified that I have an A1 Mini and for my printer there is only the clock profile
Show original
0
Reply
Replying to @user_1426315222 :
ah ok tonight I'll try to understand why it's not possible to print with A1 mini in terms of part size we should be fine regarding the clock part the profile uploaded by Zeirh despite being with a 0.2 nozzle will save you a lot of time and material I need to modify mine to print the 4 flat faces I don't know why I didn't think of it at first but I don't know when I'll do it So I recommend you use that one for now Also adding an internal aligner like hummingprinter did is a great idea these are all modifications I have planned but I don't know when I'll do them meanwhile tonight I'll try to sort this out for the A1 mini
(Edited)
Show original
0
Reply
Could you provide an AliExpress link for LED rings? They should be the same size as those on Amazon and function identically. I've read Amazon reviews mentioning soldering and contact issues, and I'd prefer to buy cheaper ones for practice before potentially damaging a more expensive set. Thank you in advance.
The designer has replied
Show original
designer
2
Reply
Superv
designer
1
Reply
Hello, could you please share the new modified code? Have you printed everything in PLA? If you have the new modified files, I would appreciate it
Show original
0
Reply
Replying to @ADNprintADN :
Hello! I will soon upload a remix of this design, with the new code
Show original
1
Reply
Replying to @hummingprinter :
Thank you, then I will wait impatiently 😁💪🏼
Show original
0
Reply
Is the AMS mandatory or can it be done without it with an A1? I only have PLA, why do you strongly recommend using PVA? Is there a tutorial on assembling all this and the electronics? Thank you very much for the hard work
The designer has replied
Show original
designer
1
Reply
The AMS is necessary for the multicolor part; otherwise, you'll have a whole marble-colored structure. I recommend PVA because otherwise removing the supports from the smaller overhangs becomes difficult, though not impossible, just laborious… There isn't a real tutorial for assembly, only what I wrote in the description and the attached PDF with a few images. It's not very complicated, but if you decide to print and have difficulty assembling it, feel free to contact me
Show original
0
Reply
@marco1234567 hi Marco. I have a few doubts regarding the circuit plan you uploaded. I am totally knew to this so I'm learning while doing. 1- I read that there needs to be 330Ohm resistances in order to protect the LED rings, but I don't see resistances in the plan. Is that so? did you use them? are they actually necessary? 2- I don know what the "green dot" on the top of the plan means. the one that receives 2 cables from GND and from Pin2. is that a switch button? 3- how do you power the system once it is finished? do you use a power transformer to power the arduino? what spects does the current transformer need to be? Thanks a lot. Guido.
The designer has replied
0
Reply
Hello Guido, I'll answer you point by point 1-I didn't use resistors, I probably should have, but I didn't use them, and in over a year and a half, I haven't had any problems (it's always on) 2-yes, it's a switch that then needs to be placed in the hole on the clock's "roof" 3-it's powered by the wall outlet and a USB-B to USB-C cable that goes from the Arduino to the plug (like with cell phones, to be clear) If you use an Arduino Nano or with other power ports like USB-C, obviously the cable must be compatible If I haven't been clear or if you need anything else, feel free to write me privately Thanks for appreciating the model and Merry Christmas
Show original
0
Reply
Print Profile
0.16mm layer, 2 walls, 15% infill
The profile uploader has replied
0
Reply
grazie!!
0
Reply
Print Profile
0.16mm layer, 2 walls, 15% infill
profile
1
Reply