Enhanced Arasaka Shingen Tki-20 (Cyberpunk 2077)


Print Profile(4)


Bill of Materials


Description
----------------------------------------------------------------
Filter the print profiles by “All” or “A1” to see/download the main print profile. The handle objects overlap with the exclusion zones used by other printers for their flow calibration lines, so you'll have to manually slice those two plates (and disable automatic flow calibration) if you have a different printer. For convenience, I've also added a “No Handles” profile that will let you print the rest of the plates directly from the app/website on other printers- except the A1 Mini, which is too small for this model.
----------------------------------------------------------------
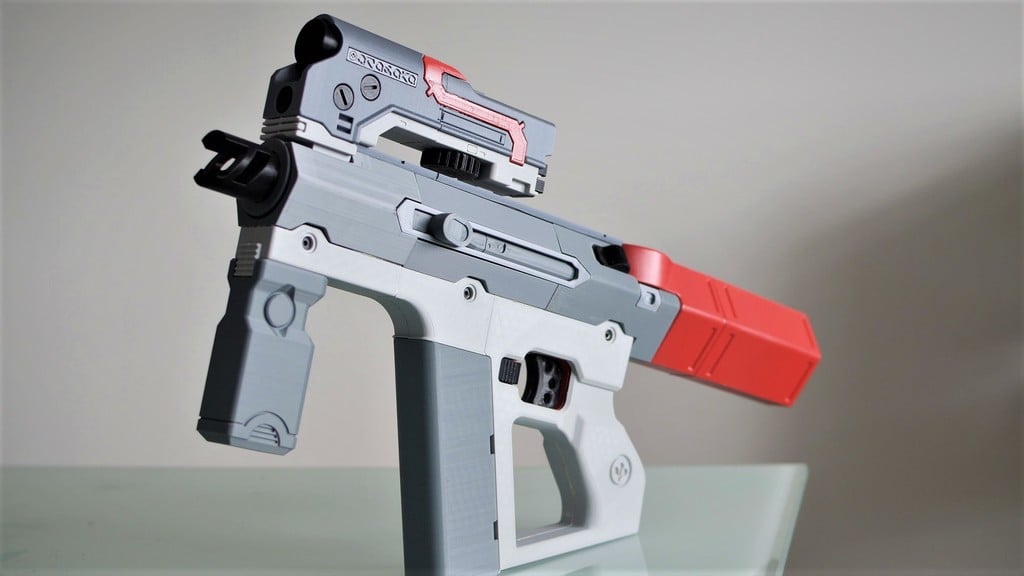
Significantly enhanced model of the Arasaka Shingen Tki-20 gun from Cyberpunk 2077. Modified from Printed_Props's model, this version takes full advantage of 256mm build plates and Bambu printer tolerances.
Enhancements include:
- Quick-release detachable magazine/stock
- Moving trigger (plus the moving slide already present in the original)
- All major components can now be assembled (and therefore disassembled) using M3 screws and nuts, plus some printed attachment mechanisms.
- You can still assemble everything using superglue just like the original if you prefer.
- Handle, barrel, stock/magazine, lower targeting module, and rails have been re-combined to all print in either 1 piece or 2 halves on 256mm build plates. This vastly improves the look of the prop, and slightly reduced print time and filament usage.
- Scope has been combined into one piece and then re-split in a less noticeable location, significantly improving appearance.
- Some decals are pre-painted in the “AMS-enhanced parts” print profile for improved appearance when printing with an AMS
- Foregrip is now composed of several separate pieces to enable more color customizations without an AMS
- Scope decal "screws" rotate via a print-in-place mechanism. Also added 2 holes to each to better reflect the in-game model.
- Scope front sensor now has an insert that looks like actual camera lenses.
- Added a rail “button” decoration that seemed to be missing from the original model.
- Fixed the NAV button to have readable text when printed in two colors with a 0.4mm nozzle.
- Added printable inserts for Arasaka logo on handle to make that pop more.
- Changed the circular magazine/stock insert to feature the Arasaka logo like the in-game model does.
All parts have optimal support settings pre-applied in the print profile, including many with manually painted supports.
The main print profile can be printed without an AMS. I'm also providing two supplemental print profiles, one for AMS and one for a 0.2mm nozzle plus AMS. There are a few small parts that benefit from one or both of these. You can just print everything in the main profile, and then go back and print the stuff in the other profile(s) if you have the necessary equipment.
Update History
1/2/25: Removed accidental voids left in the stock, and reduced the stock's peg size for easier insertion.
Bill of Materials
(*=optional)
5x standard ballpoint pen springs (4mm dia, 20-25mm length)
Various M3 screws
- 2 M3x20
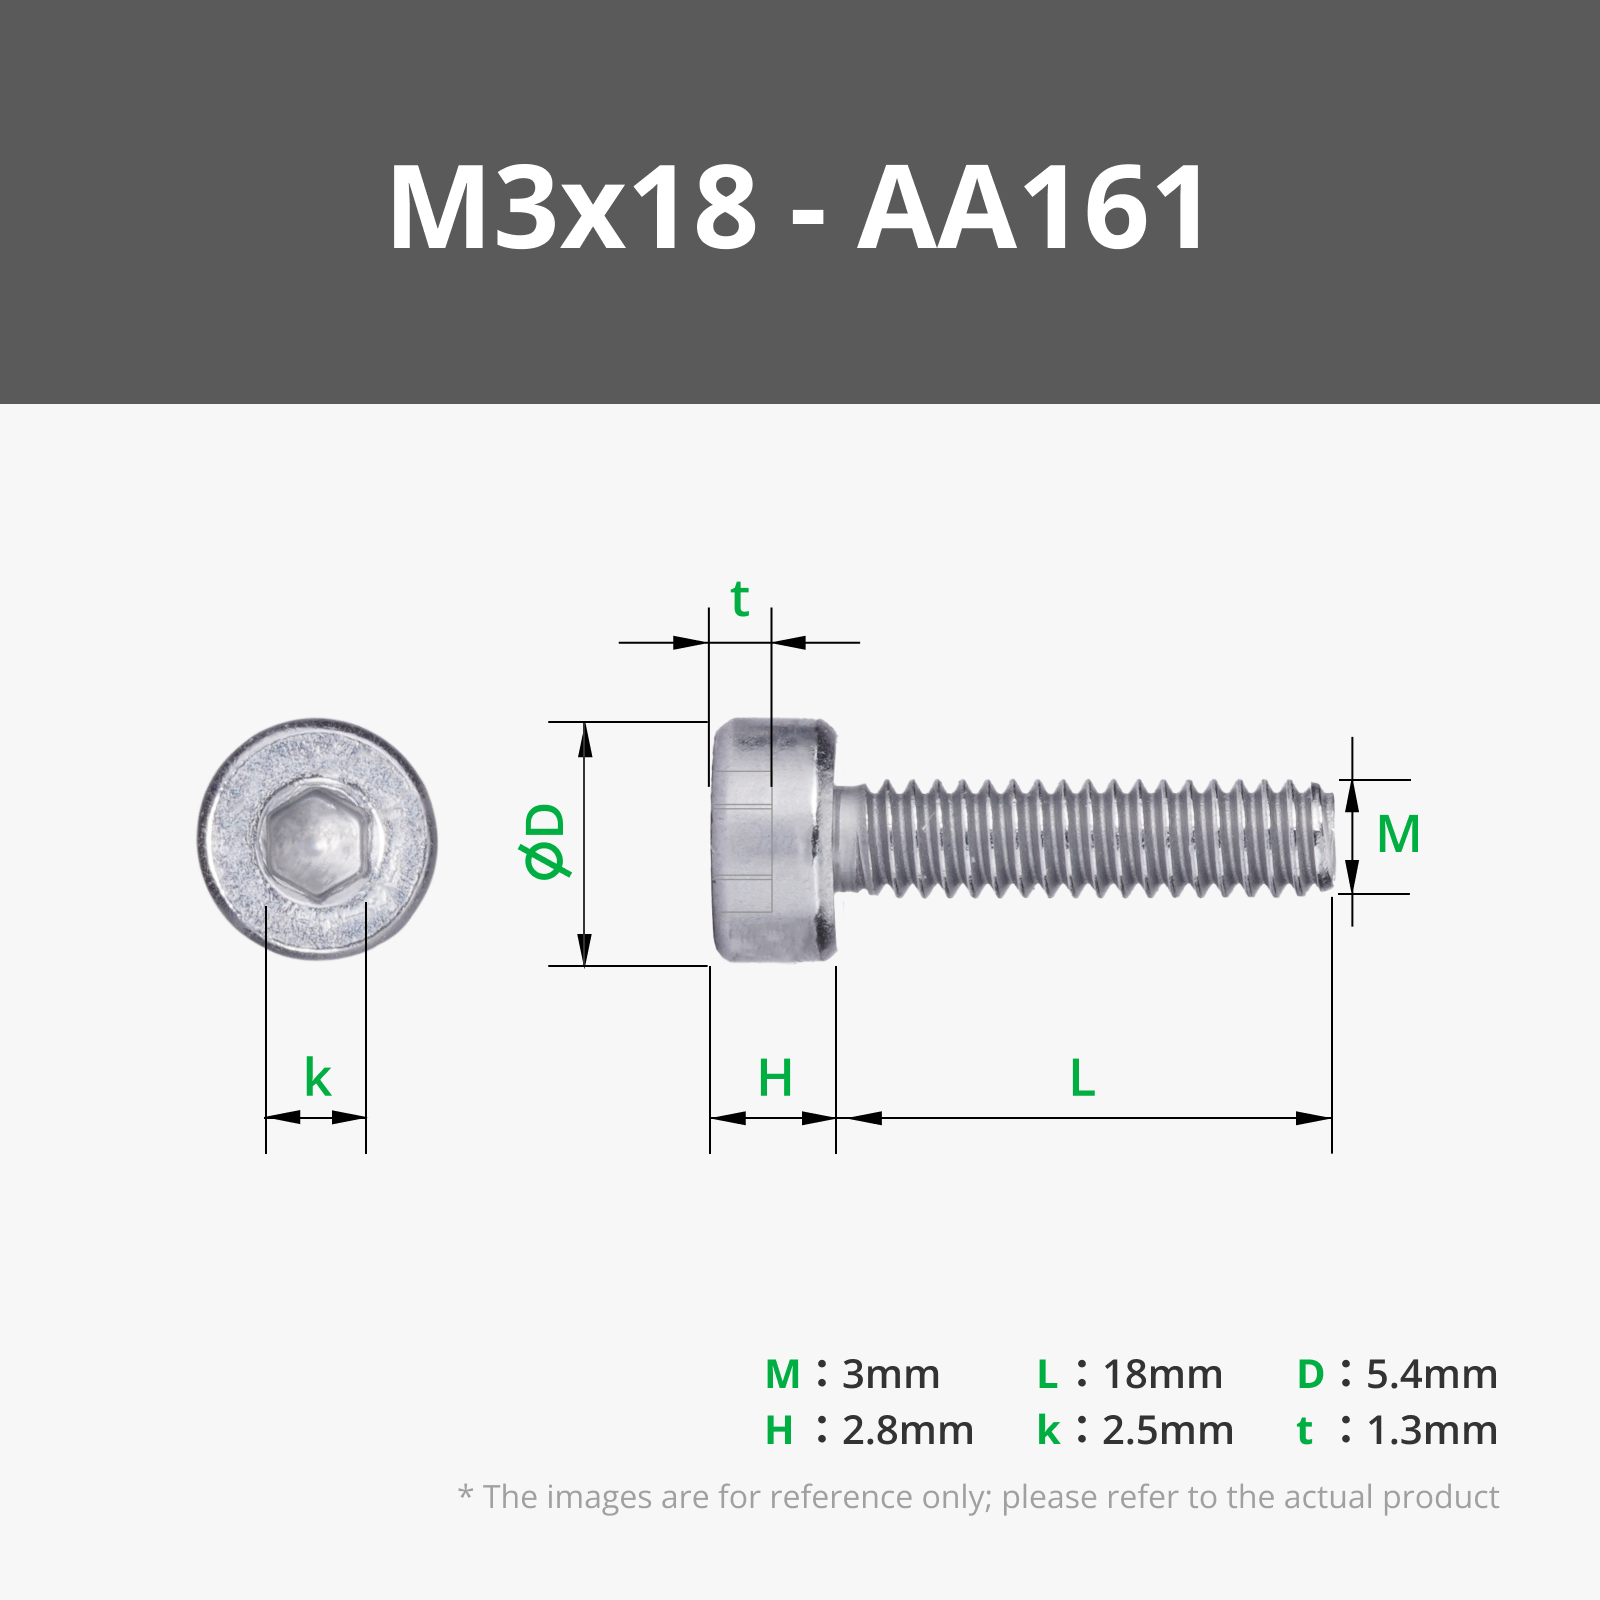
- *1 M3x18
- *2 M3x16
- 1 M3x16
- 1 M3x14
- 2 M3x12
- 2 M3x8
- 5 M3x6
8 M3 nuts (recommended)
*3 more M3 nuts (probably not needed)
M4 screws
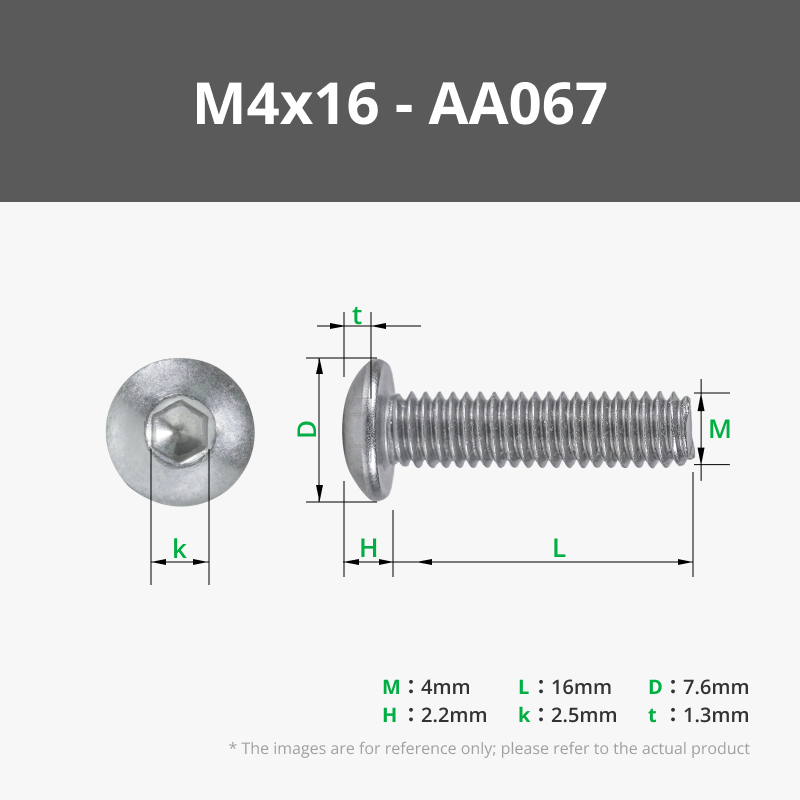
- 3 M4x16
- 3 M4x6 (or shorter)
Some extra 1.75mm filament
Superglue
*Double-sided tape
*Paperclip
Printing Notes
DO NOT CHANGE the orientation of the two barrel parts. For some reason several other orientations I tried resulted in weird printing artifacts that magically went away in this specific orientation.
The two handle parts only have 1-2mm of clearance from the edges of the build plate. Make sure your plate is PERFECTLY centered before printing those pieces.
The scope's “arasaka” insert looks WAY better printed with a 0.2mm nozzle. Use the associated print profile if you have one of those.
All the pieces with screw holes in them have 3 walls to maximize the structural strength of the holes since the M3 screws tend to remove a bit of plastic during insertion. Unfortunately there's a really old bug inherited by Bambu Studio that makes it impossible to modify wall counts in specific areas using modifier objects without destroying the integrity of stuff around it, so the entire part has to have 3 walls even though only the holes really need it.
Assembly Instructions
Pre-assembly Notes
All nuts are optional but recommended where available. Screws should self-tap into the plastic holes, but nuts will provide more secure attachments that will keep working even if the screw holes get stripped.
- I strongly recommend using a nut for the muzzle attachment since that screw hole is made of two halves that are more likely to strip or push apart than all the other screw holes.
Or you can completely ignore all the screws and just superglue everything together if you want.
These instructions provide an outline of the steps to follow, since some parts have to be assembled in a certain order, before other parts. A bit of personal judgement, common sense, and trial-and-error may be necessary to fill in the gaps. If you're new to this kind of project, I strongly recommend you do a “dry-fit” test of the entire assembly first, without using any glue.
I'm listing the minimum screw lengths in this guide. Most of the M3 screw holes (that end inside the plastic) can actually take a screw up to 4mm longer.
Screws will go in much easier if you first run a screw through each hole by itself. The screws tend to push out a small amount of plastic as they self-tap, which can cause a slight separation between pieces that you are trying to join together.
Barrel
- Put a slide insert into each barrel half. The open end of the inserts should point towards the rear of the gun.
Place the two magazine release guides into their slots in one of the barrels.

- Place small pieces of filament into the two holes in one of the slides.
Put a spring in the hole in one of the slides and carefully place it through the slide insert, making sure the other end of the spring makes it into the hole in the barrel. This is probably the trickiest step. Repeat for the other barrel half.

- Put the two barrel halves together, ensuring the filament in the slide goes into the holes in the other slide; the magazine release guides should also slot into place in the other barrel half.
- Verify that you can move the slide, and the springs return it to the closed position.
Glue the three sleeves onto the rail. Make sure the thinner side of the sleeve goes into the rail; they should be flush with the underside. Glue the rail button piece in place too.

- After the glue has cured, slide the rail assembly onto the barrel, locking the two halves together.
- (Optional, not really necessary) Use a M3x18 screw and nut to secure the two barrel halves together in the rear.
Slide the two fake stock/magazine release buttons into place in the rear of the barrel.

Handle
- Put pieces of filament in the holes in the triggers and press the two halves together.
Place pieces of filament in the holes in the trigger guard pieces, and sandwich the trigger assemble between them.

Place a spring in the appropriate hole in the trigger assembly.

Place the trigger-and-guard assembly into one of the handle pieces; the nubs in the trigger that keep it aligned should be pointing down. Carefully force the spring into the handle, then place the other handle piece on top. Keep the two handle pieces pressed together from now on or that spring will fly out.

Slide the barrel assembly onto the handle assemble. Get all three slots started, then press the front into place, followed by the rear. This may take a little bit of force.

- While pressing both halves of the handle together, screw 3 M4x16 screws into the handle (red circles below). This will secure the handle halves and the barrel assembly to each other.
- (Recommended) Screw 3 M4x6 or shorter screws into the opposite side of the handle to make it look the same on both sides. These screws do not serve any functional purpose.
- WARNING: there's not quite enough room for M4x6 and M4x16 screws to be tightened into the same hole, so you may have to back them both out slightly.
(Optional, probably unnecessary) Further secure the handle halves to each other using two M3x16 screws and nuts (blue circles below).

Use two M3x12 screws and nuts to attach the handle grip to the handle, one on each side of the handle. You'll need to insert both nuts before slotting the grip on, but then use gravity to keep each one in place while inserting the associated screw.

Glue the logo inserts into the handle, and the trigger guard decals in place (not pictured here, I forgot)

Foregrip
- Glue the two halves of the fake foregrip release button together. Slot it into the foregrip.
Screw the bottom of the foregrip to the main piece with a M3x6 screw

Slide the foregrip into place in the front of the handle. Attach with a M3x14 screw and nut.

Place the caps over the screws. Rotate to secure in place. The hex tool you use for all your screws is a good tool to help rotate these using the small grooves in the outer edge.


Scope
- Place the rotating knob between the two halves of the lower targeting assembly. Use 2 M3x6 screws and nuts to join the two halves together. Glue the side inserts into place.
Carefully glue the two scope body pieces together.

Use 4 screws to attach the scope body to the lower targeting assembly. Use 2 M3x8 screws for the front, and 2 M3x6 screws for the rear.

- Glue the 4 directional arrows, small circular button, and NAV button into the scope.
Glue (or double-sided tape) the scope's front sensor into the scope body, then the camera insert into that. Glue the front circle below that.

- Use a small dot of glue to attach the rotating decorative screws into the side of the scope body.
Glue the small Arasaka logo and curved side decoration piece into their places in the scope body.

- Glue the rear scope decoration to the scope body; DO NOT glue it to the lower targeting assembly or you won't be able to take them apart in the future. Alternatively, use double-sided tape, or just rely on the friction-fit.
- Glue the 4 small fake screws into the rear of the scope. Stop to admire your handiwork so far.

Muzzle
Drop three nuts into the front of the barrel assembly, then place the scope assembly into the front of the barrel and secure with two M3x20 screws.


Screw the muzzle and muzzle guard into the front of the barrel assembly with a M3x16 screw.

Stock/Magazine
Drop the two quick-release buttons into place in the rear of the barrel assembly. Note the orientation of the triangle pieces.


Insert two springs (between 20mm and 25mm long) into the holes in the release buttons. A bent paperclip is very helpful for doing this.

Glue the stock retainer to the stock as shown here.
- I strongly recommend doing a dry-fit test using tape of some sort first; if you position this wrong the stock either won't be able to attach to the gun, or will be loose and rattle around when inserted.

- Verify that the stock attaches securely to the gun. Detach by pressing both release buttons inward at the same time. If it's working but seems to be struggling a bit, try just inserting and removing it 10-20 times to smooth out the plastic interface a bit.
- Glue or tape the two decals into place on the stock.
- Take a picture of your finished model and post it here for me to admire.
Boost Me (for free)
Like it? Leave a like.
LOVE it? Boost it!

Comment & Rating (63)