Search models, users, collections, and posts

Ikea Markus chair Thrustmaster T-flight HOTAS

Print Profile(5)

All
A1
H2C
P2S
H2S
H2D
H2D Pro
X2D
A2L
P1S
P1P
X1 Carbon
X1
X1E
A1 mini

nozzle 0,4mm; 0.2mm layer; 4/5 walls; 10/20% infill
Designer
23.9 h
5 plates
4.5(6)

Thrustmaster TWCS plate 0.2mm layer, 2 walls, 15% infill
2.3 h
1 plate
5.0(1)

A1 Mini 0.2mm layer, 3 walls, 15% infill
13 h
2 plates
5.0(1)

VKB Gladiator NXT Evo Plate 0.2mm layer, 2 walls, 15% infill
2 h
1 plate
Click to see more

Open in Bambu Studio
Boost
86
207
23
14
213
58
Released 

Description

Content has been automatically translated.
Show original

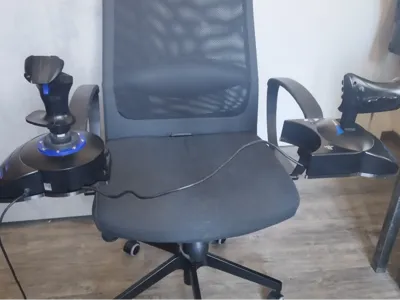
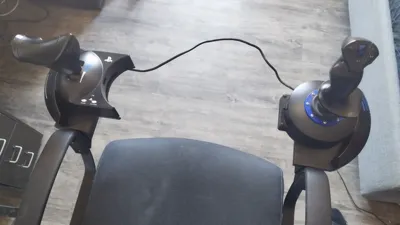
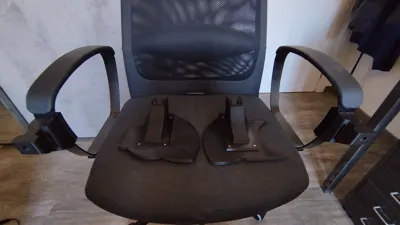
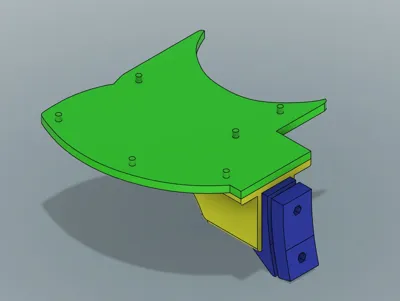
This support is compatible with all three HOTAS Thrustmaster T-Flight models (4, One, and X) and allows them to be attached to the Ikea Markus chair

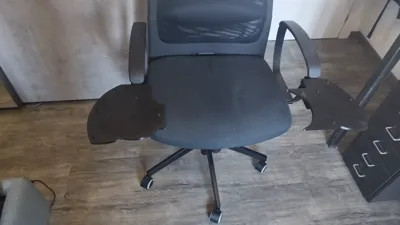
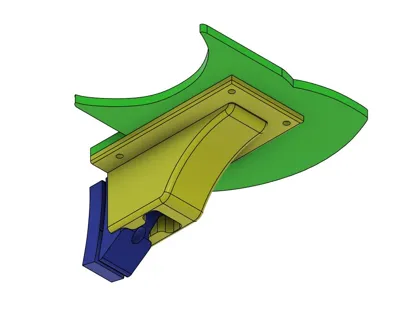
For assembly, it will be necessary to drill two holes on each armrest of the chair using a drill To facilitate the drilling operation, I have created a guide This guide corresponds to a section of the outer guide, so make sure to orient it correctly before proceeding

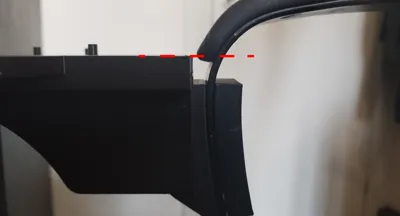
A useful tip is to fully assemble the support and place it on the chair before marking the drilling points Draw a line with a pencil on the armrest to indicate the height at which to attach the guide, ensuring that the support surface for both parts of the HOTAS is perfectly horizontal Roughly, the support should be fixed so that the HOTAS's resting surface remains aligned with the initial part of the padding, as shown in the photograph


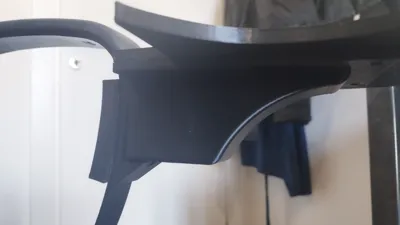
For attachment to the chair, four M5 x 25mm bolt screws and four M5 self-locking nuts will be needed (the screws must have a round head, not hexagonal)

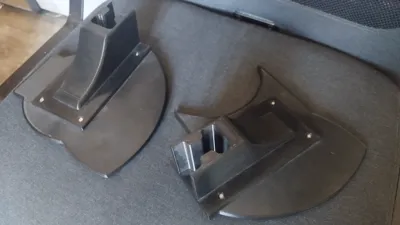
I have made the HOTAS bases in two versions: one requires M3 brass inserts with an outer diameter of 4.5 mm and a depth of 5.7 mm, the other uses M3 nuts that will need to be glued into the appropriate recesses Choose the version you prefer based on your preferences and availability

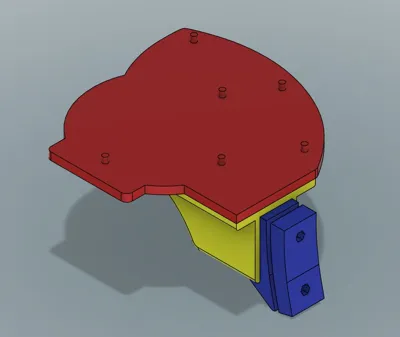
Finally, the outer guides and bases will need to be secured using two M3 x 8mm screws


The materials you will need are therefore:

  • 4 M5 x 25mm bolt screws (no hexagonal head)
  • 4 M5 self-locking nuts
  • 8 M3 x 8mm screws
  • 8 M3 brass inserts or 8 M3 nuts

My personal recommendation is to print it in PETG, but PLA is also fine

I created the profiles for a 0.4 nozzle and 0.2 layer height, but it also prints well with a 0.6 nozzle and 0.3 mm height by reducing the wall count by 1


The pins on the bases will fit into the screw holes of the HOTAS If any don't fit, you can remove them by prying with pliers, as not all are necessary to keep the HOTAS from moving


Boost Me (for free)

Please leave a Boost if you liked the model :)

Comment & Rating (23)

(0/1000)

Boosted
Superb, exactly what I was looking for, perfect print, the joints fit perfectly Congratulations, I expect other beautiful things :)
(Edited)
Show original
designer
2
Reply
brilliant design and model. printed the Thrustmaster one for now. waiting for my dual gladiators to arrive so this is absolutely perfect. print settings and quality are top notch!
0
Reply
I fitted it this weekend. Brilliant bit of kit. I did leave off the rear mounting bracket from my chair as it seemed surplus to requirements.
0
Reply
Print Profile
nozzle 0,4mm; 0.2mm layer; 4/5 walls; 10/20% infill
I like it very much
Show original
profile
1
Reply
Used this build for my Markus chair, but made plates for my own HOTAS setup, VKB Gladiator and TWCS. works like a charm!
designer
1
Reply
can u make a version for a gaming chair?
The designer has replied
1
Reply
I’m sorry, but at the moment I don’t have the possibility to make custom models on request.
0
Reply
Print Profile
nozzle 0,4mm; 0.2mm layer; 4/5 walls; 10/20% infill
Other Issues:The screws on the parts of the chair for the bracket are useless and achieve nothing if the screw had been the other way around it would have done something
The profile uploader has replied
Show original
0
Reply
I can’t understand what you mean
0
Reply
From the top plate where the stick is on, it is attached to the bottom with screws
Show original
0
Reply
Replying to @Paulus1520 :
The screws are there for two reasons: The first and most important is that if the piece had been a single one, you would have had to make so many supports that it would have made no sense, while the second is that this way you can adapt it to any hotas you have by designing the base yourself, as some other users have actually done. Regarding the screws, I still don't understand what you mean, you would have had to put them in anyway. If you have better ideas, feel free to make a remix that suits your needs
(Edited)
Show original
0
Reply
well I’m a bit confused on why the 6mm screws are too small for threads. so I had to find a different size screw so I found 1/4-28 they kinda work until you tighten ever so slightly the thread strips . so I’m not sure what to do to make it work well
The designer has replied
0
Reply
Which screws are you talking about? The M3 ones that go into the threaded inserts? Those are 8 mm long
0
Reply
Print Profile
nozzle 0,4mm; 0.2mm layer; 4/5 walls; 10/20% infill
fits perfect
0
Reply
Would be great if the Gladiator base has the hex nut option. Any chance you could post one?
0
Reply
Print Profile
Thrustmaster TWCS plate 0.2mm layer, 2 walls, 15% infill
Use it on a daily basis and to be honest it's slick and very confortable compare to the ones that clamp on to the desk. Thank you for making this!!!
0
Reply