


Print Profile(1)

Bill of Materials


- 2.7InchE-paperDisplay x 1:
- ESP32 x 1:
- 18inchPlexiGlass x 1:
Description

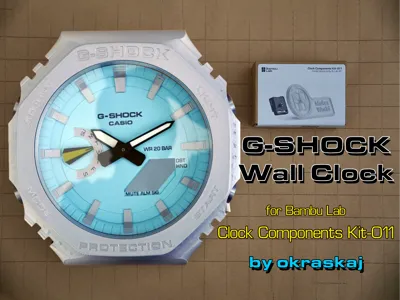
Are you looking for a clock model to use your clock components kit?
Look no further! This G-SHOCK GA-2100 inspired wall clock checks all the boxes:
- Amazing Look!
- Universal Style
- Easy to print (with or without AMS)
- and most importantly it's a G-SHOCK, which is always a win for me!
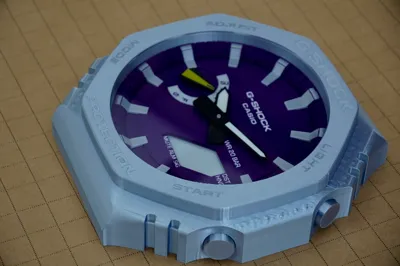
While I can't vouch for its shock resistance or water resistance (I hope you will forgive me the false advertisement on the clock face :P), I can assure you it's even more beautiful in person than it is on photos.
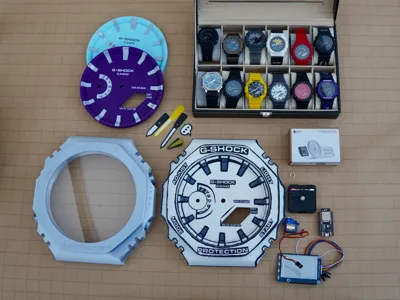
What you'll need
- Bambu Lab Clock Components Kit-011
- 1 AMS ONLY if you need to have different colors (for example for hour markers- it can be changed in slicer).
- You can still have similar effect as on photo without any color changing.
- I will soon add a print profile for non-AMS printers to facilitate this.
- You can still have similar effect as on photo without any color changing.
- 5 colors (white, black and gray for the face and bezel, yellow for minute hand and silver for the buttons). You can also use glow in the dark filament for the hands to simulate the lume! (read below)
Optional, but cool things
1 x servo motor (the one I used is SG90 9G Micro Servo Motor- the most popular and cheapest one out there)

- 1 x 2.7 inch E-ink display here's the one I used

- 1 x ESP32 SoC- It could also be arduino or Raspberry Pi. I will post my solutions for those platforms in upcoming weeks.
- 1 x 18cm diameter round plexi glass - I bought one that was meant as a cake stand- it works great) - If you can't find one, just skip it- it doesn't make much difference.
For servo and e-paper display I will soon post a print profile containing 3d-printed stand-ins. It can still look good, without 90% of the hassle!
Tips and tricks
- When printing hands, pay attention to the colors- the green on the top is representing glow in the dar filament- it's just 2 layers so the color from below should show if you have mildly transparent glow in the dark filament. The hands on the photos are printed like this- and during the day you can't tell it's the ugly green hue. It also really glows! I'd say better than the real G-SHOCK lume :P
- The face and buttons are designed to fit quite tightly in the bezel- I didn't want to go to tight because, it's much harder to correct this way. So if it's a bit too loose to hold itself, you can apply one or two layers of tape on the hidden parts and it should be tight!
- The e-paper display goes in first, then the clock component kit- the metal tightener is needed to keep everything together so don't lose it.
- The microcontroler and the power source will probably need to be stuck to the back with double-sided tape. I will update this description when I have this tested for all the options. But feel free to experiment yourself.
- You can notice that there is no second hand- it's also missing in this model of g-shock- however if you want one- there is nothing blocking you from using the one that's included in the bambu kit. If you want me to design something more in style- let me know in the comments!
Inspiration
I'm the biggest fan of G-SHOCKs myself and I have a special place in my heart for 2100 series. When the manga limited model came out I was very excited but because of low supply and scalpers I couldn't get one for myself :(
So I decided that I need to make my own!
I searched the internet for the GA-2100 3d model, but the only one on grabcad was very rough and lacked the curves and details. So I decided I need to create one from scratch!
It's not 1:1 copy- if you are a CASIO connoisseur yourself, you will quickly see the differences. I focused on the model fitting to the 'cristal' I bough, and fitting on the X1 build plate.
This is not the manga model- you can find it here:

Boost Me (for free)
Leave a boost for a fellow G-SHOCK collector ;)

License
You shall not share, sub-license, sell, rent, host, transfer, or distribute in any way the digital or 3D printed versions of this object, nor any other derivative work of this object in its digital or physical format (including - but not limited to - remixes of this object, and hosting on other digital platforms). The objects may not be used without permission in any way whatsoever in which you charge money, or collect fees.
Comment & Rating (23)