Cat grass planter with automatic irrigation and fixed base


Print Profile(4)

Description
As we all know, cats need cat grass to cleanse their intestines and supplement their nutrition…or, for no reason at all, they simply love cat grass.
After intermittently growing cat grass for five years, I was tired of the endless struggle with soil, bugs, mold, soggy stems…so I thought, why not make a disposable cat grass planter? After clarifying all the pain points, this once-and-for-all design was born:

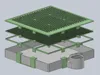
There are five layers from top to bottom:
- A perforated top cover with reinforcing ribs, which not only prevents cats from prematurely damaging newly sprouted cat grass but also holds down the planter below, avoiding noise when the cat pulls the cat grass.
- A disposable planter, requiring only 9g of filament and 30 minutes of printing. No more cleaning vigorous roots! Want a new one? Pick up the planter, throw it away, and get a new one!
- A bracket to help suspend the planter. You can throw it away with the planter and get a new one, or simply use scissors to cut along the middle grid twice to separate and reuse it.
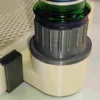
- A water basin with an automatic irrigation system, completely without dead angles. If mold appears after prolonged use, it can be easily cleaned with a wet wipe.
- A base to prevent cats from pushing (you know what I mean). Simply fix it to the desktop with double-sided tape. The cat grass planter can be inserted or removed by opening the clip (do not use excessive force).
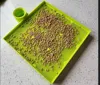
Believe me, I've already grown a batch of cat grass. Put in the seeds, put in the water…that’s it. You don't need to worry about it for a whole month, and this is the most lush, long-lasting, and clean cat grass I've grown in five years.
Special Note:
- When assembling, the planter should have the raised side facing up. This is to minimize potential mold contamination of the (relatively) much more expensive top and base covers.
- I used a special technique to create the perforations on the planter: set the top and bottom layer thicknesses to 0, then add a modifier to restore the parts I didn't want to perforate. Therefore, you can easily adjust the size and shape of the holes by modifying the infill ratio and geometry of the planter.
Boost Me (for free)
I have uploaded all design files (based on Solidworks), and welcome you to further optimize and improve this design.
License
You shall not share, sub-license, sell, rent, host, transfer, or distribute in any way the digital or 3D printed versions of this object, nor any other derivative work of this object in its digital or physical format (including - but not limited to - remixes of this object, and hosting on other digital platforms). The objects may not be used without permission in any way whatsoever in which you charge money, or collect fees.
Comment & Rating (24)