Search models, users, collections, and posts

Animated Winter Wonderland

IP Report
GIF
Contest Winner
Cozy Christmas

Print Profile(3)

All
A1 mini
P1S
P1P
X1
X1 Carbon
X1E
A1
H2D
H2D Pro
H2S
P2S
H2C
X2D
A2L

0.2mm layer, 2 walls, 15% infill
Designer
56.4 h
33 plates
4.9(40)

with rafts added to vulnerable parts
Designer
55.7 h
33 plates
4.9(12)

Figures Only - Improved supports (easier to remove)
6.3 h
4 plates
5.0(1)

Open in Bambu Studio
Boost
1489
3455
264
274
1.3 k
293
Released 

Bill of Materials

Maker's Supply Kits and Parts
Select all
N20 Single Shaft Worm Gear Motor 25rpm (1PCS) - LA008
Maker's Supply Electronics Bundle - ZH038
300x1mm (1PCS) - KA009
2x10 mm Stainless Steel Dowel Pins (20PCS) - DA037
M2.5x6 BHCS Machine Screw (20PCS) - AA050
Bambu Filaments
Select all
Onyx Black Sparkle (13101) / Filament with spool / 1kg
Alpine Green Sparkle (13501) / Filament with spool / 1kg
Crimson Red Sparkle (13200) / Filament with spool / 1kg
Classic Gold Sparkle (13402) / Filament with spool / 1kg
Matte Ivory White (11100) / Refill / 1kg
Matte Scarlet Red (11200) / Refill / 1kg
Matte Dark Brown (11801) / Refill / 1kg
Blue Grey (10602) / Refill / 1kg
Matte Sakura Pink (11201) / Refill / 1kg
List other parts
  • TF Card U Disk MP3 Decoder Module x 1: https://www.aliexpress.us/item/3256807157780615.html?spm=a2g0o.order_list.order_list_main.17.70b31802KMz0cn&gatewayAdapt=glo2usa
  • 2” 4Ohm 3W Speaker x 1: https://www.aliexpress.us/item/3256807978863657.html?spm=a2g0o.order_list.order_list_main.11.70b31802KMz0cn&gatewayAdapt=glo2usa

Description

IMPORTANT NOTE ON COMMERCIAL USE OF MY MODELS

Please note that I am sharing my designs for everyone to enjoy but for personal use only. You may share physical copies for FREE but not the digital copy nor sell as I have NOT provided any commercial license to any one to sell either digital or physical copies of my designs. I will not hesitate to report to Etsy's and other online sites' admin if I find them being sold there for profit.

__________________________


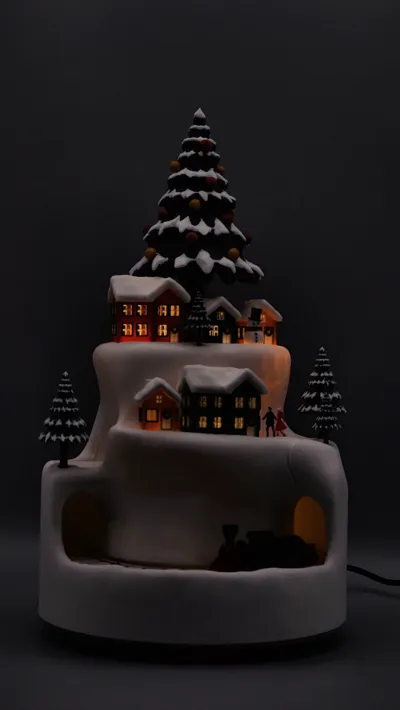
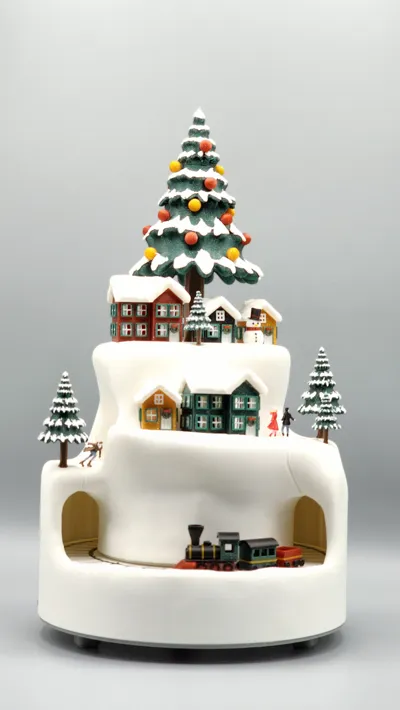
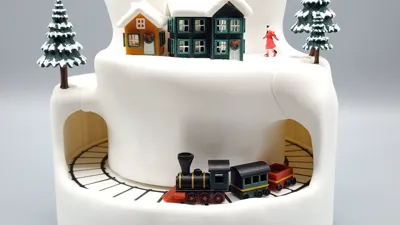
Embrace the holiday spirit with this breathtaking Christmas décor that’s bound to become the star of your festive celebrations! This charming piece boasts a quaint winter village scene featuring cozy, snow-kissed houses, sparkling trees, and a magnificent Christmas tree adorned with vibrant ornaments. Adding to the allure is a whimsical miniature train, cheerfully winding through the snowy landscape!


This isn't just a decoration, but an experience to savor. With integrated lights and music playback control, this décor captures the warmth and joy of Christmas. Slap in a micro SD card with your favorite holiday MP3s to bringing an enchanting ambience to your home! Assembling this piece yourself is a labor of love that culminates in a unique and dazzling display, offering both the satisfaction of crafting and the joy of showcasing your very own winter wonderland.


Transform your home into a festive haven and create lasting holiday memories with this exquisite Christmas décor!


Features video:

Full experience video:

IDEA BEHIND THE DESIGN

I kind of anticipated that various 3d model sites will have the usual yearly Christmas design contests. Despite knowing this, I didn't have any idea or concept that I feel is worthy of submission. I wanted something unique, a project that would challenge my skills and stand out as a one-of-a-kind 3D-printed masterpiece.


December came and still, I had no solid idea in mind. Until a video got into my YouTube feed showing a set of green-colored planetary gears. Immediately, I thought, how can I use this mechanism to create a Christmas décor with moving elements that capture the essence of a cozy, festive setting? A scene where people gathered, relaxed, and basked in the warm, lighted ambiance of the holiday.


Now having an idea in mind, I searched for information to help me confirm the feasibility of such project. While I did see fully functioning out-of-the-box animated Christmas villages available for purchase, I have not had one in the past and didn't know how the internals work. Nonetheless, I was convinced that planetary gears held untapped potential for this application.

Fig. 1: The planetary gears driving the moving elements on the model. 


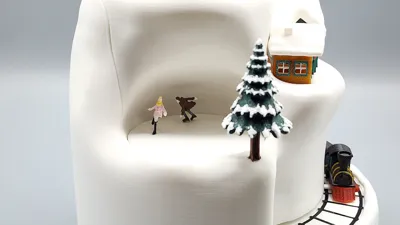
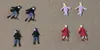
One of my primary objectives was to create moving elements that evoked genuine winter activities, such as ice skating, rather than static figures merely spinning in place. I think I achieved this through the poses and realistic movements of the skating and dancing figures in the model. And of course the scene would not be complete without a moving train!


To elevate the piece further, I wanted to add light and music, hence the integration of LED strips and an MP3 decoder module, adding an enchanting sensory dimension to the final model. All with the goal of minimizing soldering as much as possible so that more people can do this project on their own.

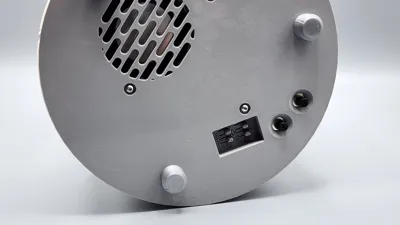
Fig. 2: The electronic components that had to be crammed in for the full experience. 


Another crucial aspect of the project was ensuring that the model could be printed using smaller printers like the A1 Mini. This required careful planning to determine the layout, where to make the cuts, and how to maximize the limited space available for additional elements.


The result is an animated winter wonderland that began as a proof-of-concept. It not only demonstrated the potential of creating animated décor using planetary gears but also served as a personal challenge to push my boundaries and achieve something entirely new and unique 3d-printed piece. I am proud to say that I accomplished my goals for this project.


I hope you find as much joy in experiencing this creation as I did in designing it!

FEATURES

  • Moving elements
  • Lighted decor - lights are dimmable via potentiometer knobs underneath the base
  • Customizable music (use Christmas MP3s of your choice) - built-in music playback controls including next/previous track, play/pause and repeat functions accessible underneath the base
  • Runs on USB battery packs
  • Can be printed on the A1 Mini

ASSEMBLY

Requires some hardware with very minimal soldering. See BOM and Assembly Guide (sample below) for details.


Boost Me (for free)

If you find this creation useful or just to show appreciation for the effort in making this model, please hit the BOOST button!


Documentation (1)

Assembly Guide (1)
Animated Winter Wonderland - Assembly Guide v1.01.pdf

Comment & Rating (264)

(0/1000)

Boosted
Pinned by Designer
Print Profile
0.2mm layer, 2 walls, 15% infill
Unfortunately, I didn't manage to complete the winter wonderland before Christmas A truly beautiful piece Thank you for the immense effort that went into it It was worthwhile I am absolutely thrilled Printing the figures with a 04 nozzle was a challenge I ultimately used PLA Matte because the support structures detached best here I didn't manage it without any breakage, but it glued well nonetheless Thank you for providing the data
The profile uploader has replied
Show original
profile
8
Reply
Wow! 😲 Your work looks even better than mine! I love it! Thanks for sharing your print and for the boost!
(Edited)
1
Reply
Forgot to mention that I don't see any traces of breakage. You glued them well!
(Edited)
1
Reply
This looks great. Your skaters looks great too. Mine are very difficult to get off the supports. I wonder if printing with a .02 nozzle will be better. I'm going to try that and see.
0
Reply
ok - Starting this tread over. I’m having issues with plate 30 not having supports. I’ve attempted to do some research since my last post and am still baffled. In this post, I’m comparing it to a similar plate 27. I’ve attached three pictures each for plates 30 the 27. 1st pic of both series is the plate brought into preview and plate sliced. Note that supports is enabled. 2nd pic of both series is supports then disables and plate sliced. 3rd pic of each series has support re-enabled and sliced. In each pic for plate 30, the organic supports do not show. in fact, it almost appears that support is the snow (white filament). Looking for any thoughts including taking another plate and resizing appropriately. Many thanks in advance.
The designer has replied
0
Reply
That is weird... 🤔 I downloaded the profile myself to double check and it's showing it's got supports enabled. Anyways, on your end, you need to ensure that supports is enabled on the object level and that the type of support is set to "tree (manual)". See screenshot below:
0
Reply
It is/has. See attached image after slicing. No support present.
0
Reply
Replying to @chiz_m :
I just noticed you have an field”style” between “type” & “threshold angle” that I do not. Is there possibly a difference in app versions / releases? How do I determine what release I’m using (sry)….?
0
Reply
running into issues on Playe 10 with the roofs (both small and large) - anyone else? I’ve also tried to print only one at a time (large) and it gets ripped off the support base. Using A1-mini with ELEGOO Rapid PLA plus. I’m a newcomer to 3-D printing so all help would be appreciated. Thanks in advance.
The designer has replied
0
Reply
I'm running into the same issue with plate 10. Waiting on my super tacking Bambu plate to see if that will print.
0
Reply
Replying to @vudographics :
Thanks for the boost! Sorry to hear about the issue. I have updated the profile so that the roofs lower edge is now chopped off so it adheres better to the print bed. Previously, the roofs are placed about -1mm in the z-axis. Pls try this updated profile and let me know if it resolves the issue. If it still doesn't, I suggest trying using glue stick.
0
Reply
Replying to @chiz_m :
Great...thanks for the quick fix. Will print tonight and let you know if it prints ok
0
Reply
Fantastic model. Obviously a lot of work went into designing it and I am greatly appreciative of the designer for sharing it. I had a few minor issues while building this project. First I had 2 failures printing plate 4. I reached out to the designer who then very quickly added an alternative project file with rafts for those plates which might have adhesion problems, and that resolved my issue. The dancers' gearing gave me quite a bit of trouble. Finally after much sanding of the axle I was able to get it spinning nicely and not stalling the mechanism. I also had an issue threading the LED strips through the channels. I could not find any tape that would stick to the LED strip so pulling them through by taping a string to them was a nonstarter for me. Ultimately I decided to drill some holes with a diameter quite a bit larger than the strip so I could feed them through easily. I put some heatshrink over the portions of the LED strips that were not inside the houses to limit the amount of light leakage in the structure. My wife liked the little snowmen so much I decided to use 3, with one taking a ride on the train. I also added a star to the top of the large tree. Overall I am very happy with this project and can't wait to show it off this Christmas! Thanks again!
(Edited)
The designer has replied
designer
4
Reply
Thanks for the boost and for sharing your print and your experience along way! A few found that wiping the LED strip lights with lubricant helps a lot snaking through the channels. I intentionally didn't make it really wide coz I'm afraid that light will bleed through it just as you suspected. Adding heat shrink tubing is a great idea! Hope you can share how the model lighting looks like with heat shrink. I might do that on my next copies. I thought of adding smaller trees to the train carriage but decided against it as it might get stuck in the tunnel. I didn't thought about adding the snowman to the carriage though. Good job! Lastly, I like that you customized your tree with a star on top. My original intent was to make the tree lighted as well and didn't have enough time to make it to the contest so... Great job overall!
1
Reply
Boosted
Where did they get the star from
Show original
0
Reply
Print Profile
0.2mm layer, 2 walls, 15% infill
An absolute masterpiece! I am very impressed. Great file 👍
(Edited)
The profile uploader has replied
Show original
profile
1
Reply
Wonderful! I love the customized text!
(Edited)
1
Reply
Replying to @chiz_m :
Thank you 🙏 It was a gift for our son Henri ❤️
Show original
0
Reply
Boosted
Would you mind sharing a link to the speaker you used?
(Edited)
1
Reply
Print Profile
0.2mm layer, 2 walls, 15% infill
some tips I have...be careful removing the train tracks from the printing plate. they have to stay flat. If you spray the holes for the string lights with silicone spray you can just push them through without having to fish them with a string or a wire. Sand the shafts on the gears underneath the skaters and dancers platform. You don't have to take the two ridges on each one all the way off, but about 1/2 or so needs to come off. The three planetary gears all need to face holes up.
The profile uploader has replied
profile
2
Reply
also I superglued the dowels in place and lubricated the gears with wd40 silicone spray. used 5 minute epoxy to attach the people. The screws use a 1.5mm hex head. Got my 3d printer for Christmas. Can't believe I can use it to make things like this. Halfway done on my second one now.
0
Reply
Replying to @user_1424998956 :
Love it! Thanks for sharing your print and tips along the build! and thanks for the boost!
0
Reply
Boosted
Would you mind sharing a link to the speaker you used? I have now ordered three different speakers from Amazon and all of them have been too tall. I measured the distance between the base and the second level to ensure I was ordering the right height, but I've had zero luck. Ty!
0
Reply
Not sure what's happening with the large tree. Tried printing it a couple of times and this is happening. Also, at layer 295, the print head knocks over the tree off the build plate! I thought it was the build plate but printed this second one on the new Bambu Labs Cool Plate Super Tack and the same thing happened. Do I need to add supports? Any advice would be great. Thanks
(Edited)
The designer has replied
0
Reply
I'm terribly sorry :( Thank you for letting me know. You are right that it's suppose to be printed with supports just like the medium trees. I'm trying to recall why it was removed in the large tree and it might have happened when the mesh was fixed. That process removes custom supports and painted colors. I updated the profile to get the custom supports back. Basically, I just resized one of the medium trees to 100%. The addition of the supports should add more surface adhesion and the tree should no longer get knocked down from the plate. Pls re-download and reprint plate #27.
(Edited)
0
Reply
Replying to @chiz_m :
saw your comment regarding plate 27 so I redownloaded this morning before printing that plate for the 1st time. I’m disappointed in the snow’s appearance (see pics). Thoughts?
0
Reply
Replying to @user_3271619506 :
Honestly, it's perfect! The "snow" is intended to be irregular/random to mimic the look of actual snow. As for the wisps, you can either trim them or much better, quick blast them with a heat gun or lighter/torch if you really want to smoothen out the irregular areas.
0
Reply
Starting my assembly of the parts and wondering what the 4 "washers" are for on plate 5.
The designer has replied
0
Reply
They're for the speaker. Picture below from the assembly guide. Guess I will have to label them in the manual.
1
Reply
Replying to @chiz_m :
Thank you....do they go above or below the speaker?
0
Reply
Replying to @vudographics :
above, underneath the screws, as pictured in the next step. The screw/bolt head is smaller than the the speaker hole hence the washer.
1
Reply
Having an issue with plate 9 slicing keeps removing part of windows.
The designer has replied
designer
1
Reply
Either you enable "Detect Thin Walls" or set your wall generator to "Arachne".
0
Reply
Replying to @chiz_m :
Thanks enabled "Detect thin walls" and it sliced correctly.
0
Reply
Boosted
Hello. Unfortunately, I had great difficulties with the gearbox. But somehow I managed to make it work. My wife and I are now completely happy. Everyone has their own taste, which is why I made small changes. But the fundamental design is unique to me. Since I am a 3D printing beginner and have no idea about designing, I take my hat off to such a construction I am grateful that I was able to print something so useful. Simply thumbs up
The designer has replied
Show original
designer
2
Reply
Good customization! Thanks for the boost and for sharing your print!
0
Reply
Help! So I have attached the electronic components according to your diagram and having an issue with one of the cob lights not working. Ive marked the slot where the light doesnt work. I've tested that both cob lights are functioning but seems like the slot where I've marked in the attached image doesnt light up the LED. I've played around with putting the second light in different slots but no luck. Any suggestions?
The designer has replied
0
Reply
I assume you tried turning the potentiometer attached to the COB LED strip that is not lighting? Nways, here are my suggestions to isolate the issue: 1. Replace the potentiometer temporarily with jumper wires, i.e., like the one you have attached opposite the motor connector. Make sure the jumper wire connector is insert pretty snug. Both LEDs should light up at its maximum intensity. 2. Similarly, make sure the COB light wire connectors are inserted firmly on both ends and make sure you have inserted the connectors in the correct orientation. 3. You may have to try a different port from the four (4) ports provided as a port could be defective. 4. Once you're sure you get both LEDs light up, replace the jumper wires with the potentiometers and rotate the lever to adjust the LED brightness. Let me know once you got it fixed. Interested to know what is the cause of the issue.
0
Reply
Replying to @chiz_m :
OMG! I feel stupid. The potentiometer was turned down so thats why it wasnt lighting up. THANK YOU!
0
Reply
Replying to @vudographics :
Yeah. That's what I would look into first lol Glad you got it resolved! Let me know if you have questions along the way.
0
Reply