Search models, users, collections, and posts

Duck Dodgers

Print Profile(2)

All
X1 Carbon
P1S
P1P
X1
X1E
A1
H2D
A1 mini
H2D Pro
H2S
P2S
H2C
X2D
A2L

0.2mm, 2 walls, 10% infill
11.2 h
11 plates
4.9(94)

Hollow, lightweight & high detail!
10.6 h
11 plates
5.0(12)

Open in Bambu Studio
Boost
849
1390
210
184
1.2 k
480
Released 

Description

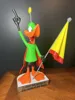
Duck Dodgers, from "Duck Dodgers in the 24+1/2th Century", a 1953 Warner Bros. Merrie Melodies cartoon directed by Chuck Jones.

In the latter half of 24th century (around 2350), Duck Dodgers (Daffy Duck) is tasked with locating the uncharted "Planet X", the only known remaining source for the dwindling element Illudium Phosdex, "the shaving cream atom". Dodgers immediately claims the planet in the name of the Earth, but is quickly greeted by Marvin the Martian, as he claims it in the name of Mars.

Only two parts require supports, shirt and beak (see notes for settings). If you have the proper filament colors, no painting is needed.

The assembled model (with base) is 290mm tall.

Note:
The model stands on it's own without the base but the flag pole would need to be shortened if you do not use the base.

Enjoy!

...........................................................................................................

Special shoutout to maker Benoît Lussier for providing QA printing and quality feedback.

Special thanks to Jason McMillan (makerworld ID Gatekeeper) for creating the Bambu Print Profile on Makerworld.
...........................................................................................................

**Print Instructions:**
Supports: Only two parts, see notes
Resolution: .2mm
Infill: 15%

Notes:**

Refer to the notes below for a few helpful printing and assembly instructions.

...........................................................................................................

**Building the model**

Colors

Black: (Devil Designs PLA - Black)
neck_bottom
neck_top
neck_extra_right
neck_extra_left
hand_left
hand_right
body_bottom
eye_black_right
eye_black_left
word_plate (with color change from bronze after .6mm)
..

Yellow: (Paramount3D PLA - Simpson Yellow)
antenna_top
flag (with color change around 10mm from red)
..

Red: (Hatchbox PLA - Red)
cape
flag (with color change around 10mm to yellow)
..

Green: (Devil Designs PLA - Green)
shirt
hood
..

Silver: (Devil Designs PLA - Silver)
flag_ball
flag_pole_top
flag_ploe_bottom
antenna
..

Marble: (Devil Designs PLA - Marble Dark)
base
..

Orange: (Parmount3d PLA - McClaren Orange)
beak
foot_right
foot_left
..

Dark Red: (3DFuel PLA - Iron Red)
tongue
..

Bronze: (Esun PLA - Bronze)
word_plate (with color change to black after .6mm)
..

White: (Devil Designs PLA - White)
eye_white_right
eye_white_left
neck_white
..

Any color: (hidden piece):
pin_neck
pin_shirt
..

...........................................................................................................

**Printing and assembly tips**

Printing tips
1 - Supports are required on only two pieces.

shirt: Supports are only needed for the right arm portion. I set the slicer to block supports for the indent on the bottom of the shirt (not needed but may be a pain to remove if you forget.)

beak: Supports are only needed at the bottom. I purposely did NOT use organic/tree supports for this part. The older support type does a cleaner job due to the shape of the part. Overkill, but I added a brim for a wider base in order to hold the part down better. I set the overhang angle to 35deg to avoid the slicer putting in unneeded supports.

2 - There are some pieces that may need brims or rafts, use your discretion. When setting up my prints I prefer to be conservative to ensure the least chance of a print failure, especially since the base of many parts are hidden when inserted into another part.

*I used brims on:
- cape
- hand_left
- hand_right
- beak (as noted above)

*I used a raft on:
- flag (easier to remove than a brim for this part)

3 - Do NOT use a brim on the eye_black parts or the neck_extra parts.

4 - Two parts require color changes, flag and word_plate, See the section on colors for directions.

5 - If you want to skip the base, the flag_pole_bottom would need to be a bit shorter. The model would still be stable and be able to stand on it's own.

6 - When removing parts from the printer bed, it's a **VERY** good idea to place left/right parts into separate containers to help with the assembly process. Sometimes the difference between the left and right parts is very small but it is still worth keeping track of them and assembling them in their proper place.

..
Assembly tips:

1 - Take your time gluing the model together and enjoy the process. Give some thought into which parts to glue together as groups and then gluing the groups together. Let the glue for each group set completely before combining groups.

2 - I used 3D Gloop and E6000 to put this model together. The E6000 sticky glue that I use allows more time to position parts and is still the best for smaller parts. 3D Gloop sets much quicker and creates a solid bond. For both glues using a smaller amount is usually better than more glue.

3 - The right_hand with the flag_pole_bottom should be attached after completing the rest of the main model, including the base. This will ensure the proper orientation of the hand. Once the glue dries, the flag_pole_top and the rest of the flag assembly can be added to the hand.

4 - After assembling the hood/neck_top/beak, insert the eyes (blacks already inserted) and neck_extra parts. The neck_extra_right/left parts are inserted with the bed side facing down.

5 - The neck_white part is attached to the neck_bottom (using the pin_neck) with the bed side facing down. The part looks like a cylinder but is actually a slightly different size on its top and bottom.

6 - Refer to the assembly diagrams in the pictures section as well as the uploaded pictures for putting the model together. The model is meant to be glued.

Do not hesitate to ask questions, feedback is essential to making better models.


Comment & Rating (210)

(0/1000)

Hi thank you for a well thought out design.My favorite character from the picture in Mr. Garibaldi's room from Babylon5 I had to have one for the Mars shot.Made my own plate added a flag just like the moon shot years ago . Hope you enjoy my take on it. Thanks once more
The designer has replied
designer
3
Reply
Perfect job! Really, really nice, right down to the size of the flag and all the finishing touches. Thank you for taking the time to post your make. Hope to see more from you. Teamwork, Steve
1
Reply
Replying to @reddadsteve :
Thanks I added magnets to the stand and feet so it can be cleanly removed and seated. Also brass and steel rod as extra supports in neck,hands and feet.
1
Reply
that is an absolute banger im so impressed would you be willing to share the print with me im a bit of a patriot myself id love this for the print display!
0
Reply
Duck Dodgers… a great addition to my collection. All were scaled to 200%. Duck Dodgers was printed in color. Marvin and his dog were printed in white and spray painted.Thank you Steve for sharing your great work! teamwork Steve
The designer has replied
4
Reply
What a nice 'family' picture! Teamwork, Steve
0
Reply
OMG!!! It's Duck Dodgers in the 24½th Century!!! As soon as I saw this, I started printing. The rendering is just beautiful and the construction is very well thought out. The plaque didn't print very well and I couldn't edit it, so I created another with lots of contrast. Thank you for sharing!
(Edited)
The designer has replied
designer
1
Reply
Your addition looks great. What happened on the original? Was it just the font that you did not like? Thank you for taking the time to post your make. Teamwork, Steve
0
Reply
Replying to @reddadsteve :
@reddadsteve The print quality of the plaque just didn't do your model justice (I'm thinking of creating a shrine). The inlay color on the plaque (I originally used white) appeared to be one layer thick and since I was printing white over black it looked dull and the print quality fell short. I couldn't figure out how to add layers to the inlay so I created a new black plaque that's 1/16" thick with 1/16" raised white letters on top (very contrasty). I'm new to 3d printing and it may have been a setting I changed and it may have looked better if I'd chosen a different filament. Regardless, I love the model and am looking forward to printing more of your work. Thank you!!!
0
Reply
Replying to @user_3567167933 :
Thank you for the detailed reply. I use three layers at .2mm for the back and three layers at .2mm for the raised letters. Some filaments are more translucent than others but three .2mm layers should be enough. Your rework is great but in the future, if you just want another layer, size the object in the Z for the extra layer. I try to use a simple font to ensure an easy print that can also be reduced in size when makers downsize my models.. Teamwork, Steve
1
Reply
First of all, thank you for your effort. I’m new to 3D printing, and I was able to make your model easily and comfortably.
The designer has replied
designer
3
Reply
Thank you! I stive to make these colorful split models easy for everyone, no matter their skill level or printer. Be aware though, from time to time, due to differences in slicers and printers, some makers have had minor issues. Do not hesitate to reach out if you need guidance. Teamwork, STeve
1
Reply
this piece came out fantastic! looks great with Marvin and K9.
The designer has replied
designer
1
Reply
Whoo-Hoo! Great job. Thank you for taking the time to post your make. Teamwork, Steve
0
Reply
Boosted
I love this character. The model is awesome. Easy to assemble. The parts fit perfectly at 0.08mm High Ql. I think i' m gonna have to print the martian and his dog now :)
The designer has replied
designer
1
Reply
Enjoy the models. Just make sure you have enough display space for them. They tend to multiple quickly. Teamwork, Steve
0
Reply
Boosted
Another great model! every part was perfect and a perfect fit. Great job!
The designer has replied
designer
1
Reply
Thank you! I appreciate your kind words and taking the time to post your make. Teamwork, Steve
0
Reply
Boosted
Just because you do extraordinary work I am happy to give you this boost Thank you PS I am looking for Sylvester in urban style to go with my Tweety (I am attaching the photo) If you have some time I would be delighted if you could make an urban style Sylvester Thank you again for your work
The designer has replied
Show original
0
Reply
Thank you for reaching out with those kind words. I noticed other makers doing the Urban style characters. I forget, but there were remixes of a few of my models into urban style. Personally, I only make one version of each character. Each model takes me a month (I'm 'old and slow') so I want to cover more characters than to make multiple versions. Teamwork, Steve
1
Reply
Boosted
I understand, keep up the great work, we are all fans of your fantastic work!🤩🤩
Show original
0
Reply
150% @.12 layers
The designer has replied
designer
1
Reply
Nice job! It's hard to tell from the pictures but does .12mm visually help printing all the parts at that layer? I can understand certain areas would benefit from a lower layer height, or variable layers. Just asking, since I only print at .2mm. Thank you, once again, for taking the time to post your makes. Teamwork, Steve
0
Reply
The print profile is no longer public
Upscaled 200%. Hollow version. A few of the parts were a little tight. Another fun build. Thanks.
profile
1
Reply
Boosted
Hello, You say enlarged to 200%, so it measures more than 29cm?
Show original
0
Reply