Tablet Weaving Loom


Print Profile(2)


Description
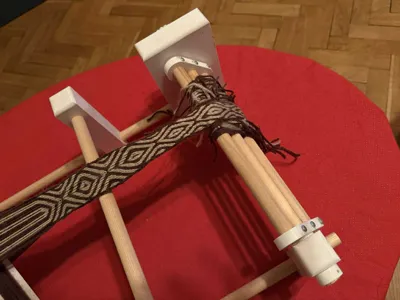
This is easy to assembly and use Tablet Weaving Loom. It was designed for my wife, which is beginner and is happy to use it.
For assembly you will need to print all files from 3mf file which are all prepared, or all stl files in following amount:
- Corner A - 2x, one mirrored
- Corner B - 2x
- Wheel - 2x, one mirrored
- Rotation join - 4x
- Rotation cap - 2x
- Lock - 2x
Middle join - 4x
Update: In US can be very difficult to source 15mm rod, so in uploaded folders you can found folder “58 inch version” which is designed for 16mm (5/8"). This version is yet untested, but I think it should work, because main difference is holes diameter. It is possible, that you will need longer screws for some parts.
Update 2025-09-13: Added ¾" version. You can find it in files.
For assembly you will need following additional material:
- 26x 3x16+ screw
- 2x 3x20+ screw
- 15mm diameter wooden stick in amount to cut following pieces:
Wood stick parts:
- 600mm - 2x
- 380mm - 2x
- 300mm - 2x
- 250mm - 4x
These lengths are not exactly required and you can modify it to fit your table etc.
Assembly
- Print all parts
- Cut sticks to sizes above
- Assembly 2 winding arms. For each you will need 2x 250mm stick, 1x 380mm stick and 2 Rotation join parts. Do not fix them yet with screws. Shorter sticks goes to outer holes and longer in the middle one.
- Now lets assembly sides. First side is easy. Put on 600mm stick 1x Corner B, Followed by 2x Middle join and end it with 1x Corner B. Space them +/- equally. Make sure, that holes in the Middle join parts are heading in the same direction. Do not fix it yet with screws too.
- Second side is little bit complicated. Middle parts are same. Outer parts are Corner A parts, which are mirrored. You need to orient them with the small holes for M3 screw in the opposite direction than the big holes on middle parts. To choose which parts goes on left and right, choose them to have M3 holes on the inner halfs. You can check attached photos.
- Mount Lock pieces on Corner A pieces. Mounting point is M3 hole near bigger hole on flat surface. Lock part should rotate freely.
- Now use remaining 2x 300mm sticks and 2 winding arms to join both sides. Winding arms goes to outer printed parts and 300m stick to inner (Middle join) parts.
- Secure winding arms with Rotation cap and Wheel parts. Wheel parts goes to side with Corner A part. These two printed parts are mirrored, so you need to chose correct one. You can determine it by putting Lock piece on its position (M3 hole nearby) and testing which Wheel will lock. Rotation cap goes on the opposite side. To mount these parts on stick drill small hole to wooden stick using 2mm drill and screw in 3x16mm, or bigger screw. Fot the wheel use the longer 3x20 screw.
- As next step you can arrange all printed parts on sticks to fit and align.
- Now secure all parts to wooden sticks. It is same as in step 7 - drill 2mm hole to wooden stick and screw in 3x16mm screw. You can leave internal bars not screwed, so you can shift them as needed.
If you are not sure about assembly, look at photos, or write comment and I will try to help.
Additional models
To use this loom, you will need to print also some of these models. At least needle and set of cards of your choice.
Boost Me (for free)
You can support me for free with boosts which I can use to buy filaments for future projects for you.
License
You shall not share, sub-license, sell, rent, host, transfer, or distribute in any way the digital or 3D printed versions of this object, nor any other derivative work of this object in its digital or physical format (including - but not limited to - remixes of this object, and hosting on other digital platforms). The objects may not be used without permission in any way whatsoever in which you charge money, or collect fees.
Comment & Rating (29)