Search models, users, collections, and posts

Blum hinge mount jig screwable

IP Report

Print Profile(1)

All
P1S
P1P
X1
X1 Carbon
X1E
A1
A1 mini
H2D
H2D Pro
H2S
P2S
H2C
X2D
A2L

0.2mm layer, 2 walls, 15% infill
Designer
37 min
1 plate
4.9(34)

Open in Bambu Studio
Boost
510
1350
55
14
830
518
Released 

Description

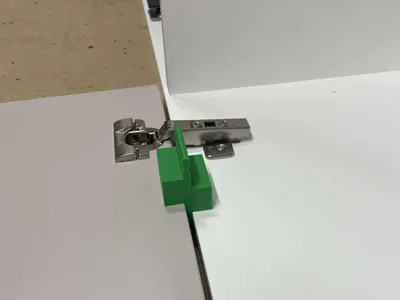
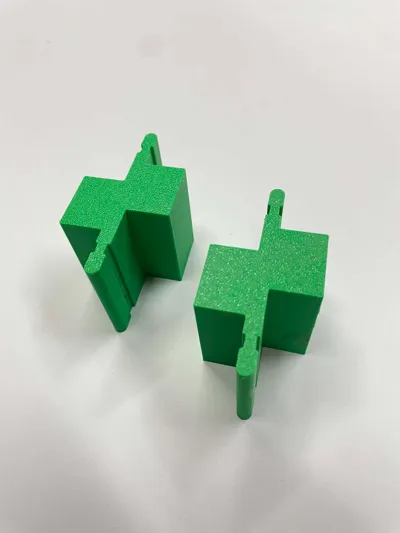
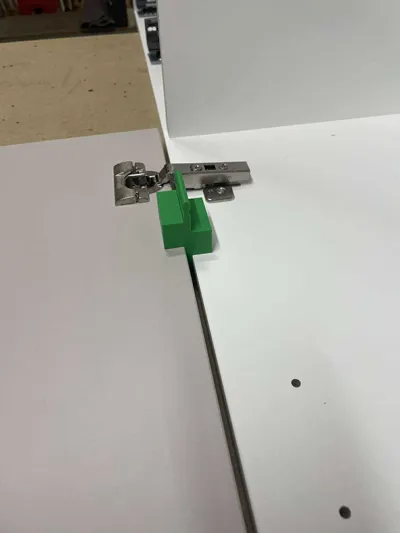
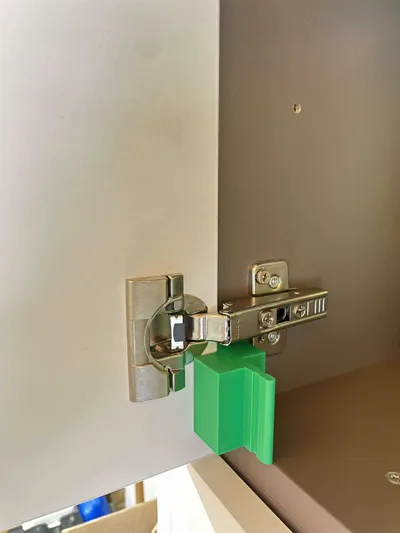
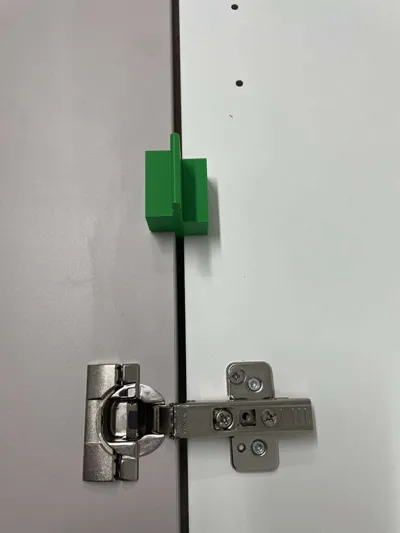
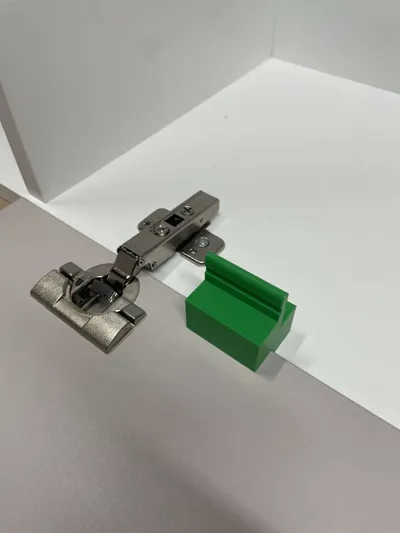
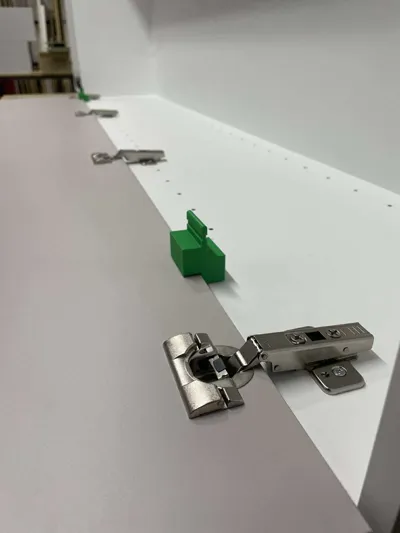
This is a mounting jig i designed for easy mounting straight Blum hinge doors to the sidepanels of your work.

Two are needed for parrallel working.

Print in basic pla. No support or brim needed. Easy print.

Could work woth Hettich hinges to but not tested yet.

It has the ideal spacing between the door and corpus

Boost Me (for free)

Thanx for your support / boost ... We will keep pushing to design great content!

Membership

If you’d like to sell physical prints of these designs in your shop or marketplace, you can join with a commercial license. 🚀

Join


Comment & Rating (55)

(0/1000)

Print Profile
0.2mm layer, 2 walls, 15% infill
This turned out awesome. Thank you for the design.
The profile uploader has replied
0
Reply
thanx! 👍
0
Reply
consider a boost of you like it! 🫶
0
Reply
Thanx!! consider a boost, will mean alot to us!
0
Reply
Print Profile
0.2mm layer, 2 walls, 15% infill
Great quit print that is useful
The profile uploader has replied
0
Reply
thanx man! consider a boost if you like. gr
0
Reply
Print Profile
0.2mm layer, 2 walls, 15% infill
Printend fine. These are a bit bigger than I Expected. I usually leave a smaller gap sao may just rescale and print again. Definitely a useful idea thanks.
The profile uploader has replied
0
Reply
the gap will leave a supposed 2mm offset to adjust the hinges correctly like blum standards
(Edited)
2
Reply
Print Profile
0.2mm layer, 2 walls, 15% infill
good
The profile uploader has replied
0
Reply
thanx for the stars💪🫡
0
Reply
Print Profile
0.2mm layer, 2 walls, 15% infill
good
The profile uploader has replied
0
Reply
🙏 thank you very much!
0
Reply
The model is simply nonsensical The position of the screw holes is predetermined by the hinge manufacturer A template for the hinge or, better yet, just the mounting plate to ensure correct screwing (drilling template or stop for the mounting plate) makes far more sense If all hinges are straight and correctly screwed into the body, the gap can be perfectly adjusted using the adjustment options integrated into the hinge Your first image also shows that the hinge is installed crooked
The designer has replied
Show original
0
Reply
hello, did you understand the correct purpose of this spacer? the intention is that holes are drilled in the door and the hinges are mounted on the door. Then the door can simply be placed on the cabinet with the mounting plates clicked into the hinges. then you can screw the mounting plates. super handy tool that I have been using for years. this way you can make perfect hinges without measuring the mounting platen. ps first foto is a fish eye effect from the camera. nothing unstraight there. fair enough, print a set and try it out. Gr
3
Reply
Ah, okay, it's for the door side
Show original
designer
1
Reply
Print Profile
0.2mm layer, 2 walls, 15% infill
Printed well but the item causes to big gaps for my purpose. It should be scaled down for most uses.
The profile uploader has replied
0
Reply
the gap will leave a supposed 2mm offset to adjust the hinges correctly like blum standards
0
Reply
Boosted
simple and clean desing
The designer has replied
0
Reply
thanx!!! 🫡
0
Reply
Print Profile
0.2mm layer, 2 walls, 15% infill
Great job, very helpful.
The profile uploader has replied
0
Reply
THANX!!!
0
Reply
Print Profile
0.2mm layer, 2 walls, 15% infill
They're great, perfect for setting depth when drilling in hinges, and also good for setting existing door gaps too.
0
Reply

License

If you want to use this model commercially, please join my membership.
Join Now
This user content is licensed under a
Creative Commons Attribution-Noncommercial-Share Alike