


Print Profile(1)

Description
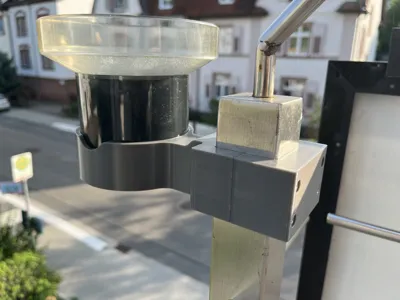
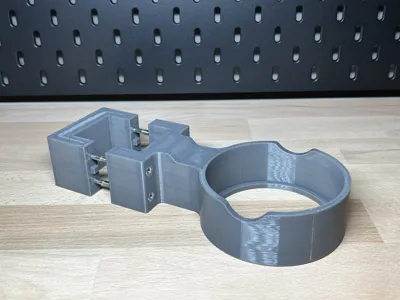
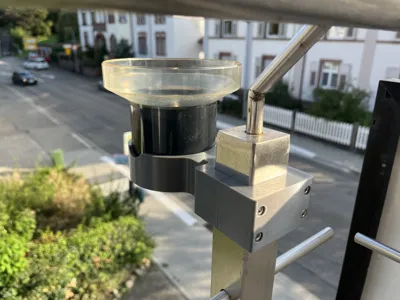
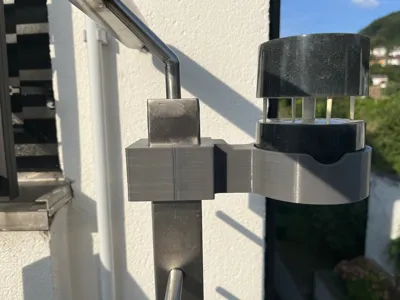
Mount for Netatmo Wind and Rain Sensor for 40x40mm Square Tube
Mount for Netatmo Wind & Rain Sensor for 40x40mm Square Tube
My Netatmo wind and rain sensors needed to be securely and neatly attached to a 40x40 mm stainless steel square tube – without a wobbly DIY solution, without a zip-tie artwork, and especially without a mount that slowly turns into sad plastic pudding in the sun 😅 So I designed this mount
The best part:
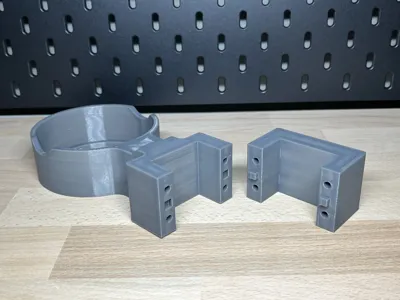
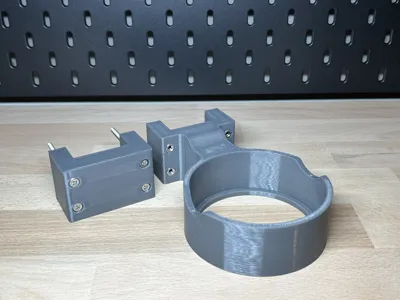
It fits both the wind sensor and the rain sensor equally. If you want to mount both, simply print the part 2x – done The clamp fits snugly on the square tube, holds stably, and the screws/nuts disappear flush into the mount This means: everything remains nicely smooth on the outside, and nothing protrudes annoyingly
Why this model was created aka: "PLA eventually becomes nonsense outdoors")
The previous mount was a purchased PLA version – and it completely fell apart over time outdoors No kidding The material was so degraded that the sensors almost took an involuntary dive Since then, the issue is clear: For outdoor use, please do not cut corners
Recommendation for outdoor use:
- at least PETG
- better ABS or ASA
- with lots of sun, preferably directly UV-resistant filament
In short:
PLA indoors is great – outdoors in continuous sun is more of a brave experiment 🌞🔥
What the mount can do
- Suitable for Netatmo Wind Sensor & Netatmo Rain Sensor
- Designed for 40x40 mm square tube
- Clean clamp mounting
- Flush screwing (no protrusion)
- One model for both sensors (print 2x if needed)
Assembly (without a nervous breakdown)
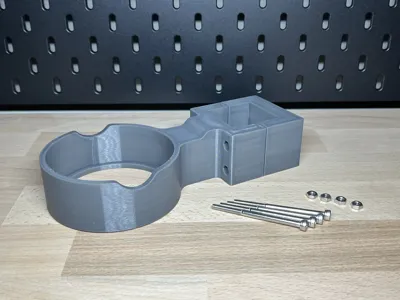
The mount is screwed around the 40x40 square tube with a two-part clamp I have integrated a small lock into the flange pieces so that the two parts do not constantly go on a world tour during assembly This makes the setup much more relaxed
Small practical tip:
It's best to press the nuts into the recesses with a short screw before final assembly Saves swearing, saves time, saves nerves 😄
In addition, screw heads and nuts sit flush in the clamp – so no snagging, no sharp edges, no "Why is that sticking out?"
Hardware per mount
- 4x M4x60 Socket Head Cap Screws (e.g.: DIN 912, A2-70)
- 4x M4 Hex Nuts (e.g.: DIN 934, A2-70)
Printing instructions (from experience)
For outdoor use, please use PETG / ABS / ASA If the part is exposed to continuous sun, it's best to use something UV-resistant
For a nicer finish, you can enable top surface smoothing in the slicer – it really makes the model look good
Have fun printing, assembling, and with your sensor-safe outdoor upgrade 😎
And if you would leave a like, a comment, or even a make – that would be super motivating 😁
Print settings
- 0.2 mm layer height
- 5 walls
- 20% infill (Gyroid)
- Material: PETG, ABS or ASA
- Minimal supports recommended (on print bed only)
- Brim optional for poor adhesion (not needed for me)
License
You shall not share, sub-license, sell, rent, host, transfer, or distribute in any way the digital or 3D printed versions of this object, nor any other derivative work of this object in its digital or physical format (including - but not limited to - remixes of this object, and hosting on other digital platforms). The objects may not be used without permission in any way whatsoever in which you charge money, or collect fees.
Comment & Rating (0)