Helping Hand - One Finger Operation


Print Profile(1)

Description
Description
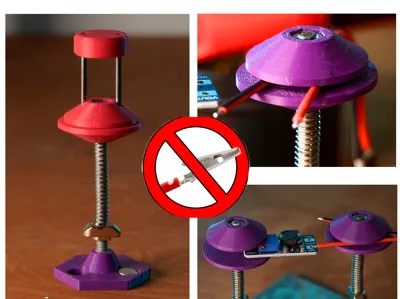
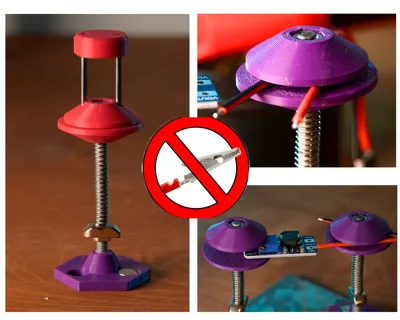
Do you hate alligator clips as much as me? then this helping hand is for you!
Version 1.2
Two upgrades in this version:
- High temp O-rings for better grip. The grip on V1.1 wasn't good enough. Two O-rings top and bottom provide the necessary holding power for wires and components.
- Thicker base, I find that when adjusting the rotation its hart to grab on the thin base, I made it thicker for easy grip. the magnets are now integrated in the base.
Use a wider spring!
In the V1 BOM I used: 50mm length, 6mm outer diameter, 0.4mm spring.
The spring get stuck between the threaded rod and the bottom part, preventing smooth up and down motion. In V1.1 I made the bottom part in to prevent it, a bigger diameter spring (8-10mm OD) will slide on the bottom part preventing jamming
BOM
- All parts from V1.1
- 30mm OD and 25 mm OD, 2mm thick O-rings
- 1 - M5 lock nut
Printing
There are two stops to make when printing, one for the magnets, second for the M5 lock nut in the top part.
Assembly
Almost the same as V1.1, insert the O-rings before sliding in the top and bottom parts.


Version 1.1
In this V I'm adding a button for one finger operation
BOM
- All part form V1
- 2 - 2.5 mm rods, 40mm length
Assembly

Push in the two rods in to the button, slide on the top w holes, push the two rods in the bottom w holes, screw on to the main rod.
- The 2.5mm rods must be very strait and equal in length for smooth operation.
- Everything else same as V1
To improve
- PLA is smooth and slippery, not the best for gripping to things, in thinking on integrating a high temp o rings help with grip strength in the next versions.
- The action on the button is not very smooth, jamming sometimes, bushing in the bottom part will help.
Version 1
Printing
- PLA +
- 3 Perimeters
- 15% infill
PLA and heat are not the best combo, but so far the helping hands are holding up very well.
BOM (for single helping hand)
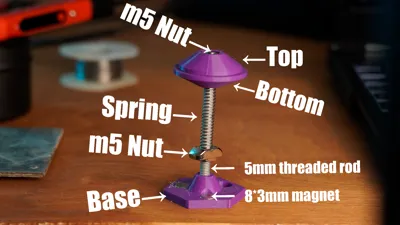
2 - m5 nuts
1 - m5 threaded rod cut to size
1 - Spring: 50mm length, 6mm outer diameter, 0.4mm wire diameter
Assembly
After printing the parts, use the pic as reference.
I'm using 70mm long treaded rod, you can make it in the size the you need.
Thread the rod in to the base, thread the nut, spring, bottom and top and the top nut.

Magnets
In this version I'm keeping it simple, exposed magnets, using a drop of hot glue to keep them in place.
Metallic base
You will need ferrous metal base, I'm using galvanized steel sheet scrap I had, for better grip I glued 4 rubber feet to the bottom.
To improve
PLA is smooth and slippery, not the best for gripping to things, in thinking on integrating a silicon tube to help with grip strength in the next versions.
Comment & Rating (0)