Cal Kestis V2 - Modular Lightsaber


Print Profile(2)


Bill of Materials


Description
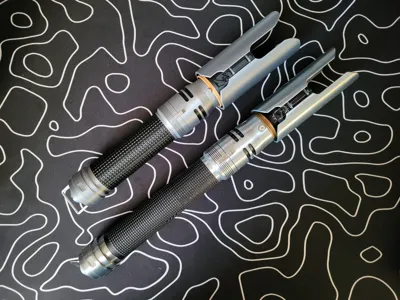
This lightsaber set is inspired by Cal Kestis's lightsaber from Jedi Survivor that he inherited from his master Jaro Tapal.
This set is part of a customizable lightsaber ecosystem where you can mix and match with other sets from my Build Your Modular Lightsaber collection. Originally made to work with the plastic lightsabers from the Disney parks, I'm taking it one step further so you can 3D print the entire lightsaber for play or display. I will be regularly adding new sets to create an expansive collection of lightsabers from both the movies and games.
4/25/25 Update: Modified the switch and switch block to be inlaid for better adhesion and easier assembly. I also tried out Bambu's PLA Silk Silver instead of Basic Silver and it looks AWESOME!!
V2 Update 4/8/25: With this being my first lightsaber design, it needed some updating since I've learned a lot about this modular ecosystem I've been working on for 6 months. I used my replica of Cal's lightsaber from Jedi Survivor as a reference so now the models are much more accurate. In addition, I made some adjustments to the model to improve the printing to remove possibilities of defects and improve reliability.
See the bill of materials and assembly instructions down below!
Boost Me (for free)
Help me buy filament so I can make more lightsaber designs! 😊 If you want a specific hilt made next, boosts are a great motivator too 😉
BILL OF MATERIALS:
Grip
Switch
Switch Block x2
Switch Circle
Pommel
Emitter - Center
Emitter - Shroud x2
Hilt Core (Not Included)
Blade or Blade Plug (Not Included)
- The blade or blade plug is required to ensure the emitter lines up correctly with the switch and pommel.
I used Bambu PLA Basic Black, Silk Silver, and Silk Gold for all parts.
ASSEMBLY:
Emitter: The emitter shrouds slide onto the dovetail connectors on the emitter center. It is a tight fit so it can take a little force, but they are tight enough that they won't need any glue.

Switch: You will need 2 switch blocks and 1 switch circle (the knob). For the circle, apply a small amount of super glue into the female end of and then join the surfaces together. For the switch blocks, place some glue on the switch sleeve in the inlaid area, then insert the top end of the switch block first and snap the bottom end into place onto the glue.


Pommel: The pommel has a print in place ring. Once you remove all of the supports, you will need to firmly push the ring up at the corners until it breaks free so it will rotate freely.

As mentioned in the bill of materials, you will need a hilt core to attach all of these parts to. The switch and grip parts slide on using the slots in the hilt core. The emitter and pommel screw on to the top and bottom of the hilt core respectively, but you will want either a Blade or Blade Plug to ensure the emitter lines up correctly with the switch and pommel.
If you have any questions or issues, please leave a comment or send me a message so I can help you and make future improvements.
Don't forget to check out my other lightsaber hilts as well as my other models!


License
You shall not share, sub-license, sell, rent, host, transfer, or distribute in any way the digital or 3D printed versions of this object, nor any other derivative work of this object in its digital or physical format (including - but not limited to - remixes of this object, and hosting on other digital platforms). The objects may not be used without permission in any way whatsoever in which you charge money, or collect fees.
Comment & Rating (26)