Search models, users, collections, and posts

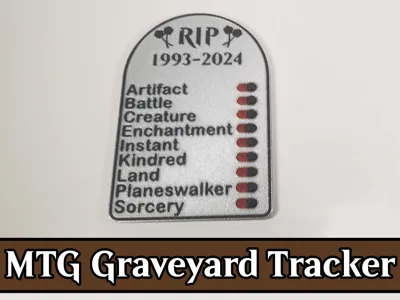
MTG Graveyard Tracker - Delirium / Tarmogoyf

Remixed by

Print Profile(2)

All
X1 Carbon
P1S
P1P
X1
X1E
A1
A1 mini
H2D
H2D Pro
H2S
P2S
H2C
X2D
A2L

X1/P1/A1 + A1 Mini | (Large) Graveyard Tracker
Designer
1.8 h
2 plates
5.0(5)

X1/P1/A1 + A1 Mini | (Mini) Graveyard Tracker
Designer
1.5 h
2 plates
5.0(2)

Open in Bambu Studio
Boost
35
108
19
9
112
88
Released 

Description


If you like this model and it's not too much trouble, please hit the 👍 button - it helps out a lot 😀


This is a remix of 3deez's awesome Graveyard Tracker to track what permanents are in your graveyard for (affiliate link) Tarmogoyf and/or Delirium! If you'd like to boost this model, I ask that instead you please boost 3deez's model! The following changes have been made:

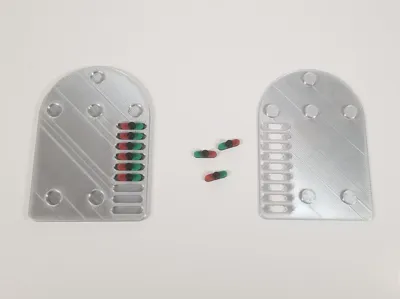
  • Added buttons / snaps to make aligning and assembly easy (ideally no glue needed)
  • Overall slimmer to save on filament usage (4mm tall once assembled)
  • Created a custom faceplate with logos and text for multicolor
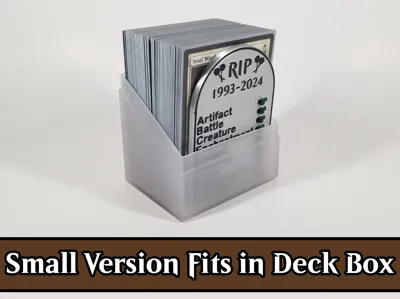
  • Chopped the sliders height down quite a bit to make it slim enough to fit inside of a deck box
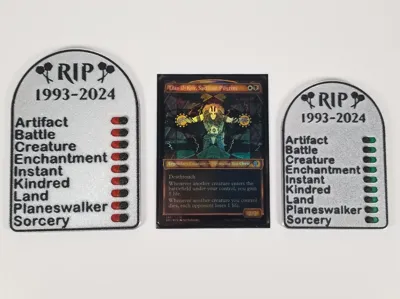
  • Added green / red colors to the sliders to represent in / not in your graveyard

Assembly

Print either the regular version or the mini version. The mini version is roughly the same dimensions as a card and can fit inside of a deck box.


Once all the parts are printed out, place each slider inside the holes on the bottom piece and then snap the top piece on and you should be good to go. Just a quick word of caution, the sliders may be very tight - if so, you can try sliding them back and forth a few times to loosen them up or try scaling them down ever so slightly in the y-axis (leave the width and height as is).


For my printer, the tolerances were perfect and everything snapped together without glue. If for whatever reason yours is a bit loose, use a small drop of super glue inside each snap to secure the top part and the bottom part together.

Printing Tips

  • I highly recommend printing the text & logos in black and using a light colored background so the text/logos are easily seen
  • You will need to make sure you have near perfect bed adhesion
    • There are some small sections when the logos and text are printing
  • Make sure you thoroughly wash your build plate with Dawn dish soap to remove any hand/finger oils. If you are still having trouble with adhesion and are using the PEI Smooth/Textured plate, try bumping the bed's temperature up 5 or 10 degrees (60 or 65 degrees).
  • It is not recommended to use ‘Sport’ or ‘Ludicrous’ mode when printing this
    • Please just use the ‘Standard’ option to ensure a successful, great looking print

Be sure to check out my MTG 3D Print Projects page if you are interested in even more MTG prints like this from myself and other very talented makers!

Comment & Rating (19)

(0/1000)

Howdy! Is there a way to change the font on the front faceplate? Is that something I can do myself in the slicer or would it be more difficult? Thanks!
The designer has replied
0
Reply
I modeled it in Fusion 360, so unfortunately it isn't as simple as editing it in Bambu Studio. What were you looking to do? I could possibly add the raw files
0
Reply
Oh I was looking at just changing the date, or removing the date entirely since it's 2025 now lol. I also thought about making it the June symbol since I was printing this for my Disa deck
0
Reply
Replying to @RussianOnWheels :
I can upload the raw Fusion files if you want
0
Reply
Boosted
Print Profile
X1/P1/A1 + A1 Mini | (Mini) Graveyard Tracker
recently got a goyf precon commander deck and this came at such a great time for me! as advertised, this mini one fits in most deck boxes. I need to mess with the tolerance of the sliders because I'd like them to have more friction but that's to be expected with different printers/filaments/etc
The profile uploader has replied
profile
1
Reply
It is strange, half of my sliders came out perfectly and slide with just enough tension to hold them in place. The other half were far too tight and i had to scale them down just a tad. Thankfully, they're small and use very little filament
0
Reply
Can this be updated to include Battles?
The designer has replied
0
Reply
Battle is the second one from the top
0
Reply
hello Great Idea having trouble finding face plate file sorry if i am missing something I am new to printing.TIA
The designer has replied
0
Reply
@Milleniumgod1 Hi there, just download the 3mf file and open it in Bambu Studio. There are 2 plates. The 1st plate are the sliders and the 2nd plate is the body which has the black outlines, artwork and text assembled inside of it. Then when each plate is printing, assuming you're using an AMS, assign the colors inside your AMS unit to the colors of the print
0
Reply
Boosted
Print Profile
X1/P1/A1 + A1 Mini | (Large) Graveyard Tracker
profile
1
Reply
Print Profile
X1/P1/A1 + A1 Mini | (Large) Graveyard Tracker
0
Reply
Print Profile
X1/P1/A1 + A1 Mini | (Large) Graveyard Tracker
0
Reply
Print Profile
X1/P1/A1 + A1 Mini | (Large) Graveyard Tracker
0
Reply
Print Profile
X1/P1/A1 + A1 Mini | (Mini) Graveyard Tracker
0
Reply
Print Profile
X1/P1/A1 + A1 Mini | (Large) Graveyard Tracker
0
Reply