Search models, users, collections, and posts

Hooping Station for Embroidery (for Mighty Hoop)

Print Profile(2)

All
X1 Carbon
P1S
P1P
X1
X1E
A1
H2D
H2D Pro
H2S
P2S
H2C
X2D
A2L
A1 mini

0.2mm layer, 2 walls, 15% infill
Designer
33.4 h
8 plates
4.7(11)

0.2mm layer, 6 walls, 25% infill
Designer
15 min
1 plate
5.0(1)

Open in Bambu Studio
Boost
154
321
57
18
356
142
Released 

Description

If you are into embroidery and use “Mighty Hoops", then this large print may be very useful for you.


A hooping station greatly simplifies setting up garments (and other items) ready for embroidery. Professional hooping stations are available, but they are extremely expensive. With a bit of work, some screws, magnets and around 1kg of filament, you could build your own and save a considerable amount of money.

Hardware Required

You will require:

  • 6 x M6 x 35mm countersunk screws (I used stainless steel security screws)
  • 16 x neodymium magnets 15mm x 15mm x 1mm thick

Printing the Clamp Sections and hinged Flaps

The print files have been instructed to pause when the magnets needs to be inserted.

It is critically important to place the magnets in the correct orientation/polarity.

  1. Place the 8 magnets for the two clamp plates in the same orientation into the square holes of the print.
  2. Place the 8 magnets for the four hinge flaps in the same orientation - BUT - opposite to the clamp plates.

i.e. if the clamp plate magnets are all placed with the positive (+) terminal facing UP into the print - place the positive (+) DOWN for the hinge flaps.

Assembly Instructions

Place the 4 x hinge flaps onto the top and bottom clamps. The magnets will hold them together (if they push apart, you will need to reprint the hinge flaps again - but reverse the orientation of the magnets.

Use a piece of filament as the hinge shaft for each flap.

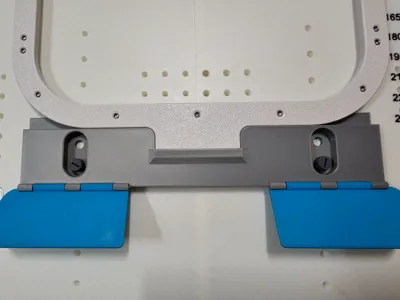
Main Table Assembly Instructions

  1. Print the 4 panels (top left, bottom left, top right, bottom right).
  2. Slide the top left panel onto the mating edge of the bottom left panel (as per one of the photos).
  3. Slide the top right panel onto the mating edge of the bottom right panel.
  4. Slide the left and right halves together. You may find that some talcum powder or light oil in the join will assist assembly.
  5. Use 2 countersunk screws to fit the stabiliser bar between the two support legs (to form a H pattern looking from above. The support legs have countersunk holes on one side for fitting the screws into.
  6. Use the remaining 4 countersunk screws to fit the main table onto the supports. The top (neck shaped end) of the main table must be at the highest point.

Depending on your printer, the threads may need cleaning out with a 5mm tap. If the stepped screws are a little tight or loose - try reprinting with them slightly scaled up/down.

To use Metal instead of Plastic Stepped Screws

I originally designed this model to use metal stepped screws salvaged from old computer systems. As these did not appear to be readily available, I made plastic alternatives included in the main print profile. 


I recently came across some M5 x 12mm washer head metal screws and made some adapting washers to use them instead of the stepped plastic screws. 


The adapters (for the single hole and double hole clamp plates) are located on the second build plate. These are a close tolerance fit and will fit flush with the bottom of the clamp plates. These adapters allow the screws to sit in the centre of the holes.


Comment & Rating (57)

(0/1000)

Boosted
hi, I'm printing this in PETG. tried this with a bambulab a1 and h2d both giving me these results. all other pieces were superb in PETG, only this is my 3rd attempt. any advice? should I print it in pla? what am i doing wrong? kindest regards.
(Edited)
The designer has replied
1
Reply
Hi It looks like the magnets have come out and the printer is trying to bridge the gaps left. My suggestion would be to use some super glue to hold the magnet in place. Please let me know how you go.
0
Reply
Wow, what a superb design, I've already started printing and will keep you updated
Show original
0
Reply
do you have a photo of what kind of magnets I need?
0
Reply
Boosted
Hi, Can I use this one with a brother/babyhoop ?
The designer has replied
1
Reply
Hi Jorgeb The table can be used with any machine to help layout embroidery, but the top and bottom clamps have been designed to work with the "Mighty Hoop" magnetic hoops for multi needle machines. The hoops in the photos are for a Brother multi-needle machine. The top and bottom clamps are used to hold the bottom of the magnetic hoop into place. They also lightly clamp any stabiliser etc into position, so that everything is held in place when the two parts of the hoop are brought together. If you want to use this with the "standard hoops" that come with the Brother or Baby Lock machines, I don't see why it wouldn't work. The ring could sit onto the bottom clamp (as in the photo below). Position the top clamp as close as possible (not shown in photo). The stabiliser can be held under the clamps - and it would work in the same way.
3
Reply
Boosted
Replying to @Solitaire :
Thank you so much for the answer, I just started to print it, I'll post my results in a couple of days. Also again thank you for this design, this hooping stations are expensive and hard to get in the country that I live.
(Edited)
1
Reply
Replying to @jorgeb :
I hope it works out well for you.
0
Reply
Great, thank you very much for this - do you happen to have the smaller version of this as a print file too? That would be cool
(Edited)
Show original
1
Reply
I made this for someone else. The magnets were a pain- had to print 3 times2/3 I place the magnets wrong. the plastic screws were hard to fit in. Metal screws are much easier. Over all I think it came out pretty good, just some parts are pain. I hope this lady likes it.
1
Reply
Print Profile
0.2mm layer, 2 walls, 15% infill
quedó perfecto
0
Reply
Oh wow! nice!!!! I was thinking about purchasing one of those expensive hooping stations, Now I will purchase a bigger 3D printer instead and will make my own hooping station! I am really excited! Thanks so much for this present!!! :)
The designer has replied
2
Reply
Cool!
0
Reply
do you hav the files for fusion for the mounts I have a Berners and magnet hoop setup
The designer has replied
0
Reply
If yours is a Bernette, from what I can see online, the mounting system is totally different to the Mighty Hoop. My files would not be of any assistance to you for what I can see.
0
Reply
bro do you have magnetic hoop stl file
0
Reply
Have you designed any magnetic hoops for your station?
The designer has replied
0
Reply
An interesting idea! I would be concerned with the strength of printed hoops - they undergo a lot of stress when being used. Short answer, No. I have made bracket adapters for using a mighty hoop on a different model rather than needing to purchase another hoop to suit.
1
Reply
can I use your clamps on an original Mighty Hoop station? particularly using the starter kit version
The designer has replied
0
Reply
You would need to check the screw hole centre dimensions on your Mighty Hoop Station and compare to the 166mm centres I used (slightly over 6.5").
0
Reply
This is amazing! I am going to try printing. I cannot however find the 15x15x1 magnets. Only round. Do you have any suggestions on where you found these or will round work ok?
The designer has replied
0
Reply
The round ones 1mm thick should be fine. If you have problems with them, please let me know.
0
Reply

License

This user content is licensed under a Standard Digital File License.

You shall not share, sub-license, sell, rent, host, transfer, or distribute in any way the digital or 3D printed versions of this object, nor any other derivative work of this object in its digital or physical format (including - but not limited to - remixes of this object, and hosting on other digital platforms). The objects may not be used without permission in any way whatsoever in which you charge money, or collect fees.