ShrinkingTest V4.1 by Alex_vG


Print Profile(4)


Description
What is it for?
The goal of this model is to achieve dimensional accuracy by compensating the natural shrinking during cooling of all FDM materials.
Printing this model and measuring some dimensions allows to calculate the shrinking factor with very high precision.
The result can be used as X-Y compensation value in a material profile in BambuStudio or Orca Slicer. All future models printed with this profile will benefit from improved dimensional accuracy.
So essentially, this models has the same purpose as your typical calibration cube. But calibration cubes are very prone to measuring errors due to the small dimensions and outside only surfaces. Yet they are not very efficient. This model is highly optimized for the purpose and achieves it in a far more efficient and precise way.
Why should I use this one?
compared to similar models, it has a few advantages:
- Very low material use (< 20g with the provided print profile)
- Optimized for use with the most common type of calipers (150mm / 6"), allowing best accuracy with standard tools
- Thoughtfully designed guides simplify handling and prevent most user errors like skewed alignment
- Inside and outside dimensions to cancel out influence from deviating line width.
Usually, you want to characterize each filament (type, brand, color) individually, so you will print and measure your test part quite often. I have put quite some time and thought into reducing weight while maintaining rigidity where needed.
Why X and Y, but no Z?
Of course, the material shrinks in all 3 dimensions, not only X and Y. But in Z direction, the printer lays down each layer at the correct height. If the printed part below lost some height due to shrinking, the next layer will just have more layer height and maybe the lines a are a tiny bit less wide. So at the end of the print, the Z dimension should be very accurate or at least much better than X and Y. If that is not the case, I would first look for faults of the printer mechanics.
Why are there no diagonals for skew?
Additional dimensions to determine skew have been intentionally left out. Skew needs to be measured only once for a printer (maybe each time after tightening belts), but you have to print this model many times. That would would be a waste of material.
How to use it?
Printing
Print the model using the embedded print profile for Bambu Studio.
If you want to print from Orca Slicer, just slab the STL on the build plate and use your preferred settings. There is not much magic in the embedded print profile. I advice to use at least 2 walls and some infill, so that walls don't lean in.
Measuring
Once the print is finished and everything at room temperature, you have to take a total of 8 measurements: two outside measurements in both, X and Y, as well as two inside measurements in both directions.
I propose to do all outside measurements first, then all inside measurements.
You might want to prepare a spreadsheet, where you can enter all measurements in the same sequence as you do the measurements. Unfortunately, I can't upload my excel template here.

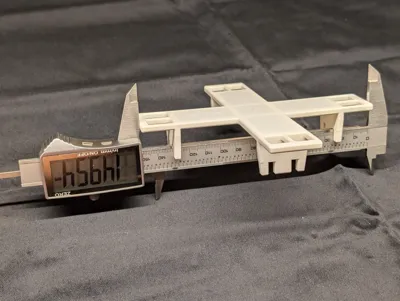
Take the outside measurements
- For the first outside measurement in X direction, fully extend your calipers and hold them with the long jaws pointing up.
- Then put the model upside down onto the calipers so that the body of the calipers sits in the first slot for X direction.
- If your caliper's body is thinner than the slot and there is play, tap the model so it is tilted inside the guide.
- Then gently push the jaws together against the outside and take note of your first measurement.

For the next measurement, repeat steps 1-4 but use the second slot in X direction.
After that, do the measurements in Y direction in the same way.
Take the inside measurements
The inside measurements work basically the same, but you have to flip the calipers over with the short jaws pointing up. This time you have to extend the calipers so far that the short jaws fit inside opposing square holes. For measuring, you gently extend the calipers against the inside of the square holes.
Calculating the shrinking factor
Finally with those measurements, you can calculate the shrinking factor for each direction and the overall average.
The nominal dimensions are:
outside: 150mm
inside: 140mm
For calculating the shrinking factor in X, use the formula
X factor = 100% * (outside_X1 + outside_X2 + inside_X1 + inside_X2) / (2 * 150mm + 2 * 140mm)
For the shrinking factor in Y, replace X with Y in the formula above.
The total shrinking factor can be calculated by averaging X and Y factor or by the formula
overall factor = 100% * (sum of all 8 measurements) / (4 * 150mm + 4 * 140mm)
The overal factor is exactly the number that you can use in Orca slicer or BambulStudio in the filament settings field Shrinkage (XY).
Additional interpretation of the measurements
The factors for X and Y should be very close to each other. If they deviate significantly, something is wrong. One reason could be skew, e.g. the printers axis aren't exactly square.
You could also calculate the formula ( (all outside measurements) - (all inside measurements) - 40mm) / 4.
A positive results means, that your lines are too wide by that amount, e.g. there is overextrusion.
You can imagine the meaning of a negative result ;-)
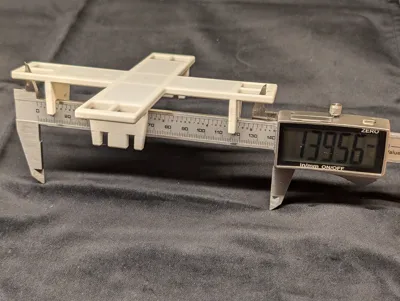
Example
For the print in the foto I took the following measurements:
| outside 1 | outside 2 | inside 1 | inside 2 | |
| X | 149.54 mm | 149.52 mm | 139.58 mm | 139.63 mm |
| Y | 149,62 mm | 149,64 mm | 139.75 mm | 139.76 mm |
As a result, the shrinking factors calculate as:
| X | 578.27 / 580.00 = 99.70% |
| Y | 578.77 / 580.00 = 99.79% |
| total | 1157.04 / 1160.00 = 99.75% |
So I will enter 99.75 in Orca slicer. Alternatively, you could rescale your model by 100.256%.
@scotta316 has kindly provided a google spreadsheet in the comments, that does the calculations for you. I have copied the link here, so more people see it: https://docs.google.com/spreadsheets/d/1WUpEs4bRG-amSfAyoMZw2wmrCpfV8FRE6bzjZ-Dmjrk/copy
@JoHaNeZz has created an online calculator to directly enter measurements and get results: https://haeusler.x10.bz/shrink-calculator.html Thank you for sharing it!
Comment & Rating (198)