
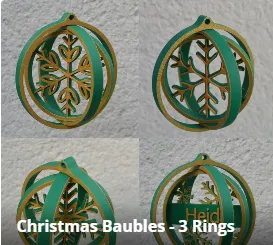
Christmas Bauble Dec - Tree Star - 3 Rings Custom


Print Profile(2)


Description
Boost Me (for free)
Your boost helps small creators like me to keep making awesome designs. Thank you 🙏😊✨
This Christmas decoration was inspired by the fidget spinners that are really popular. They print flat but can be turned to make a pattern, or kept flat if you prefer.
I now have a gift box especially designed for gifting these decorations. Please see the below link for details:
https://makerworld.com/en/models/802476#profileId-742634

You can find more of my 3 ring bauble decorations here:
https://makerworld.com/collections/9285877
Instructions for changing the name and re-colouring within BambuLabs:
First you need to go to ‘Objects’ and select the text shape.

Then, using the ‘Text shape’ tool you can change the text. You can also change the font size here if you need to.

I like to ensure the thickness of the text is 3mm. You can do this from the ‘Scale’ menu option but ensure you untick ‘uniform scale’ first.

The last thing you will want to do is reposition the text. You can do this by eye but I like to check get the X axis position correct. To do this you need to use the ‘Move’ tool.
Just check that the two components have the same X-axis, and if not correct it. Just click on each object from the left menu and use the ‘Move’ tool.

You will notice that the name has lost its colouring since you changed it. The instructions for re-colouring it the same way I did are below.
Re-colouring
My print profiles all include a cross section in a different colour. You could recolour individual parts of the decoration if you wish, but it significantly reduces waste, filament changes and time by merely changing the filament twice during the print.
Start by selecting the entire object and removing the painting I did for the print profile, using the ‘Erase all painting’ button.

Then, if you want to match my original settings, you’ll want to change the tool type to ‘Height Range’ and change the Height Range to 2.0.
Select the colour you want and move your mouse over the decoration to apply the paint. I always try to aim for 2.75. The more you zoom in, the more control you get over this number.


Hit ‘Return’ in the top left corner and you’re ready to print.
Membership
Become a member to support me and sell my designs 🙂
Boost Me (for free)
Your boost helps small creators like me to keep making awesome designs. Thank you 🙏😊✨
License

You shall not share, sub-license, sell, rent, host, transfer, or distribute in any way the digital or 3D printed versions of this object, nor any other derivative work of this object in its digital or physical format (including - but not limited to - remixes of this object, and hosting on other digital platforms). The objects may not be used without permission in any way whatsoever in which you charge money, or collect fees.


Comment & Rating (38)