Search models, users, collections, and posts

Bubble Blaster

Print Profile(3)

All
P1S
P1P
X1
X1 Carbon
X1E
A1
A1 mini
H2D
H2D Pro
H2S
P2S
H2C
X2D
A2L

Bubble Blaster - 0.16mm layer, 2 walls, 15% infill
Designer
8.9 h
9 plates
4.9(123)

higher bubble tank + bigger gasket
10.3 h
9 plates
5.0(128)

gradient silk, large tank, 0.16mm layer, 2 walls, 15% infill
11.6 h
7 plates
5.0(1)

Open in Bambu Studio
Boost
577
1467
339
357
2 k
1.2 k
Released 

Bill of Materials

Maker's Supply Kits and Parts
Select all
Electric Bubble Maker Kit 01 - ZC006
D6x3 mm Round Magnet (20PCS) - CA007
M3x10 SHCS Machine Screw (20PCS) - AA159
M2x6 FHCS Machine Screw (20PCS) - AA009
Bambu Filaments
Select all
Black (51100) / Filament with spool / 1 kg
List other parts
  • Super Glue x 1:

Description

Boost Me (for free)

If you enjoyed the design, drop a boost! Thank you!

Designed for the Electric Bubble Maker Kit 01 (NO AMS), this easy-to-use bubble toy will light up your child’s imagination as they create streams of glimmering bubbles at the press of a button. Perfect for outdoor adventures, parties, or backyard play, this bubble gun guarantees hours of entertainment for kids and the young at heart!


Let the bubbles soar and the laughter roar with the Bubble Blaster!

Assembly

Feed the wires through the barrel and feed the tube through the hole.

Slide one of the rubber pieces on to the tube.

Put the nozzle on front of the electric bubble maker where the slot goes over the tube.

The two pieces should be flush if inserted correctly.

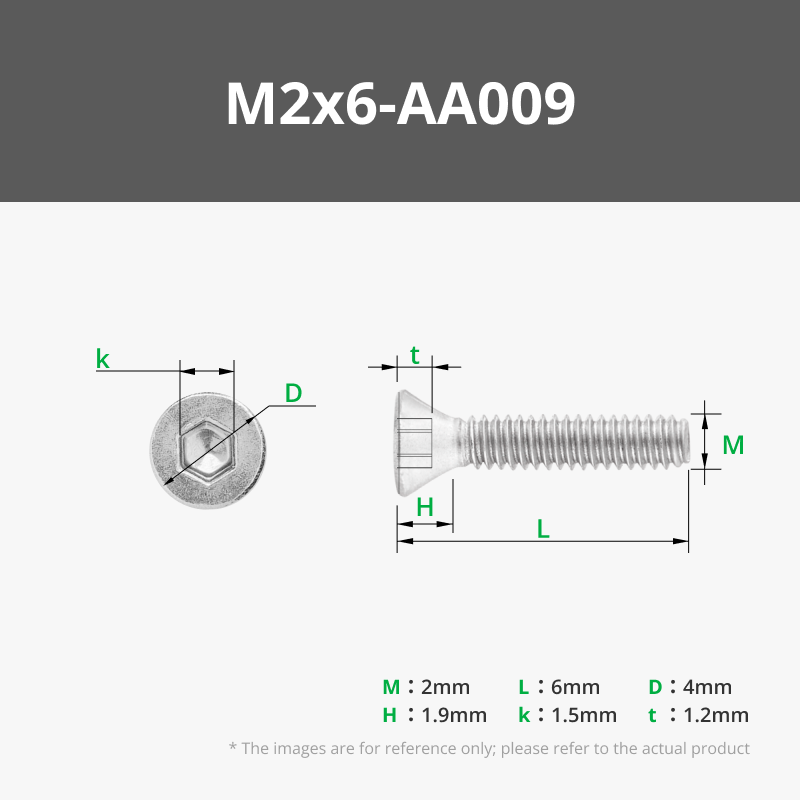
Screw 4x M2x6mm screws into the top of the nozzle to connect to the barrel.

This will secure the motor.

Slide the rubber piece into the hole so it is flush to prevent water leaking into the barrel.

Glue the grips to the handles.

Insert the switch into one of the handles with the two dowels. Make sure the cables are properly tucked in the slot.

Insert the trigger.

Connect the other handle.

Screw 2x M2x6MM screws into the handles.

Slide the connected handles into the bottom of the barrel.

Slide the battery mount into the top of the barrel.

Glue 2x magnets to the back cover.

Glue 2x magnets to the back of the barrel.

These two pieces will connect, so make sure the magnets attract!

Screw 1x M3x10mm screw through the slot at the top of the barrel to secure the back mount.

The screw should be flush.

Connect and insert the battery.

Cut the length of the tube to properly fit into the bubble tank.

Add the gasket to the bubble tank.

Screw the bubble tank to the bottom of the barrel.

Add warm water & soap to the bubble tank and enjoy!!!!

Comment & Rating (339)

(0/1000)

Print Profile
Bubble Blaster - 0.16mm layer, 2 walls, 15% infill
A splendid project and a fantastic design! I recommend gluing the handle into the barrel. I slightly raised the tank; this allows for more water and enables the blaster to stand upright. I also modified the seal somewhat. Otherwise, the original print profile is excellent
The profile uploader has replied
Show original
profile
5
Reply
Thank you! The extended tank looks awesome! Thanks for sharing and for the boost
(Edited)
2
Reply
that's a great idea, what is the z measurement for the extended tank? also, did you just make the gasket thicker? I am about to print it out
0
Reply
Replying to @ImageGenerator :
The Z dimension of the extension is 38mm and the tank is about 86mm overall. So it will print easily on the A1 Mini. I have made the seal larger in the inner diameter and also slightly thicker. I have already uploaded the profile for this. Just use this one.
(Edited)
1
Reply
we need a better explanation of where these go as there is nothing to show how they fit at all
The designer has replied
designer
1
Reply
Those parts are not used
0
Reply
Replying to @wuboo :
so why are they in the kit??
0
Reply
Replying to @castaway1200 :
Because the kit is made to support a variety of bubble gun models...
0
Reply
Excellent design, everything printed flawlessly and fits perfectly. PLA for most of the body except the water container which was made in PETG.
The designer has replied
designer
4
Reply
It looks awesome! Thanks for sharing and for the boost!
0
Reply
Boosted
Excellent for printing and assembly. Functions perfectly. All from PETG HF / BambuLab seal TPU red / BambuLab
The designer has replied
Show original
designer
3
Reply
It looks good! Thanks for sharing & for the boost
0
Reply
I believe this is a Bambu Lab issue, the kit's screw specifications are incorrect and prevent assembly, requiring substitute screws for installation
The designer has replied
Show original
designer
1
Reply
Did Bambu change their kit specs? I have not made any changes to the model, everything should still be the same for the design itself.
0
Reply
yep me to,the screws needed for the end of the barrel are way to small.......................caused me lots of problems despite having the correct m2 6 mm screws
0
Reply
Boosted
amazing design!
The designer has replied
1
Reply
Thank you!
0
Reply
Print Profile
Bubble Blaster - 0.16mm layer, 2 walls, 15% infill
The kids and I had fun, I still have two more already printed to build yet as I bought four!
The profile uploader has replied
profile
1
Reply
I'm glad your family is enjoying the design! My kids were excited to start using them again this summer. Enjoy!
0
Reply
Boosted
A superb design, practical and engaging Thank you for sharing
The designer has replied
Show original
designer
1
Reply
Thank you very much! I appreciate the boost
0
Reply
Boosted
Print Profile
Bubble Blaster - 0.16mm layer, 2 walls, 15% infill
print without any problem, it’s been really fun when assembling, work perfectly
The profile uploader has replied
profile
1
Reply
That’s looks amazing!! I love the translucent PETG. Great choice! And thanks for the boosts
0
Reply
Print Profile
Bubble Blaster - 0.16mm layer, 2 walls, 15% infill
This is so much fun!
The profile uploader has replied
Show original
profile
1
Reply
Thank you!
0
Reply

License

This user content is licensed under a Standard Digital File License.

You shall not share, sub-license, sell, rent, host, transfer, or distribute in any way the digital or 3D printed versions of this object, nor any other derivative work of this object in its digital or physical format (including - but not limited to - remixes of this object, and hosting on other digital platforms). The objects may not be used without permission in any way whatsoever in which you charge money, or collect fees.