Search models, users, collections, and posts

X/P Rear Tensioner Cover

Print Profile(3)

All
X1 Carbon
P1S
P1P
X1
X1E
A1
A1 mini
H2D
H2D Pro
H2S
P2S
H2C
X2D
A2L

Bambu Logo
Bambu Logo
Designer
48 min
1 plate
4.6(28)

Honeycomb Pattern
Honeycomb Pattern
Designer
52 min
1 plate
4.9(8)

Finger Warning
Finger Warning
Designer
50 min
1 plate
4.5(6)

Open in Bambu Studio
Boost
87
235
104
13
291
224
ReleasedĀ 

Description

X/P Series Rear Tensioner Cover XPRTC

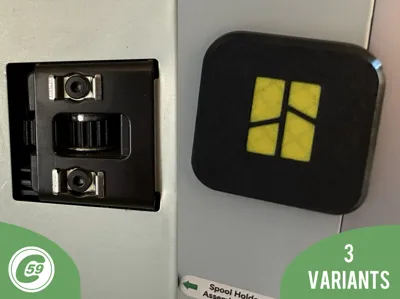
Rear Tensioner/ Pulley Hole Caps Overview

These caps are designed to cover the rear tensioner holes on the X/P printer series. They provide a clean appearance, keep dust out, and can be printed with or without a logo. For a seamless look, match the cap color to your printer if opting for the no-logo version.

Material Recommendation: PETG is highly recommended for its strength, ensuring the clip securely retains the cap.

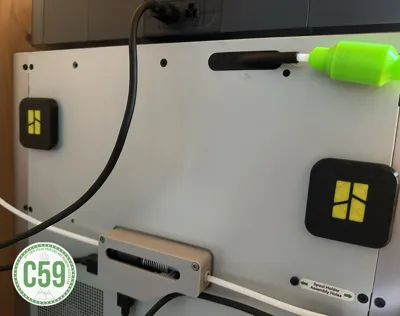
Installation Instructions

  1. Align the Cap:
    • Position the cap over the tensioner, ensuring it is centered on the hole.
  2. Insert the Cap:
    • Push the cap firmly into place until it is secure.
  3. Removal:
    • Pull gently on the bottom edge of the cap to remove it.
    • The strong holding force ensures the cap remains securely attached but is still removable when needed.

Enjoy your clean, dust-free setup with a professional finish!


Install Action HD Video :


V1.0 Specifications

Material: PETG (recommended for optimal strength and durability).

Printer Settings:

  • Profile: PETG Standard
  • Layer Height: 0.20 mm
  • Mode: CERTIFIED LUDICROUS
  • Infill: 15%
  • Walls: 2
  • Bottom Layers: 3
  • Top Layers: 5

Printing Details:

  • Supports: Not required
  • Print Time: 41:14
  • Filament Usage: 0.61 oz
  • Estimated Cost: ~$0.43 (based on a $26 PETG spool)


Boost Me (for free)

šŸš€ Boost Your Project! šŸš€

If you love what I'm working on, hit the Boost button! Your support helps me continue to create, improve, and share even more exciting designs. Thank you for being part of this journey!


Enjoy your printing journey, and remember—keep your fingers away from the poop chute, she's angry!


"I’ll be sure to keep you updated with any future developments. If you come across any issues or need assistance, don’t hesitate to reach out—I’m here to help!"


You shall not share, sub-license, sell, rent, host, transfer, or distribute in any way the digital or 3D printed versions of this object, nor any other derivative work of this object in its digital or physical format (including - but not limited to - remixes of this object, and hosting on other digital platforms). The objects may not be used without permission in any way whatsoever in which you charge money, or collect fees.


Current ver.1.0_11/15/2024

Ā© 2025 C59 Design Lab. All rights reserved.

Comment & Rating (104)

(0/1000)

Pinned by Designer
Print Profile
Bambu Logo
Fit perfect on my P1S
The profile uploader has replied
profile
1
Reply
They look great in yellow and black, I have to admit! Thanks for sharing your experience and leaving a rating!
0
Reply
Print Profile
Bambu Logo
print quality was great but fitment was too tight. was very hard to get one of them in and the other I was unable to get in.
The profile uploader has replied
profile
2
Reply
Hello ! not sure if it printer dimensional, or the stamped steel hole that differ but they clip perfectly on my printer, you might want to resize them in the slicer for now, I wil maybe eventually redesign de clip if this problem is common. Thank you appreciate your feedback !
(Edited)
1
Reply
Replying to @C59DL :
Hello! Thank you for your reply and great design! The left side cover fit fine was just a very tight fit and had to press very hard to get it clipped in. the right side just wouldn’t fit at all and I realized that was because the grey piece behind the steel part, was blocking the right side clips from pressing in far enough. I had to cut the right side clips to about half the size so they were thin enough to fit. I think if you modified the clips to be thinner so they could actually flex easier and also fight in the tighter gap that would be better!
(Edited)
profile
1
Reply
Replying to @MWright :
Thank you for the precision I will revise this when I have time and check what I can make ! I have other thing underway also and working aswell haha āœŒļø
(Edited)
1
Reply
Print Profile
Finger Warning
came out good
The profile uploader has replied
profile
1
Reply
That combo of color is šŸ”„ For those haha Thanks for taking time to rate, review and share a nice picture šŸ‘ŒāœŒļø
0
Reply
Print Profile
Bambu Logo
Beautiful design and a perfect fit
The profile uploader has replied
Show original
profile
1
Reply
Thank you for sharing your experience—I’m glad they’re working well for you! The color combination looks perfect. Enjoy!
0
Reply
Print Profile
Honeycomb Pattern
Great Clips :) Fit as a charm! Thanks my friend!! :-)
The profile uploader has replied
profile
1
Reply
Thank you for the review! Glad to hear they fit well. Some users have mentioned issues, which can depend on a few factors, but on both of my machines—and for others like you—they’ve worked great. I really appreciate you taking the time to leave a review. Enjoy!
0
Reply
Print Profile
Bambu Logo
Impeccable precision, a beautiful design, bravo
The profile uploader has replied
Show original
profile
1
Reply
Thank you! Given the comment, I imagine the three-star rating was due to the app not allowing you to rate it higher
Show original
0
Reply
Replying to @C59DL :
My apologies, I had indeed given it a five-star rating Exceptional work in any case
Show original
0
Reply
Replying to @C59DL :
Yet I gave it five stars
(Edited)
Show original
profile
1
Reply
Print Profile
Finger Warning
Turned out great
The profile uploader has replied
profile
1
Reply
Looks great, did they fit well ? Thank you! āœŒļø
0
Reply
Print Profile
Bambu Logo
looks good but fits too tight
The profile uploader has replied
profile
1
Reply
Hi there, have you been able to insert them or ?
0
Reply
yes but it was really hard to insert them and i dont know if iam going to be able to pull them out without breaking anything
0
Reply
Replying to @jakub_broz09 :
They should come off. Like I mentioned to another user, the first insertion is often the hardest—it depends on the print factors. However, after you remove and reinsert them a couple of times, they loosen up and become easier to handle. If you printed in PETG, the tabs should not break based on my experience. But with PLA, the tabs might break, which is why I recommend using PETG. I’ll review them soon to adjust the fitment!
0
Reply
Boosted
Finally one that actually works and is removable without tools! Nice nice job! Thank you!
The designer has replied
designer
1
Reply
Haha ! Nothing perfect in life of course but yeah real clip and flapper to remove just the basic. Thanks so much, Happy New year to you !
0
Reply
Boosted
Replying to @C59DL :
Boosted my friend!
designer
1
Reply
Replying to @REsliced :
I appreciate ! I cannot say Thanks enough āœŒļø
1
Reply
Print Profile
Bambu Logo
I appreciate the design, I had to heat one with hot air because it didn’t fit
The profile uploader has replied
Show original
profile
1
Reply
It is the first design, there will be an updated clip sometime with a magnet option as well ! Thanks for giving your feedback āœŒļø
0
Reply
Replying to @C59DL :
your welcome
0
Reply
Replying to @C59DL :
thanks, good design
0
Reply
Print Profile
Finger Warning
Sharp looking print but does not fit my P1S.
The profile uploader has replied
0
Reply
Hi there! Can you describe the problem you encountered? If the clip didn’t fit into the metal bracket at all, it’s possible that the four tabs are slightly too big due to factors like filament or print tolerances. If that’s the case, you can simply file them down a bit. These caps will be updated with a newer version, including a magnetized version, to address issues like this. Thank you! āœŒļø
0
Reply
Replying to @C59DL :
I will effort filing them down. Thank you for your time and your attention.
0
Reply
Replying to @user_1330442632 :
I’m sorry for the issue you encountered. I designed the cap to clip securely to the machine, but as I own multiple machines, I’ve noticed that variations in machine or filament tolerances can result in slight size differences. The first time you insert the cap, it may be tight, but it typically becomes easier with subsequent uses.I personally use a P1S, and the caps fit well for me. However, another possible issue could be the tensioner at the back blocking the clip. While I haven’t experienced this myself, it’s something I considered.One user mentioned gently heating the cap to make it fit better, which could be a helpful solution. I apologize for any inconvenience caused and appreciate your understanding. If filing the cap resolves the issue for you, that’s great! Thank you for your feedback!
0
Reply

License

This user content is licensed under a Standard Digital File License.

You shall not share, sub-license, sell, rent, host, transfer, or distribute in any way the digital or 3D printed versions of this object, nor any other derivative work of this object in its digital or physical format (including - but not limited to - remixes of this object, and hosting on other digital platforms). The objects may not be used without permission in any way whatsoever in which you charge money, or collect fees.