Search models, users, collections, and posts

3D Printed RC Forklift - DIY

IP Report

Print Profile(2)

All
P1S
P1P
X1
X1 Carbon
X1E
A1
H2D
H2D Pro
H2S
P2S
H2C
X2D
A2L
A1 mini

0.2mm layer, 2 walls, 15% infill
Designer
10 h
4 plates
4.8(58)

Optimized - 0.2mm layer, 2 walls, 18% infill
11.6 h
4 plates
4.9(30)

Open in Bambu Studio
Boost
1132
1941
145
261
2.1 k
705
Released 

Description

Have you ever wanted to obtain the highest level of achievement known to man also known as being “Forklift Certified”? Well this RC forklift is meant to help make that dream a reality.


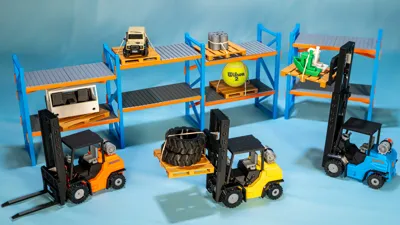
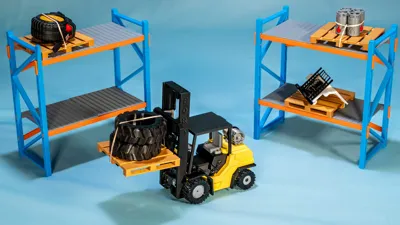
This Mini-Fork is front wheel driven with rear wheel steering and features a fully functional mast that can tilt forward and back. I built this project to be the simplest one yet and act as a jumping off point for people looking to join in on these 3D Printed RC builds. I'm using the warehouse system that can be found here created by @Wimv who did a great job! I've also put together a video on the build for your viewing pleasure which can be found below.


For a step by step guide on how to assemble the model and order all the parts consider joining the Professorboots workshop which helps fund the development of these mini RC projects:

https://professorboots.com/products/professorboots-workshop-pass


BOM Cost Overview: Cost really varies depending on where you get your parts from, for instance an n20 motor on amazon can cost 6-10$ versus on aliexpress they can be found for around 3$. The downsides of using aliexpress is that shipping times can be lengthily and quality mixed. The second thing to keep in mind is that a lot of the parts you'll have to buy packs of(or should buy packs of), for instance a 5 pack of CR123A battery holders costs 6$ on aliexpress which is enough for 2.5 projects. Another example is a 3pack of esp32's which costs 17$ on amazon and will cover 3 projects versus buying a single unit is 8.99$. So if you build multiple the overall cost goes way down.

If you have no soldering supplies and are just building a single model you can expect to pay upwards of 70-80$. If you're buying parts in bulk which the expectation to build more then 2 the cost drops to around 40$. That's using the phone/pc controller option. If you don't already have a PS or Xbox controller lying around and what to use that instead add that to your cost.

Comment & Rating (145)

(0/1000)

Boosted
I actually printed this full set from Printables on my A1 and one thing I noticed is that on my A1 (really any bed slinger) the tall part of the mast should be turned 90° so that it is “facing” to the left or right so when the bed moves back and forth, it has more stability. Initially mine failed and once I turned it, it printed without any issues. 🙂
19
Reply
Boosted
Print Profile
0.2mm layer, 2 walls, 15% infill
On my A1 Mini, although I was using Bambu Basic PLA, I had to set the filament to Generic PLA as the vertically placed mast printed with a defect due to the higher print speed of the Basic. It got a little wobbly as it got near the top but with the Generic profile, it came out perfectly. Everything else has printed perfectly. I'm about halfway through assembly, so far, so good!
4
Reply
i having same issue with A1, but generic profile doesnt solve the issue. if anyone have other solution may please share with me
0
Reply
My experience with tall objects on A1 Mini is - change orientation to print longer side on bed slinging axis - so from 3MF original file - split the objects and try to turn it 90° on Z axis - this mostly does it for me - I did not tried this file tho.. :)
0
Reply
Boosted
Print Profile
0.2mm layer, 2 walls, 15% infill
So great that I had to make two! Awesome print quality on the X1C & A1. I printed the yellow / silver on my A1 and the red / gold on my X1C. Both work amazingly well and are a blast to play with!
1
Reply
Are you having any issues burning out servos? I've had to replace the steering servos 3 times and the tilt servo once, I've been trying to learn how to edit the code to add end stops for the servos to keep them from straining themselves when steering too far, but I'm not making much progress.
0
Reply
Boosted
Replying to @TechKnowlogy :
I did notice one getting pretty warm, but I also noticed that the ESP32 board can push into the way of the servo itself and cause the servo to have to push past it, adding additional friction. I’d double check that placement as well, from a hardware perspective. I’ll look through the code. I edited it to add “dead zones” to my controller so it would stop making the motor whine without being able to actually move it. I’ll take another peek and let you know if I can find the line in the code. 😊
(Edited)
1
Reply
Boosted
Replying to @TechKnowlogy :
On line 153 of this file (https://github.com/ProfBoots/Mini-Fork/blob/main/MiniFork_Bluepad2.0/MiniFork_Bluepad2.0.ino) it receives the value from the right joystick axis, then divides it by 9, dividing it by 10 or whatever math you prefer to make the number smaller should help! I didn’t test it out, as I’m laying down in bed but got curious and opened GitHub on my phone. 🤣
(Edited)
3
Reply
very cool was pretty easy to build and really fun to play with didn’t have tpu so I hade to make my own wheel and use Lego tires😂
2
Reply
Hello everyone! I printed and built the forklift successfully, yet when I tried using the mast, it would only go up when I press the right joystick down. I have tried every other button and it won’t go down unless I do it manually. I just need to figure out how to change the buttons in the code. I am using a PS4 controller. Any help?
3
Reply
You may need to add more weights to your mast or some sort of lubricant so that it slides better. Mine would get stuck at the top as well.
0
Reply
If you swap the orientation of your postive and negative wires it should reverse the direction. I also couldn’t get it to go down initially but my thread was too short. The thread has to be long enough to reach the fully down position or it will just continuously go up
0
Reply
hello, you guys were a bit late. All I had to do was swap the wires like you said, @Glof. But thanks anyway.
0
Reply
Loaded on Printables and I printed the parts on the A1. I laid the mast flat on the bed and printed it with supports. Very nice model, works flawlessly
Show original
0
Reply
Print Profile
0.2mm layer, 2 walls, 15% infill
Follow the Workshop EXACTLY and it'll come out great! The soldering took some time to learn but after that everything was good👍
0
Reply
cyberbrick edition plz
5
Reply
Print Profile
0.2mm layer, 2 walls, 15% infill
printed well!
0
Reply
Print Profile
Optimized - 0.2mm layer, 2 walls, 18% infill
love the propane canisters
0
Reply

License

This user content is licensed under a Standard Digital File License.

You shall not share, sub-license, sell, rent, host, transfer, or distribute in any way the digital or 3D printed versions of this object, nor any other derivative work of this object in its digital or physical format (including - but not limited to - remixes of this object, and hosting on other digital platforms). The objects may not be used without permission in any way whatsoever in which you charge money, or collect fees.