Search models, users, collections, and posts

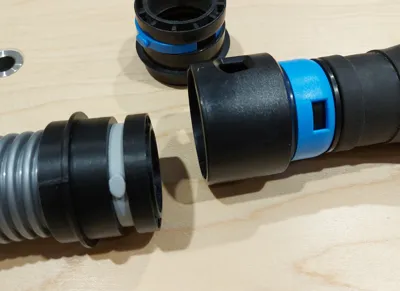
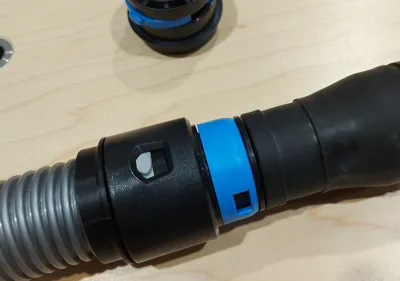
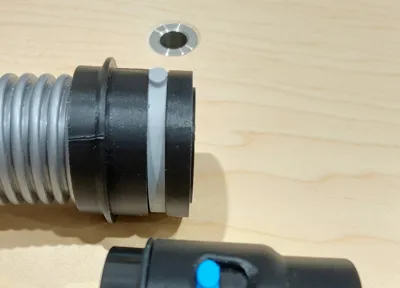
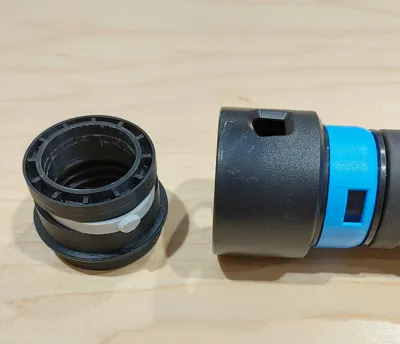
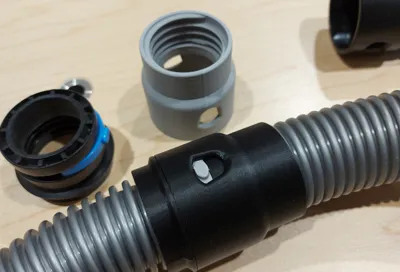
3DP version of the Cen-Tec Quick Click Hose

IP Report

Print Profile(2)

All
X1 Carbon
P2S
P1P
P1S
X1
H2C
A1 mini
H2D
A1
H2S
X1E
H2D Pro
X2D
A2L

0.2mm layer, 2 walls, 15% infill
Designer
51 min
1 plate
5.0(50)

0.16mm layer, 4 walls, 25% infill ABS GF.
44 min
1 plate
5.0(2)

Open in Bambu Studio
Boost
297
1065
121
88
1.1 k
641
Released 

Description

This vacuum hose attachment is modified to be a 3D printable version that is compatible with the Cen-Tec Quick Click system. It's designed for a vacuum hose with a 40mm OD. 


Assembly (CA glue) is required. The components are designed to print without support. (30° overhang.) 

Note: It fits the Cen-Tec Quick Click hose perfectly. The Cen-Tec hose is listed as a 1.5" OD (38mm) 

Boost Me (for free)

Please share a Boost if you found this model useful. Many thanks. 😊

Comment & Rating (121)

(0/1000)

Print Profile
0.2mm layer, 2 walls, 15% infill
I have printed a bunch of these to connect to every small tool in my shop that has a dust collection port. Thank you! I just uploaded a Centec splitter model with 3 female connectors, and recommended your excellent, mating male connector. https://makerworld.com/en/models/2168611-centec-splitter-3-female-ends
(Edited)
The profile uploader has replied
profile
1
Reply
Nice one, I was just going through my comments as this model is getting attention for some reason. I've made a few attachments and I made a very similar one. https://makerworld.com/en/models/859269-40mm-cen-tec-hose-splitter-adapter
(Edited)
0
Reply
Replying to @user_1765744671 :
I based my model on yours, of course! I decided I needed a Y connector only occasionally, so I made it a 3-way Quick-Click so I could set it up and break it down quickly. You have helped spur my interest in learning more about 3D modeling. I've collected Centec parts and ideas from you, Making Dove, and other makers. Now I have 3 parametric Centec models in Fusion: male with vent, male without vent, and female. Next I plan to learn threading so I can make the shop vac end that comes with the Centec hoses. Hmmm ... any chance you'd share the threading parameters for this?
(Edited)
profile
1
Reply
Replying to @user_296626333 :
I'm delighted you've been inspired to learn 3D modelling. I'm not in front of my CAD computer much as I'm overwhelmed with other tasks. Re speckling the thread you measure the space between the bumps on the hose (it's a reverse thread) and the diameter you need, those dimensions are all you need for the spiral. The actual thread design was with a 30 deg undercut wall, basically a 2D triangle with fillets. I made 2 threads so I could print one upside down. (the 30 deg was so the overhang would be well-supported. If i was you i would just import my .stp files and make that an object. That's what I did with many of my other components, and what many on Maker World have done. It's not one of those things that copyright, (as its pure function) so just use it as you see fit.
(Edited)
1
Reply
Hi. Love the print, but I ended up with a 9.1mm wide groove for the 5.13mm locking ring. Any insight into what I've done wrong? The groove is just off by enough the ring slides back as the fitting is pushed on that it won't lock. What program did you use to create the file? TIA!
(Edited)
The designer has replied
designer
1
Reply
That gap is huge. Two possible reasons I can think of 1. you glued the retaining ring on upside down. 2. you printed with support (everything should print without support) and the support is adding spacing. On reexamining your photo, the top ring was glued on upside down. The top housing and retaining ring fit together in a male and female clip style, sandwiching the 0 shaped spring. You dont need much glue, only add glue to the female side, to avoid gluing the 0 clip.
2
Reply
Replying to @user_1765744671 :
Thanks. "If I only had a brain." 🙄 Glue part worked out OK. I used thin, but it ran terribly. Will use thick next time.
designer
2
Reply
Replying to @user_1765744671 :
All good. Bad hair day LOL
designer
2
Reply
Thanks for the model. It printed well in Amazon Basics PETG, though when gluing it together the clip got stuck too. I'm guessing I just put too much on and it squeezed up towards the clip, but if you've any specific tips on avoiding this I'd appreciate it.
The designer has replied
designer
1
Reply
Applying superglue can be a bit of an art. I've found less is better for 3D prints. This print the lines work to strengthen the bond, so just applying a little bit of glue to the inside of the small ring part should be more than enough.
1
Reply
PS. I hope you get a usable print. I Also see you have what look like 20mm bench dog holes. I also made a bench dog vacuum hose attachment for the Cen-Tec hose you may find useful.
0
Reply
Oh those clips look useful. I'll get a handful of those printed too, thanks. I'll try to print again over the weekend though and be a bit more delicate with the glue this time.
designer
1
Reply
Print Profile
0.2mm layer, 2 walls, 15% infill
Printed with ABS GF
The profile uploader has replied
profile
2
Reply
Thanks for sharing the photo, looks good, hope it works for you as well as it's worked for me. I'm testing a spin welding jig so you can weld the two parts in place with friction - no glue. (I just mention it because you're printing ABS.) PETG and PLA are two soft, but my ABS version welded great. I'm new to printing my own parts and have had some issues getting ABS to stick to the plate, so the ABS spin weld is still in testing.
(Edited)
0
Reply
Replying to @user_1765744671 :
It's a real good design. I'm using Bambu Labs ABS GF on the PEI Textured Plate. I'm using brimming, and have slow my print right down. For first layer I print at 0.28mm @ 30mm/s. Increased my temps 5 degrees with the hotend and plate.
(Edited)
profile
1
Reply
Replying to @Gazzy79 :
That looks so cool. Nice work, I'll try slowing my speed next time I print ABS Did you dry the filament first?
(Edited)
0
Reply
Boosted
what are the odds of getting this but having it couple to a standard 1 7/8 (47mm) Dewalt shop vac hose? want to convert my hoses to Cen-Tec but can't find anything that will work.
The designer has replied
designer
1
Reply
The odds are slim, but I'm at work and already in shit, so why not.
0
Reply
Boosted
Replying to @user_1765744671 :
Heck yeah! Thank you so much!
0
Reply
Replying to @user_1765744671 :
PS I'm assuming it's a 47mm OD and hose thread is also a reverse thread, I don't know the thread pitch (space between bumps) so I just scaled the cen-tec thread to a bigger side - it may or may not fit. Generally, there is prototyping and many iterations before you get a Woking design - this one is "use at your own risk". I've uploaded the .stp file, if you click Download STL/CAD files you should see it there. when it's finished verifying. it's an Assembly, so bring it in as separate parts - and arrange intelligently.
0
Reply
Thank you. X1C print with Bambu standard PLA. Worked perfectly! Boost given:-)
The designer has replied
designer
1
Reply
Thanks.
0
Reply
Boosted
Thank you for the model. The print was perfect. For those who have a problem with CA glue, try this: Use painters tape to hold the spring ring in place on the large part. Place the small part on a table (as seen in image) and use small amounts of CA glue on the beveled area. Wipe excess glue from the top face of the small part (glue should only be in the beveled area). Install the large part (with attached spring ring) on to the lower part. Any excess CA glue should run away from the spring ring. Hold / clamp until dry. remove painters tape. Use.
The designer has replied
designer
1
Reply
Thanks for the CA tip. Your print looks so clean.
0
Reply
Boosted
Print Profile
0.2mm layer, 2 walls, 15% infill
Great print! Also used threads and combined with Bauer hose threads so I can join those 2 hoses when need additional length
profile
1
Reply
I used PETG and it printed perfectly. Less is more with CA glue. I just wicked the glue around just the bevel and it feels solid
designer
1
Reply
Boosted
Print Profile
0.2mm layer, 2 walls, 15% infill
Thank you for the model. The print was perfect. For those who have a problem with CA glue, try this: Use painters tape to hold the spring ring in place on the large part. Place the small part on a table (as seen in image) and use small amounts of CA glue on the beveled area. Wipe excess glue from the top face of the small part (glue should only be in the beveled area). Install the large part (with attached spring ring) on to the lower part. Any excess CA glue should run away from the spring ring. Hold / clamp until dry. remove painters tape. Use.
profile
1
Reply