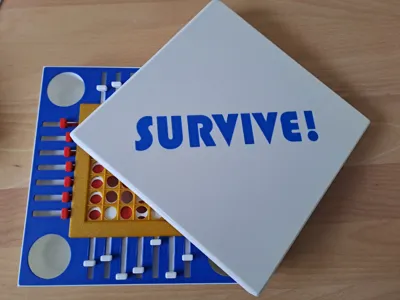
Survive! (board game of the 80s)


Print Profile(2)

Description
Adaptation of a classic board game of the 80s. It is conceived to fit P1 and X1 printers without splitting the design.
2 to 4 players game, with the goal of being the last survivor!
Game Preparation
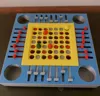
Each player, starting from the younger following clockwise, place a marble of his color where a hole covered in red or white is available.
At 5th turn each player placed his 5 marbles on the grid and game can start!
Game Play
Starting from the younger following clockwise, each player can move one cursor of one position.
Mind that a cursor moved in a specific direction from a player cannot be moved in the opposite direction from the player playing just after.
Moving a cursor may cause one or more marbles to fell down.
The goal is to make moves which let fall other player marbles and / or prevent our marbles from falling.
When a player has no more marbles he is eliminated and no longer move the cursor.
Game End
The winner is the last player which has marbles left on the grid
Installation
Print all the plates and 4 sets of 5 marbles of different colors

Clips (and glue) Playground grid as in the picture

Clips (and glue) Top and Bottom Box

Before starting next phase, mind that a coding is present on the box and on the cursor to simplify the cursor sorting and apply the original algorithm.

Start by inserting the red cursor. Let them slip in one side, move them till the end to finally insert them in theother side (See 3 following pics).


Following for reference all the red cursor installed

Then install the white cursors. Follow same steps as per the white red cursors, with the only difference that white cursors may need a genle push downward when inserting them on first side (see thumb in pic)

Following for reference all the red cursor installed

To finish the installation, clips the grid on the box.
Half marbles shall be glued to form a whole marble. I chose to split them to avoid support and make them more beautiful.
Half marbles come with a hole which you could use to place a bit of filament in it to help you center the marbles when gluing them.
License
You shall not share, sub-license, sell, rent, host, transfer, or distribute in any way the digital or 3D printed versions of this object, nor any other derivative work of this object in its digital or physical format (including - but not limited to - remixes of this object, and hosting on other digital platforms). The objects may not be used without permission in any way whatsoever in which you charge money, or collect fees.
Comment & Rating (13)