Search models, users, collections, and posts

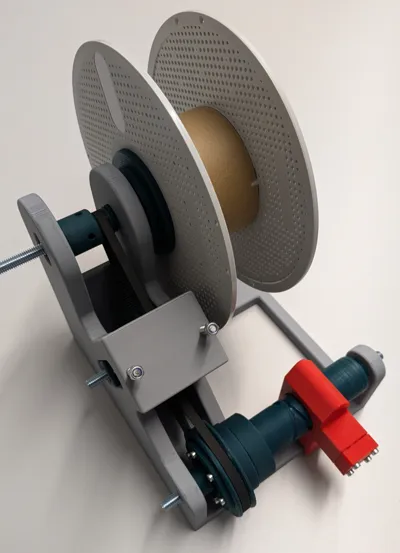
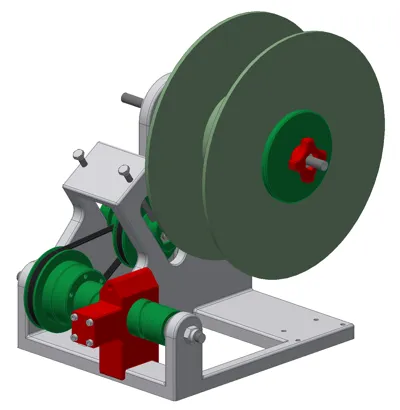
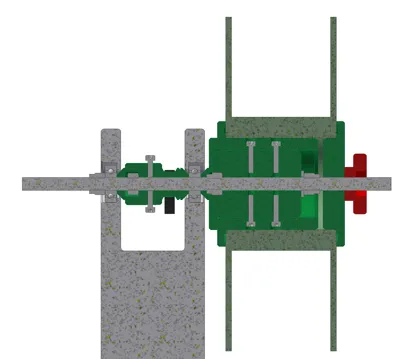
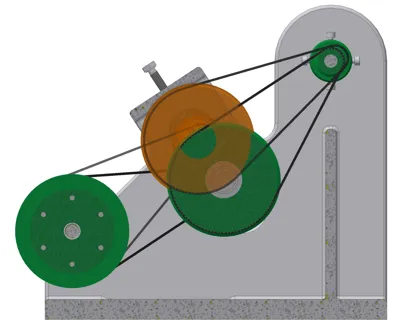
filament winder with belts

Print Profile(1)

All
P1S
P1P
H2S
H2C
X1 Carbon
X1
H2D
X1E
A1
P2S
H2D Pro
X2D
A2L

0.2mm layer, 3 walls, 30% infill, partially supports
Designer
19.5 h
4 plates
5.0(9)

Open in Bambu Studio
Boost
114
253
42
36
329
79
Released 

Bill of Materials

Maker's Supply Kits and Parts
Select all
608ZZ P5 Steel (2PCS) - EA028
List other parts
  • Gewindestange x 1: DIN976 M8x200
  • Gewindestange x 1: DIN976 M8x220
  • Mutter x 2: DIN934 M8
  • Sicherungsmutter x 8: DIN985 M8
  • Zylinderkopfschraube x 16: DIN912 M3x10
  • Zylinderkopfschraube x 8: DIN912 M3x16
  • Zylinderkopfschraube x 6: DIN912 M3x40
  • Sechskantschraube x 1: DIN933 M8x70
  • Gewindestange x 2: DIN976 M5x70
  • Sicherungsmutter x 4: DIN985 M5
  • Kugellager x 8: 608-2RSR
  • Zahnriemen x 2: GT2-B=6mm-L=320mm
  • Unterlegscheibe x 1: DIN9021 M8
  • Einschmelzmutter x 24: RUTHEXM3x7

Description

Content has been automatically translated.
Show original

I looked at several Filament Spool Rewinders online, but none of them really satisfied me. There were several reasons:

  • On almost all of them, the drive shaft breaks because it is printed
  • many winders do not use ball bearings
  • almost all winders rely on gear transmissions that sometimes do not run properly

That's why I modeled and printed the winder myself

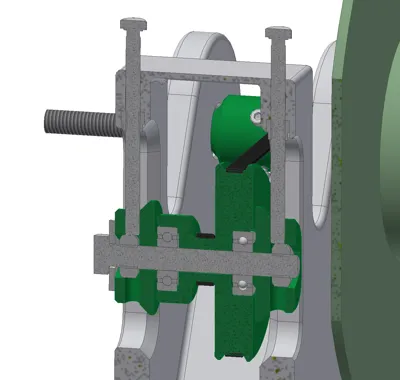
Instead of gears, I use GT2 timing belts. The Bambu Lab spool has an inner width of approx 57mm, subtracting 1x filament diameter leaves approx 55mm winding width. For 1.75mm filament, this is about 32 layers side by side in the spool. The timing belts translate the winding roller from 32 revolutions to 2 revolutions on the threaded rod, which moves the filament guide by 55mm. The timing belts can be tensioned via the middle timing belt pulley. "Long" screws must be made from two M5 threaded rods and M5 lock nuts (glue them)

Instead of printed axles, I use M8 threaded rods. The parts on the drive axle with the spool can be fixed to the threaded rod using lock nuts or radial set screws/screws

I have fixed a 40mm diameter spool holder on the threaded rod. For the Bambu Lab spool, I modeled an adapter and a clamping lid that aligns the spool for the movement of the filament guide. Other spools can also be mounted via adapters as needed

The spindle of the filament guide is attached to the last pulley with screws, so an alternative spindle can be mounted if necessary

The pin that runs in the spindle is "pressed" by a compression spring and can also be easily replaced if required

The spool is cantilevered; if necessary, a "support" brace can be mounted at the free end

In the video, you can see the adjustable filament unroller in the background, with which I can also unwind 2.5kg spools

https://makerworld.com/en/models/772498#profileId-708554

Below are pictures showing the assembly order and some links to purchased parts:

Pulley1 Assembly

Pulley3 Assembly

Pulley2 Assembly

Spool Holder Assembly

Install Spool Holder Assembly in Base

Install Pulley2 Assembly in Base

Install Pulley3 Assembly in Base

Install Spool

Tension Belt

Comment & Rating (42)

(0/1000)

Hi ! I am having difficulty understanding how to assemble and what needs to be put in the "red box" to make the worm gear work. Do you or anyone else have an actual photo of the assembly to be made inside the "red box"?
(Edited)
The designer has replied
0
Reply
Hi, in the red box, the printed part "leadscrew pin" (gray in the picture) goes. Take a spring from a ballpoint pen and insert it into the hole of the pin (black line in the picture is the spring). The box is closed with the lid and 4 M3 screws. Green in the picture is the shaft with the leadscrew thread
(Edited)
Show original
1
Reply
Replying to @maot1985 :
Okay, thank you very much, that's very clear now. I'll be able to finish my editing properly !
0
Reply
How is this meant to be with the additional support? With two screws on the base carrier? Then you would always have to remove it for coil replacement
The designer has replied
Show original
0
Reply
The support was modeled as a precaution in case anything on the construction was "too soft". It works as in the video without support
Show original
0
Reply
Boosted
Print Profile
0.2mm layer, 3 walls, 30% infill, partially supports
One of the most interesting projects printed… perfect and super functional
The profile uploader has replied
Show original
0
Reply
Delighted to see it :-) looks splendid
(Edited)
Show original
1
Reply
you should make and assembly video and maybe link the belt and parts needed ... just a suggestion. this winder has a lot of potential when compared to others.. I'm tempted to print, but don't feel comfortable without a good video tutorial. thanks for the upload.
The designer has replied
4
Reply
Thanks for the feedback :-) It's too late for a video, but I have illustrated the assembly steps and linked the purchased parts
(Edited)
Show original
0
Reply
Do you have a video of you using this?
The designer has replied
1
Reply
Last night I rewound filament from a 2.6 kilo spool I can rewind the rest onto another spool today or tomorrow and then I'll make a video :-)
Show original
0
Reply
Replying to @maot1985 :
Thanks!
0
Reply
Replying to @BrysonC :
I've added a video ;-)
Show original
0
Reply
Looks interesting, the pictures, but it doesn't help me further. Getting a clean print of the parts is not a problem. The assembly could perhaps be managed with the help of the pictures. But then it stops. What do I do with the timing belt. Do I make several belts out of it. How are the open ends connected. Glue, staple? It is indeed an interesting part, but with so little helpful input, I'd rather leave it. I don't want to risk the frustration with the printed parts and the attempt to assemble them properly. Then I wouldn't put it online at all. Unfortunately, I'm just not on the intellectual level to manage the rest needed for a successful build of this interesting part based solely on a handful of pictures. Too bad... Then I'll wait to see if perhaps someone who has managed it shares their knowledge with us simple folks
The designer has replied
Show original
0
Reply
Hi, I'm sorry you're having trouble with the timing belt. I know where it's coming from too. Amazon now has an open belt on offer under the original link. When I uploaded the model, the belts were still listed as the closed version with 320mm on Amazon (as I had ordered them). In itself, I think I have described everything as well as possible with the pictures, they explain what screws/nuts go where and what needs to be assembled one after the other. One picture also shows the timing belt with a length of 320mm, only the note is missing that it must be an endless belt. Unfortunately, I don't have time for a "fancy" general manual in PDF, sorry. Compared to many other spool holders, I focused on robustness and easy printing, and the pictures in the comments also show that it works
(Edited)
Show original
0
Reply
Replying to @maot1985 :
OK, thank you very much for the answer, then I know what I need to look for now. Thanks again. If I manage it, I'll let you know. Best regards.
Show original
0
Reply
Replying to @maot1985 :
OK, nobody can know how many I need of them and in what length. And where will which one be installed. I can't tell where which one goes. sorry....
Show original
0
Reply
This is wayyy too advanced for me to wrap my non engineering brain around, but after watching your youtube video I really really want one. It’s amazing. Can I either pay you for some dumbed down instructions or just to out right build one for me?? i’ll pay you very very well. you sir, are a genius in my eyes. well done.
The designer has replied
1
Reply
Hi, thanks for the praise :-) I have added the assembly steps as pictures and linked the purchased parts
Show original
0
Reply
Replying to @maot1985 :
I just looked through them. It’s incredible. I will attempt to build this. I’ll put the over / under at 4 weeks for it to be completed. ha. wanna make a bet?
0
Reply
This looks good and I am going to give it a try. The only question I have at the moment is how to join these belts?
The designer has replied
0
Reply
You have to mount the belts e.g. on the first and last axis. When you mount the middle axis, just pust the belts over the middle gear.
0
Reply
dumb question, do you need two of these to respool? I see in the video you are using 2 units
The designer has replied
0
Reply
Foolish inquiries do not exist; one simply requires but a single instance. In the background, a Filament Spool Rewinder of my own creation is discernible (https://makerworld.com/en/models/772498-adjustable-spool-rewinder#profileId-708554)
Show original
1
Reply
Replying to @maot1985 :
thank you
0
Reply
what is a mutter. is that a nut?
The designer has replied
0
Reply
Yes, a mutter is a hexagonal nut
Show original
1
Reply
ok thank you
0
Reply