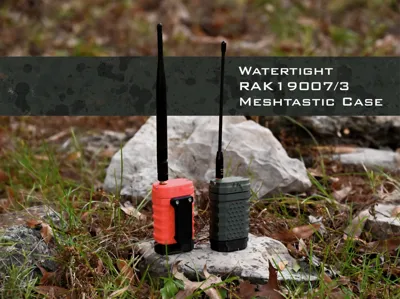
Watertight Rak19007/3 Meshtastic Case w/ Switch


Print Profile(1)

Description
This is designed as an attempt to be a watertight radio case for the RAK WisBlock 19007 and 19003 series Meshtastic radios starter kits (with 2000mah battery) with room for GPS board and antenna and an externally accessible power switch. I've attached the blend files, the stls and the 3mf file. There are two options for the cap, depending on the external antenna count. If using a square ceramic GPS antenna, there's plenty of room in the single external antenna design to adhere the gps to the cap.
I'm using 4 o-rings in this design, all 1/16th in diameter. One on the top for the cap, a smaller one around the port access at the bottom, and then two small ones (or one per antenna) to go around antenna threads under the washers.
UPDATE: There's an option now for printable TPU gaskets attached in the 11/14/24 update.
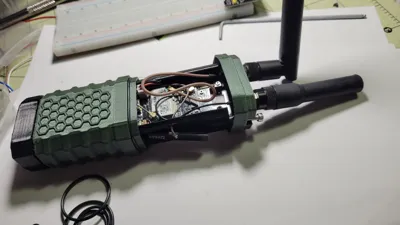
To install all of this, the battery goes into the internal frame upside down. The cable will go through the large opening in the frame, and against the slot side that the battery connector will be on. Use the screws included with the RAK starter kit to install your board, but don't hook up your power until you've attached your antenna(s). Use the recess on the side to place your bluetooth antenna (the one labeled BLE) and slide the antenna cable for it through the hole and plug it onto the board. There's a hex recess in the lid to capture the antenna mount. Secure your antenna mounts, install antennas, plug them onto your board and plug in the battery. Slide the whole thing into the case, aligning the internal frame grooves (they are two different sizes to prevent switch and charging port misalignment) with the case grooves The bluetooth antenna, if it's not adhered in place, likes to catch on the body when sliding in. Slot it all together and secure the cap with two m3 socket cap screws.
UPDATE: If using the battery switch, I used the SPDT Chonzon Micro switches available here: https://www.amazon.com/dp/B09R3Y6MMN?ref=ppx_yo2ov_dt_b_fed_asin_title. Slot it into the hole in the base as pictured. Cut your battery wire at a point where the battery is slid up a little bit in the frame, giving you room to work. Once the switch is soldered, neither it nor the battery can leave this internal frame unless you break it out or desolder it. Solder your battery to the central post. You will most likely need a short stretch of thin gauge wire to patch from the switch, back to the wire attached to the plug. Solder it to the left most plug as pictured, then install as described above.
To install the Belt Clip: Use two m3 nuts inside the external shell, and use (2) m3 socket screws to tighten it in place.
When printing the case, the outer shell and upper lid will need supports. I use tree supports on the lid, but regular supports on the body and that works well. I print in PETG for higher durability outdoors.
Comments, questions, feedback welcome. I wouldn't submerge this case, but I'm pretty confident with it in just rain and outdoors moisture in general.
11/5/24 Update:
1) Move antenna ports slightly towards the wall. A few antennas were rubbing on the board and this made room for them.
2) Thickened the lid wall slightly. Sometimes a print would be good, sometimes it would be too thin and have a hole. Was most likely a printer issue but nonetheless.
3) Added a corner to the internal grooves that the insert and the body align on. This will ideally prevent misalignment of the USB port during assembly.
11/14/24 Update:
Lot of big, positive changes on this one. Don't forsee needing to update this again in the future unless a component goes missing or such.
1) Added a lip to the middle of the internal frame, making it easier to pull it out.
2) Added a second option for the bottom charging cap, something a little more designed looking. Less plain.
3) The internal groove didn't work as well I wanted, so I just widened it and now it forces a direction.
4) Added a place for an on/off switch in the internal frame and the case. This is located near the charging port and can be accessed by removing the charging cap.
5) Added a belt clip. Clip has recess on the backside to fit orings if desired.
6) The locking action of the charging cap was pretty rough in the first version. Cleaned it up a lot. It's much, much better now.
7. Added an option for TPU gaskets, but Orings are still fine.
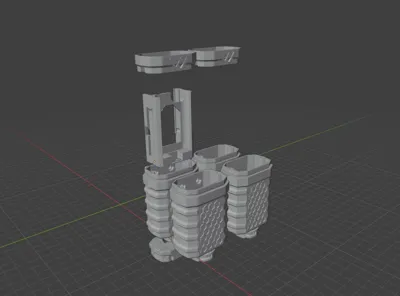
There are now:
- 2 Lid options
- A. 1 external antenna
- B. 2 external antennas
- 1 Internal option. Can be used whether or not you use a switch.
- 4 Body options.
- A. With belt clip holes, with on/off switch port.
- B. No belt clip holes, with on/off switch port.
- C. Belt clip holes, no On/Off switch port.
- D. No belt clip, no On/Off switch port.
- 1 Belt clip.
- 2 Charging caps.
- Basic cap
- Fancy cap (Not super fancy though. Just looks like I tried.)
- TPU Gasket options.
License
You shall not share, sub-license, sell, rent, host, transfer, or distribute in any way the digital or 3D printed versions of this object, nor any other derivative work of this object in its digital or physical format (including - but not limited to - remixes of this object, and hosting on other digital platforms). The objects may not be used without permission in any way whatsoever in which you charge money, or collect fees.
Comment & Rating (87)