Search models, users, collections, and posts

Card Stock Break

Print Profile(1)

All
X1 Carbon
P1S
P1P
X1
X1E
A1
H2D
H2D Pro
H2S
P2S
H2C
X2D
A2L

0.2mm layer, 4 walls, 12.5% infill
Designer
8 h
2 plates
3.0(3)

Open in Bambu Studio
Boost
36
118
12
4
40
19
Released 

Description

In the Maker Universe it is very popular to create stunning Holiday Cards using a Cricut machine. Many of these cards are multi-dimensional and involve the use of several layers of card stock being crafted to produce a truly unique and personal card. One of the areas that make this creation particularly challenging is producing all of the required folds. In the sheet metal industry, the use of a ‘Break’ is standard for producing precise folded patterns out of sheet metal. This model was produced for my wife to help her with that specific task when she is creating a personal holiday or gift card, hopefully it can help others in the same way.

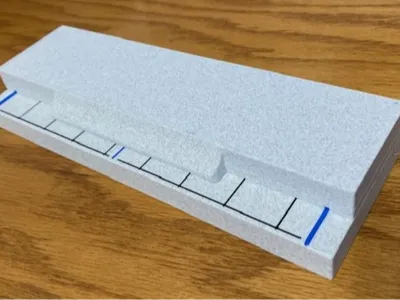
The Card Stock Break:

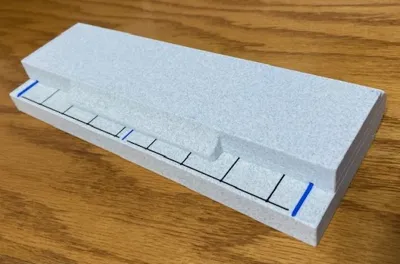
Opened and ready for use:

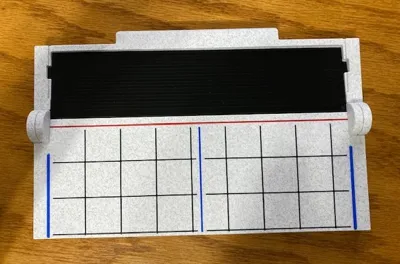
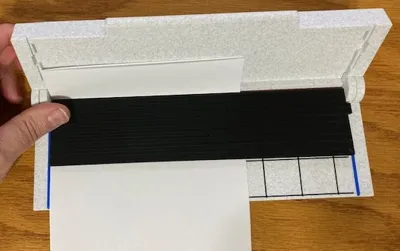
The black plate is used to hold down the card stock and line it up with the bend line:


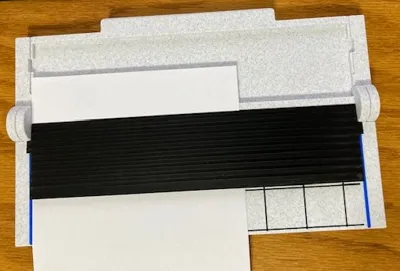
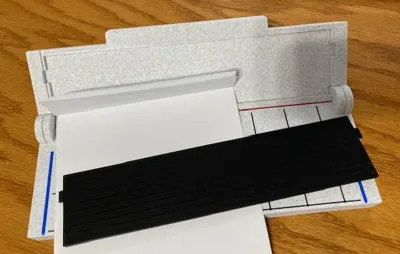
Rotate the top down to create the fold:

The end results:


I used the following colors for this print:

  • Bambu Labs PLA Marble (White)
  • Generic PLA Read – Fold Line
  • Generic PLA Blue – Edge Guides and Centerline (8 ½”)
  • Generic PLA Black – 1” Grid Lines


Comment & Rating (12)

(0/1000)

Print Profile
0.2mm layer, 4 walls, 12.5% infill
print itself went well, but my wife ended up just using the blades instead of the device itself because you can't fully close the thing with a blade installed. also, the second build plate has two blades but you can only store one of them in the device because of where the slots are. these are easy to fix in the model, but they're also obvious and a shame that they weren't addressed before release
The profile uploader has replied
0
Reply
It shouldn’t be necessary to close all the way to score a bend. It wasn’t designed To close all the way for that. The second blade was just an extra and is not required. I’m sorry that you are disappointed with it. I will take a look at the model and see if I can fit the second blade into the cover as suggested. If not, I will remove the second from the build plate. thanks for the review, they are great for improvements.
0
Reply
I think this is why my wife bought me a 3d printer. 🤪
The designer has replied
designer
2
Reply
thanks for the boost!
0
Reply
It printed very nice looking but I cant get the hinges to break free to be able to close it. I can even get a knife between all the gaps but it's really stuck together someplace. I even cracked the bottom piece trying to get it to release. It's just PLA.
The designer has replied
0
Reply
When it prints, there will be a small area under each hinge pin that needs to be snapped free. Try to rotate each hinge, one at a time to free it up. Put your thumb on the seam and rotate the halves just enough to snap it free.
0
Reply
Replying to @GrumpBucket :
I got it. I placed the curved part of the hinges on the edge of a table and very gently tapped it with a mallet. They broke free and now it works perfectly. I did crack the back a little trying to get it to release, but not enough that it shows or effects it's function. Wife loves it!
0
Reply
When we printed out the file and tried to separate the two pieces (the lid from the base), the clips on the sides broke and we could not get them to go together. Would it be too much to ask if you could please separate the two pieces a little and then we could assemble? Or, if we have done something wrong, please feel free to let me know. Thank you so much for all that the people in this group do.
(Edited)
The designer has replied
0
Reply
Hello, I am sorry that you are having trouble with this. The design is supposed to be a print-in-place model that does not need to be separated. When printing the 'pins' for the joints there is a small area that has support material but for all the prints that I made, I could put my thumbs on the hinge area and then rotate the lid vary slowly until that support material broke free. After that the hinges worked freely. What filament material are you using? It also may be a good idea to allow the print to cool off and let the plastic to harden before trying to operate the hinges. Please let me know if you continue to have issues with this and I can try to make some adjustments. I printed with PLA Matte (white marble) and never had an issue with the hinges breaking, I printed this many times making modifications.
0
Reply
Print Profile
0.2mm layer, 4 walls, 12.5% infill
Other Issues:The piece got stuck in the area that was supposed to rotate
The profile uploader has replied
Show original
0
Reply
Yo do have to be a little forceful to break the hinges free. Try freeing one side at a time. After they are free, it should operate well.
0
Reply
Boosted
Print Profile
0.2mm layer, 4 walls, 12.5% infill
0
Reply
No more

License

This user content is licensed under a Standard Digital File License.

You shall not share, sub-license, sell, rent, host, transfer, or distribute in any way the digital or 3D printed versions of this object, nor any other derivative work of this object in its digital or physical format (including - but not limited to - remixes of this object, and hosting on other digital platforms). The objects may not be used without permission in any way whatsoever in which you charge money, or collect fees.