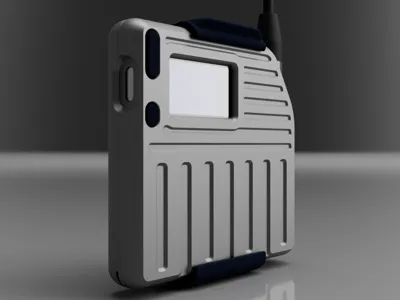
Heltec T114 Slim Pro Case

Print Profile(2)


Description
Commercial Use and Attribution Notice:
© by Alley Cat and Majestic AV, LLC. is licensed under CC BY-SA 4.0.
Commercial use of this design, including promotional use, selling, and reselling to other businesses for sale, is permitted under the following conditions: Prior to any commercial exploitation, you must contact Alley Cat or MajesticAV, LLC to ensure proper attribution. This requirement extends to any sharing, distribution, or creation of derivative works, including manually crafted designs that emulate this design. Proper attribution must be clearly stated in all instances of use. For official contact methods and further information, visit Majestic AV, LLC - Alley Cat. Any other sources are unauthorized and should not be used for commercial or licensing inquiries.
Disclosure: Some links on this page may be Amazon affiliate links. If you make a purchase through them, I may earn a small commission — at no extra cost to you. I only recommend gear I trust and use myself. Thanks for your support!
Description:
Custom case for the Heltec T114. No hardware needed unless you want to use the Baofeng style clip which requires M2.5 nuts or heat set inserts and M2.5x5mm screws. Here are links to the parts I used:
MakerNova Branded Gizont Antenna
Will not fit an antenna with bigger than 11mm base
I personally do not sell anything, but you can order these from a couple of sellers online. I am not affiliated with these stores and do not make any money from them.
I haven't had a chance to make a video for this one yet, so for now just use my other Heltec video for assembly instructions, it's almost exactly the same. You DO NOT need to remove the plastic screen and button cover in the T114.
Assembly Video:
Suggested Print Settings:
Material: PLA+ or PETG
Nozzle: 0.4mm
Extrusion Width 0.4mm
Layer Height: 0.2mm
Perimeters: 3
Infill: 20%
Top/Bottom Layers: 5
Support Material: None
3D Printing Disclaimer:
Thank you for downloading my CAD design! I want to assure you that extensive testing and iteration went into creating this design. However, please keep in mind that 3D printing involves a wide range of variables, including different types of filament, printer settings, and calibration levels. These factors can significantly impact the final print.
Before concluding that the design is flawed, I encourage you to:
• Check your printer calibration: Ensure your printer is properly calibrated. Especially filament shrinkage.
• Adjust print settings: Try changing the print settings to achieve better results.
• Resize the model: Scaling the model up or down slightly may resolve fit issues.
Remember, these are development boards and sometimes have very fragile parts. If you encounter any issues or need assistance, please feel free to reach out to me. I am here to help and can provide guidance to achieve the best results. Claiming a design is bad without considering these variables does a disservice to the community and may discourage others from trying a design that could work perfectly with minor adjustments.
Thank you for your understanding and cooperation. Happy printing!
Comment & Rating (73)