Search models, users, collections, and posts

Chinese Dragon_Dragon Soaring Nine Five

Print Profile(4)

All
P1S
P1P
X1
X1 Carbon
X1E
A1
H2D
H2D Pro
H2S
P2S
H2C
X2D
A2L
A1 mini

0.16mm layer, 2 walls, 15% infill
Designer
32.8 h
3 plates
4.4(25)

0.16mm layer, 2 walls, 15% infill
Designer
20.3 h
2 plates
4.3(10)

0.2mm layer, 2 walls, 15% infill
Designer
54 min
1 plate
4.5(2)

0.2mm layer, 2 walls, 15% infill
Designer
9.9 h
1 plate
4.3(8)

Open in Bambu Studio
Boost
1367
2894
105
68
2.1 k
359
Released 

Description

Content has been automatically translated.
Show original

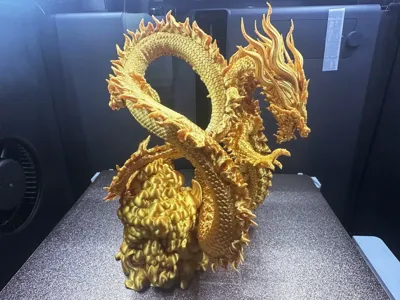
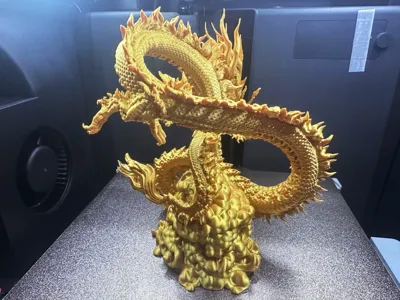
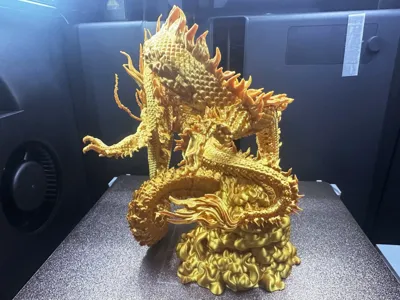
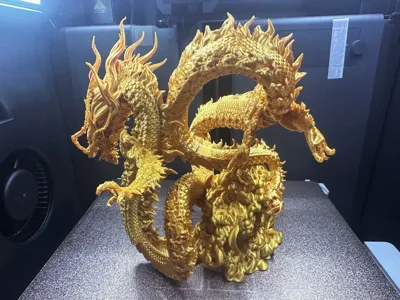
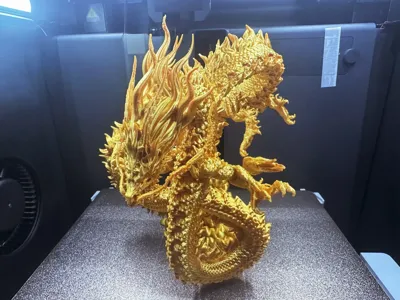
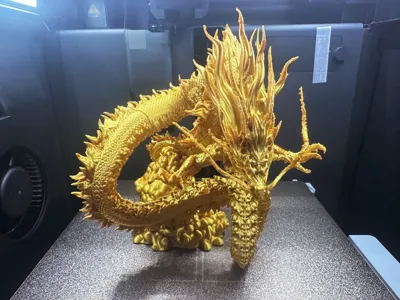
Dragon Soaring Through the Clouds

  • I have always wanted to print a dragon with a dynamic and exaggerated tension, and after much deliberation, I decided to take on the challenge.

    This creation can serve as a Feng Shui ornament. The featured printing material is Tianrui Silk Gold PLA, with a layer height of 0.16-0.2, tree-like supports combined with a tree structure, a threshold of 25, and a raft of 10.The support removal difficulty is four stars, and it has been pre-sliced into separate parts.

    Configuration 1: Enlarged version, excellent results, easier support removal compared to the original version, but with a longer printing time.

    Configuration 2: For those short on time, you can download the optimized version with enhanced support adhesion for the smallest size (be patient when removing supports, use the peeling method for small structures).

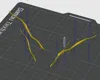
    Configuration 3: The whiskers are separated into a separate part.(If the whisker print is not ideal, you can try cutting them off and printing them separately to reattach them)

    Configuration 4: Uploaded the uncut version of the whole model according to user requirements (requires you to design your own supports to challenge one-piece printing).

    Please adjust the material temperature to suit your own printer before printing. For any questions, you can first discuss in the comments section. Welcome all bigwigs to share your print results and comments! Thank you all!


  • The size can be scaled for printing based on your personal preference,I recommend using PLA material, which will result in a more delicate finish!
  • You can print with the default settings, but those with higher requirements can fine-tune it themselves. Please enable "Only Support Key Areas" in the support settings. Please enable "Only Support Key Areas" in the support settings. Please enable "Only Support Key Areas" in the support settings.
  • Personal experience: When removing supports, always remember to use your skills to remove them in the direction you need. Be sure to first cut off the part of the support that is far away from the contact surface, leaving just enough for the pliers to open to the optimal extent. This allows you to perfectly clamp the pliers onto the topmost layer of the support that is closest to the model, using the pliers to roll and tear. This can greatly increase the chances of rolling up the layer of support to be removed. Remember to adjust your hand position, be patient, and proceed step-by-step.

Boost Me (for free)

If you like my content, please give me a boost with a rocket! Your support is my motivation to create more content! Thank you!!!


  • 3D Printing Tips and Preparation Notes

  • (All the models published by this account have been tested and printed, and can adapt to all machine models. Before printing, you need to check if the printer and materials are working properly. If you encounter any problems that cannot be resolved, please feel free to send me a private message, and I will do my best to help!
  • Note:
  • If you encounter any problems, you can go to theReference Learning Area: Print Quality and Troubleshooting | Bambu Lab Wiki
  • Ensure that the printer plate is clean. It is recommended to wipe it with 95% medical alcohol after each print to ensure stable print quality and prevent crashes. This is because any oil left behind from touching the print plate after printing will significantly reduce adhesion, and any small debris or residue from previous prints will also affect the first layer print quality, thereby reducing the yield rate.
  • Pay attention to drying your materials (PLA generally does not need to be dried, as it has a good moisture resistance). This will greatly affect your print quality and printing experience! Materials that have been sitting for a long time will inevitably absorb moisture, and if stringing or spaghetti occurs, you need to consult the seller for drying parameters and printing parameters to adjust them. Most sellers' materials are not dried when they leave the factory, so you can pre-dry them if possible, and the print results will be better.
  • Choosing the right printing material. PLA is usually chosen for appearance parts, while PEGT is usually chosen for structural parts. Both of these materials are relatively affordable and have almost no toxic gas emissions. (For health reasons, it is best to have an air purifier running)
  • When using materials from a new manufacturer, it is recommended to calibrate the material flow rate immediately after the first print and adjust the calibration coefficient. This will greatly affect your printing quality and is a necessary process for making new materials adapt to your printer.
  • If you encounter problems such as a sudden decrease in print quality and low yield rate, check if the nozzle is clogged, check if the printer is placed stably (it's safer to place it directly on the ground) and you can also try recalibrating the printer.
  • Print at the speed recommended in the model description. Overhang quality, the number of model faces and print speed are directly related, a suitable speed (too fast or too slow is not good) will allow more time for the material to cool and solidify during deposition.
  • Set the hotbed and nozzle temperature appropriately depending on the material. Too high or too low temperature can lead to warping, layer deformities, or adhesion problems, affecting print quality and success rate. For users with P1S or higher models, if the temperature inside the user chamber exceeds 35 degrees Celsius, be sure to open the glass door of the machine body.

Comment & Rating (105)

(0/1000)

This is an absolutely gorgeous model!! my parts print it out beautifully. I set it at a 0.12 mm layer height. I figured for such a large project that I will be displaying, I might as well go for maximum quality, even if it adds a few hours to each plate. I was excited to get started with a brand new roll of filament, and so I didn't properly dry it, which is why I imagine the tree support failed on my first run with the head portion, which resulted in a spaghetti face. no worries, I pushed forward and printed the rest of the plates, and when I got home today I was met with a perfect version of the head and front claws. removing supports was time consuming, but not too difficult. I only lost one claw and part of a whisker. I can glue those back on. now I'm just waiting for my weld-on 16 glue so I can assemble the model. I used GEEETECH Metal Shine Gold PLA. Great work, and thanks so much to the creator for all the hard work and wonderful details!! 😁🙏
The designer has replied
designer
5
Reply
can I ask what glue/method/products you used to join the parts? i was going to use Weld-on 16, but now i see how toxic it is, and i don't want to use it in my house. I don't have good ventilation, and it's winter so I can't do it outside. Thanks Again!! 😁🤙🏻
0
Reply
Thank you very much for your download and support, thank you for uploading such a successful printing display, thank you for patiently waiting for the fruit to ripen, thank you for daring to strive for a four-star rating, haha Thank you for not being like some other users who give me a bad review without looking for the cause of printing failure There are generally two types of messy prints that occur during printing 1 Our printing plate has too much oil or dust on it (I usually wipe camera lenses with chamois and 95% medical alcohol, which works great) 2 Our filament is damp I have separately uploaded the dragon beard, you can try printing the dragon beard separately, this can optimize the model's expressiveness I will try my best to arrange better support for complex models Thank you for your understanding of the printing difficulty of my content
Show original
1
Reply
Replying to @WillpowerFPV :
I use a welding quick-drying glue called "502". I used it to modify and weld Bandai's Gundam models and to connect light-cured split parts. It also has a pungent smell. Generally, this type of glue is best placed in a ventilated place outdoors for a while after welding.
1
Reply
This was by far the most challenging print I’ve tackled to date. If I attempt this model again, I’ll definitely need to fine-tune the support settings. A significant portion of the dragon broke during cleanup, and the hands were completely encased in supports. Additionally, the print profile caused excessive stringing near the end of the piece, so there’s plenty of room for experimentation and improvement. Normally, I would give this print a lower rating, but I understand the complexity of the model. In the future, I might try printing it on my resin printer for better results. On a fun note, I didn’t reference the original pose when assembling the dragon, and somehow ended up with a completely unique pose! Everything fit together seamlessly, and the base mounted perfectly, so it’s safe to say there’s more than one way to piece this model together. Overall Rating: • Quality: 9/10 • Difficulty: 8/10 • Print Profile: 5/10 Final Score: 7/10
designer
3
Reply
this turned out amazing! I did mine in parts on the mini. looks great, but I like yours better..😉
designer
2
Reply
Replying to @WillpowerFPV :
How big is this?
1
Reply
Replying to @user_116539628 :
the dragon is approximately 175 mm tall. I printed mine is pieces and connected the parts with 5 min 2 part epoxy. 🙂
0
Reply
So I find the model superb I printed it in Polyterra PLA Starlight Nebula I have the last plate currently printing however it's a shame indeed the supports in too fragile places e.g. claws and often you can't really distinguish the supports or where they are located but I loved printing it
The designer has replied
Show original
designer
1
Reply
Thank you very much for your acknowledgment. Many factors in the printing process (machine model, temperature, consumables, etc.) will lead to a certain probability of failure (especially the support, I do not know if your palm support collapsed during the printing process or if it was due to temperature causing uneven filament extrusion)
Show original
0
Reply
Furthermore, since the selected color for the support is consistent with the color of the printed content, you must pay attention to the structure when removing the support Visual errors will occur and must be carefully identified, or additional professional support materials can be used I would prefer to try reprinting a single failed part once
Show original
0
Reply
Replying to @RicoolChen :
Not all prints were perfect
Show original
0
Reply
The first plate is ready. The printing went quite smoothly, apart from the whiskers which don't look too good. The supports are unfortunately a pain in the ass :) but after thirty minutes of struggle I managed it. To be continued...
The designer has replied
1
Reply
Hello! Brother! Thank you for your support for the content I posted! In terms of support, the faucet area support is easy to fall over. I did not see this during the printing process. It may be that the grease on my hands was rubbed onto the printing plate during the removal process, resulting in a decrease in adhesion. You can try to clean the board or wipe it with 95% medical alcohol. At the same time, you can use the simplest way of adding skirts to increase the adhesion area. You can increase the skirt data to 30-50.
0
Reply
Hi! Bro! I have separated the dragon whiskers separately. If you need, you can cut off the bad ones, print the separate dragon whiskers and stick them on.
1
Reply
The reason the nozzle rubbed against the support was because the layer warped during printing, and the nozzle rubbed back and forth, causing it to warp more and more, so I had to pour it down. It is recommended to adjust the retraction lift (1-2mm is acceptable, the nozzle will automatically lift after each print), this retraction setting is available in both the filament and the printer. You can choose either one, it's the same, Filament Settings -> Parameter Override -> Retraction -> Lift when retracting
Show original
0
Reply
A1, plate 1, 0.08mm layer, 50% speed, fully applied glue, 28 degree room temperature, 40 percent humidity, with silk gold, this section failed 5 times, supports were changed from hollow to cross, but it still got knocked off It felt like silk gold couldn't print this It failed over 10 times, but finally, regardless of cost, with 0.08mm layer, normal supports, grid, Z-axis distance 0.2, and fully applied glue, it could be printed successfully
(Edited)
The designer has replied
Show original
designer
1
Reply
0.08 is to big use 0.04 or 0.02
0
Reply
The reason the nozzle rubbed against the support was because the layer warped during printing, and the nozzle rubbed back and forth, causing it to warp more and more, so I had to pour it down. It is recommended to adjust the retraction lift (1-2mm is acceptable, the nozzle will automatically lift after each print), this retraction setting is available in both the filament and the printer. You can choose either one, it's the same, Filament Settings -> Parameter Override -> Retraction -> Lift when retracting
Show original
0
Reply
Print Profile
0.16mm layer, 2 walls, 15% infill
I cannot recommend this model. I tried it a few times and had problems with support and the design itself. Don't try to print with Bambu PLA Silk. I tried it, and it worked with Bambu PLA Silk+, but I lost a lot of filament. However, visually, it's nice.
(Edited)
The profile uploader has replied
profile
1
Reply
The reason the nozzle rubbed against the support was because the layer warped during printing, and the nozzle rubbed back and forth, causing it to warp more and more, so I had to pour it down. It is recommended to adjust the retraction lift (1-2mm is acceptable, the nozzle will automatically lift after each print), this retraction setting is available in both the filament and the printer. You can choose either one, it's the same, Filament Settings -> Parameter Override -> Retraction -> Lift when retracting
Show original
0
Reply
Boosted
I am currently printing this in dual colour silk will upload a photo when done I do agree supports are painful to remove but worth it unfortunately I did lose part of the whiskers in removal so clipped them shorter to match 🤣dual colour is a bit tricky but what do you think
(Edited)
designer
2
Reply
In short, this model for me turned out amazing for the end result. I used anycubic silk multicolour filament on my anycubic kobra 3 max with 0.2 layer height and 6 percent infill and it looks magnificent however it was my mistake that I decided to print all of the model in one go. As a result, the was a lot of supports and it took me a good 1 and a half hour to remove them and some parts broke meaning I had to also glue them back on. I recommend to print in multiple parts and I recommend you try this print and do not print in one go with supports if you are a beginner, I am not so I count myself lucky! Deffo recommend the creator and all credit to them!
1
Reply
This is how the dragon looks after being professionally painted.
designer
1
Reply
Boosted
I really enjoyed printing this model, thank you!
designer
1
Reply

License

This user content is licensed under a Standard Digital File License.

You shall not share, sub-license, sell, rent, host, transfer, or distribute in any way the digital or 3D printed versions of this object, nor any other derivative work of this object in its digital or physical format (including - but not limited to - remixes of this object, and hosting on other digital platforms). The objects may not be used without permission in any way whatsoever in which you charge money, or collect fees.