Search models, users, collections, and posts

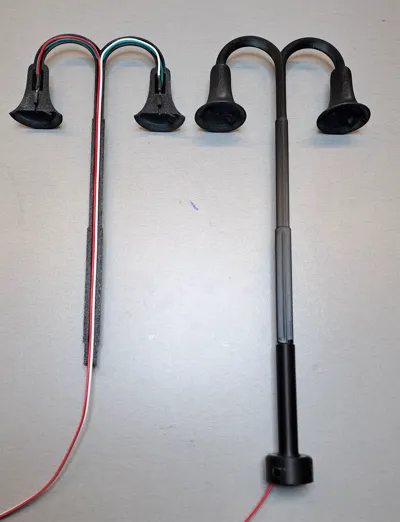
Train station lamp M1:22,5 M1:24

Print Profile(1)

All
P1S
X1E
X1
P1P
H2D Pro
H2D
H2C
A1
P2S
X1 Carbon
H2S
X2D
A2L

0.16mm layer, 3 walls, 15% infill
Designer
6.3 h
3 plates
4.9(16)

Open in Bambu Studio
Boost
175
395
27
15
342
102
Released 

Description

The model is designed in scale 1:22.5–1:24 and is suitable for garden railways.


Station lamp model. Attention! Manual skill is required to complete the lamp! Also basic knowledge of electronics.
The lamp was printed from ASA material -I haven't tried PETG, but I believe it will print without problems. The cover glass is made of PETG material. If you use a good material for printing, it is possible to choose a layer thickness of 0.12 mm. For lamp printing always use: Brim.
Edges need to be trimmed/cleaned after printing is complete. Watch the assembly and gluing procedure on the video. The basic wiring diagram is shown in the picture. If you have a different voltage, you need to change the value of the resistor. If you don't know how to connect, write to me.


Adjust the number of parts to print as needed. In the printing profile, printing of all parts for two types of lamps is set.


Necessary accessories (Use similar parts):
 

LED 5mm warm white 8500mcD, 3100K, 8500mcd, 20mA, 3,1V (type)

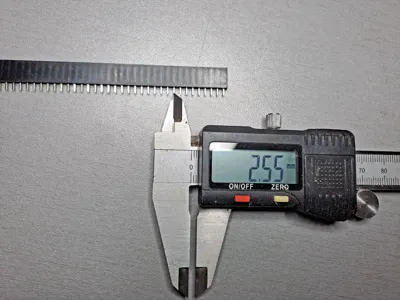
Socket 2.54mm Pitch (type)

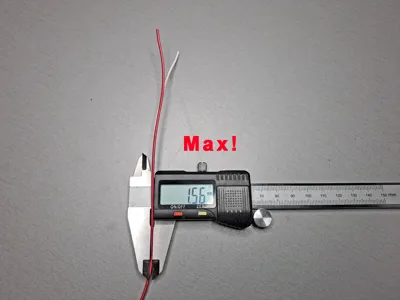
cables AWG 22 or smaller (type)


Documentation (2)

Assembly Guide (2)
009.jpg
010.jpg

Comment & Rating (27)

(0/1000)

Boosted
Print Profile
0.16mm layer, 3 walls, 15% infill
I have printed several lamps so far Unfortunately, I am still missing the transparent PETG, which is currently on its way However, the lamps were printed in matte black PLA They have now been painted dark green
Show original
profile
1
Reply
Print Profile
0.16mm layer, 3 walls, 15% infill
With a little bit of modeling putty, a bit of sanding and grey primer it came out beautifully!
0
Reply
Print Profile
0.16mm layer, 3 walls, 15% infill
profile
1
Reply
wow tell me how you is the brick work? 👌
The designer has replied
designer
1
Reply
I used mosaic stone tiles, separated the individual colored pieces, and then placed and glued them one by one to create the platform surface. It took some time, but I like the result. ;-)
0
Reply
These are very nice lamps! Is it possible to also upload the two-sided lamp as a Step file? Unfortunately, there is only the 3mf file available for it. That would help me a lot. Thanks :)
The designer has replied
Show original
designer
1
Reply
Thanks for the hint I didn't even notice that I hadn't published the STEP file I have since corrected it 😉
Show original
1
Reply
I love the lamps, and I love that platform with them... Do you have a link to the platform for printing? Thank you :)
The designer has replied
designer
1
Reply
Thanks! I’m really glad you like the lamps. The platform you see in the photos isn’t 3D printed though — it’s actually real stone tiles glued down on my garden railway. So there’s no printable file for it. 🙂
0
Reply
Fits perfectly with my garden railway
Show original
designer
1
Reply
Print Profile
0.16mm layer, 3 walls, 15% infill
Fresh off the printer! The details on this model are insane!
profile
1
Reply
Print Profile
0.16mm layer, 3 walls, 15% infill
Great, I had to cut it because I only own an A1 mini
Show original
profile
1
Reply
Print Profile
0.16mm layer, 3 walls, 15% infill
does not speak the scale
Show original
profile
1
Reply

License

This user content is licensed under a Standard Digital File License.

You shall not share, sub-license, sell, rent, host, transfer, or distribute in any way the digital or 3D printed versions of this object, nor any other derivative work of this object in its digital or physical format (including - but not limited to - remixes of this object, and hosting on other digital platforms). The objects may not be used without permission in any way whatsoever in which you charge money, or collect fees.