Chess pawn mold / International Chess Pawn Mold


Print Profile(1)

Description
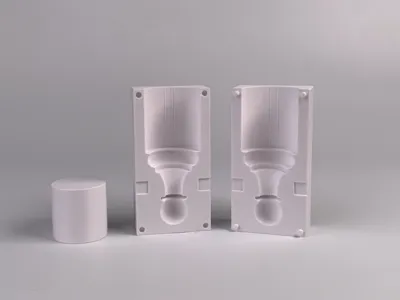
This is a mold designed to recycle 3D printing waste material (PLA) to create a chess pawn, printed using PETG. It can recycle 15g of PLA at a time. (It can also be used to recycle 11g of HDPE bottle caps.)
Required Tools:
- Oven
- 3M respirator
- Silicone baking tray
- Three 4-inch G-clamps
- M3 25mm screw (used as an ejection pin)
- Flathead screwdriver
- Hammer
Production Process:
- Place 15g of PLA into the oven and heat it to 210°C for about 10 minutes.
- Lock the mold tightly using the G-clamps.
- Pour the melted plastic into the mold, insert the piston, and press down firmly (for about 15 seconds).
- After approximately 5 minutes, open the mold using the flathead screwdriver, and use the M3 screw as an ejection pin to release the mold.
- Remove any excess material and sand down the base.
This is a mold designed to recycle 3D printing waste material (PLA) to create a chess pawn, printed using PETG. It can recycle 15g of PLA at a time. (It can also be used to recycle 11 grams of HDPE bottle caps.)
Required tools:
Oven, 3M respirator, silicone baking tray, three 4-inch G-clamps, M3 25mm screw (one, used as an ejection pin), flathead screwdriver, hammer.
Production process:
1, Place 15 grams of PLA into the oven, heat it to 210°C for about 10 minutes.
2, Secure the mold with the G-clamps.
3, Pour the melted plastic into the mold, insert the piston, and press down firmly (for about 15 seconds).
4, After approximately 5 minutes, open the mold using the flathead screwdriver, and use the M3 screw as an ejection pin to release the mold.
5, Remove any excess material and sand down the base.
License
You shall not share, sub-license, sell, rent, host, transfer, or distribute in any way the digital or 3D printed versions of this object, nor any other derivative work of this object in its digital or physical format (including - but not limited to - remixes of this object, and hosting on other digital platforms). The objects may not be used without permission in any way whatsoever in which you charge money, or collect fees.
Comment & Rating (37)