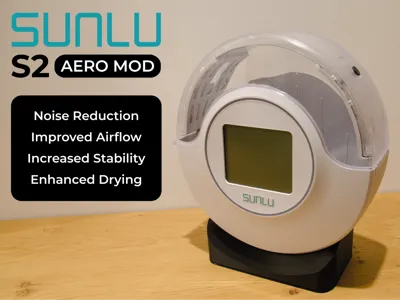
Search models, users, collections, and posts

SUNLU S2 Aero Mod

Print Profile(2)

All
A1 mini
P1S
P1P
X1
X1 Carbon
X1E
A1
H2D
H2D Pro
H2S
P2S
H2C
X2D
A2L

PLA 0.12mm layer, TPU 0.2mm layer
Designer
21.2 h
5 plates
4.8(31)

0.2mm layer, 2 walls, 10% infill only 2 plate
19.5 h
2 plates
5.0(10)

Open in Bambu Studio
Boost
272
796
100
68
612
198
ReleasedĀ 

Description

Boost Me (for free)

Love this model? Give it a boost! šŸš€ Your support helps fuel more amazing creations. Thank you!

NOTE: The mod is only compatible with the version of SUNLU S2 equipped with a fan.
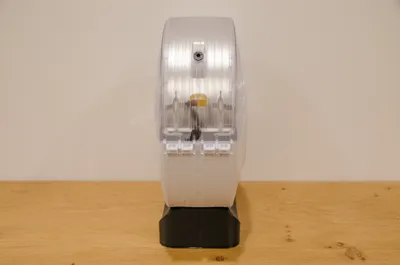
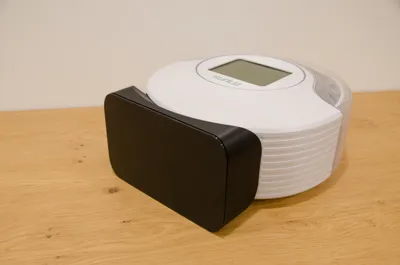
 

THE AERO MOD


The Mod is intended to:

  • Reduce noise.
  • Improve airflow.
  • Increase the dryer stability.
  • Enhance drying performance using desiccant in the right place.
  • Not increase the footprint.
  • Be appealing from an aesthetic point of view.
  • Be reversible and minimally invasive.
  • Be printed in PLA and TPU on an 18x18 cm print bed (compatible with Bambu Lab A1 mini) without AMS.
  • Facilitate the filament movement within the PTFE tube during printing.

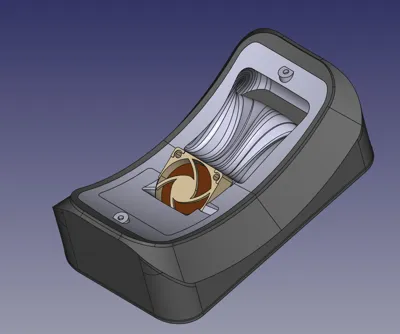
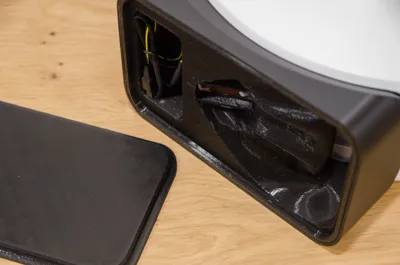
The mod includes the following components:

  • Rigid shell (PLA). The 3D model has a vertical notch so that the seam line is ā€œniceā€ and straight.
  • Inner body (95A TPU)
  • Upper support for the fan (TPU 95A)
  • Bottom lid (TPU 95A)
  • Hole cap (TPU 95A)
  • PTFE Tube adapter (TPU 95A)


MATERIAL


Required materials:

No other material is needed, as the original mounting screws are reused and the cables are already included in the fan kit.


WHY TPU?


Although TPU is not the easiest material to print with, it was selected for the following reasons:

  • It allows parts to be sealed together naturally, preventing air leaks and having a simpler design.
  • It is resistant to the temperature generated by the dryer.
  • It absorbs vibrations and reduces the device noise.
  • It allows a good level of grip between the dryer and the support surface.
  • Can be printed by almost all modern printers.


INSTRUCTIONS

  • Print all parts paying particular attention to:
    • dry the TPU filament properly
    • print the TPU with low flow/speed
    • use the type of plate suggested for each model in the Bambu Studio file if possible
    • use glue to avoid excessive adhesion of TPU on the smooth plate

BASE

  • Remove the base of the dryer. The screws will be used later.
  • Cut the fan wires, ensuring that you leave enough length to easily connect the new fan. This is the only step that is not completely reversible, although you can always re-solder the wires to restore the original functionality. I do not take any responsibility for any damage caused to the device.
  • Take the extension cable included in the fan package, cut the connector on the power supply side, remove the outer sleeve and all the wires from the remaining connector except the yellow and the black one. Now solder the wires to those that were previously connected to the old fan (black to black and yellow to red). Make sure to insulate the connections properly.
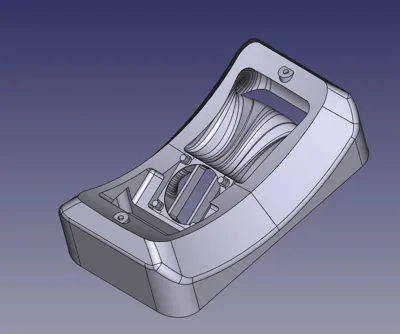
  • Place the outer shell over the inner body.
  • Push the fan into the slot so that the wires are pointing downwards in the cable cavity and air is blown upwards (as shown in the photos)
  • Position the fan top support, taking care to insert the extension cable in the side slot.
  • Attach the inner body to the dryer using the original mounting screws. Ensure that the fan is oriented correctly and that the shell seam line is positioned at the rear (hinge side).
  • Plug the fan to the extension cable. At this stage or later you can decide to insert the silent cable in between (not suggested). This reduces the noise slightly, but affects the airflow as it reduces the speed of the fan.
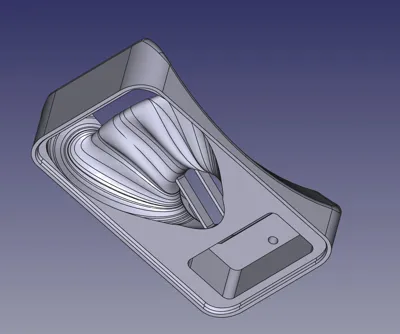
  • Now you can insert a silica bag inside the air channel. The shape of the cavity is designed so that there is always a minimal airflow. In any case, place the silica correctly so as not to occlude the channel too much.
  • Press the entire dryer over the bottom lid to close the base.
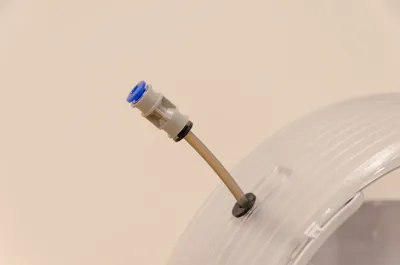
TUBE ADAPTER

  • Insert the tube adapter into the rear hole (recommended). The design is asymmetrical so that the filament can move in the PTFE tube with a better angle. Rotate the adapter to achieve the optimal tube orientation. If you have a small piece of PTFE tube and a connector, you can attach them to the adapter. This way you can easily and quickly connect/disconnect the dryer to the PTFE tube of the printer.

HOLE CAP

  • Insert the cap into the remaining hole only when the dryer is turned off to prevent moist air entering from outside.


MAINTENANCE


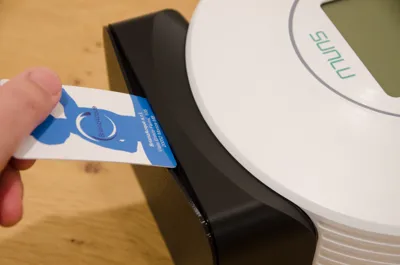
Make sure to replace the silica regularly. To access the inner cavity, insert a plastic card (credit card size) between the base and the lid as shown in the photos.


Enjoy your super dryer and happy printing!

Comment & Rating (100)

(0/1000)

Boosted
Print Profile
PLA 0.12mm layer, TPU 0.2mm layer
It also works with the fanless version. I took the power from the power socket, but a better option is to use the heated bed – it switches on together with the heating and turns off after the set time. I printed both main parts in PETG, and only the bottom closing piece in TPU. The parts fit together nicely. The fan is 24V, but I added a step-down converter and set it to 14V so the fan makes less noise. There’s plenty of space underneath.
profile
5
Reply
Hello, have you tried taking the power from one of the 2 resistors? I tried but it didn't work, I don't know the reason honestly... I was forced to take the power from the input 24V
(Edited)
Show original
0
Reply
Boosted
Replying to @EmmeVproject :
Hi. I’m powering it from the 24V supply input, just like in the first photo. I was thinking about modifying it and taking power from the heating element instead, because with the current setup the fan runs all the time. Ideally, the fan should only turn on when heating/drying starts, and switch off once the cycle is finished. I’ll let you know if it works for me.
0
Reply
Replying to @Dr.Lama :
I was asking if it worked for you because I initially drew power from the resistor, but it wouldn't power the fan. The voltage fluctuated wildly... even though the resistor was starting to heat up, I was forced to draw power from the input connector, like you did. But as you well know, this configuration isn't ideal for the reasons you mentioned. I don't know if it's just my problem or the type of fan (it's the same one you have). If you try this, please keep me updated. Thanks, and have a good day.
0
Reply
Print Profile
PLA 0.12mm layer, TPU 0.2mm layer
Very nice! I haven't got the rewiring done yet but prints look and fit really well. I added a slight fuzzy skin to the PLA part to give it a similar textured look as the dryer.
The profile uploader has replied
profile
5
Reply
Well done! Great texture!
0
Reply
Print Profile
0.2mm layer, 2 walls, 10% infill only 2 plate
I printed all parts in PETG HF, except for the bottom plate, which I made in TPU. A great upgrade overall – and the fan is no longer annoying.
4
Reply
This is a great mod. Thank you! The humidity level inside registers down to 15% now. I've never seen lower than 18% previously. The model is beautifully designed. I'm not 100% convinced that it needs TPU for the guts but I used TPU as suggested and it does work great. Everything fits perfectly and I can see the design work that was put into this. Thank you again for sharing. Minor review/comments: It is *by far* the most silent that I've (n)ever heard the S2. As always, Noctua fans really shine in a role like this. There is a slight noise that isn't "fan noise". It's more like the sound of air rushing through a cylinder, which kind of is what's happening. Regardless, it's so much better than the cheap, rattling side blower fan that Sunlu includes with the stock S2. I think there might still be some very minor air leakage where the new base meets the bottom of the S2. I'm thinking about adding some VHB tape insulation around the rim where they join. But, really, I'm speculating and nitpicking. I'll run it as Ko designed it for a few weeks and see how I feel then. I skipped the soldering and just used Wago wire connectors. This makes it easier if I want to mod something later. There is plenty of room in the wire compartment to fit everything. I am trying to figure out the purpose of the two "fins" that are directly under the fan on the large TPU base. They don't seem to support anything. As noted in the mod's description, Noctua fans are quite weak and it seems like anything in the path of the airflow should be removed. What is their purpose? I am considering cutting them out with cutters. All said... Really great design! Thank you for sharing with the community. For anyone else reading this who is sick of how loud the S2 is and couldn't find a good mod, or didn't have their own time to create their own custom mod, this is the one we've been waiting for.
The designer has replied
2
Reply
Thank you for your comment! I have not experienced any leakage noise in my model. Please check that it is not due to a problem with the cable interacting in the assembly or airflow. The fins have been inserted to prevent silica bags from coming into contact with the fan and blocking it. They do not create any problems as the upper channel has a much lower flow volume than the lower channel (without silica). Thanks again for your precious feedback!
(Edited)
1
Reply
Boosted
Print Profile
PLA 0.12mm layer, TPU 0.2mm layer
Don't laugh at me, I had to plug a TPU hole that I made pulling off the supports!Everything fits together, the tolerances are perfect. I cut out both of the grids because I preferred to put a big silica bin in the spool compartment. Thank you for this model!
Show original
profile
2
Reply
Inner part made of ASA, outer part made of PLA, base cover made of TPU. Works perfectly!
Show original
designer
1
Reply
First off, I really like your design but may I ask if you can share step files. As I'd like to reroute the power plug position to the short side of your base. I'm in the process of adding a bowden tube down and around below the bottom heater to exit at the bottom of the hinge side, free up having to feed the filament through the lid (much easier loading and unloading of filament for my set up that is)
The designer has replied
0
Reply
Thank you. I'm sorry, but I don't intend to share the STEP files. In any case, running the tube too close to the heater is bad for the filament, which could reach excessively high temperatures. I strongly advise against it.
1
Reply
Thanks for this, it's a great design and a definate improvement on the standard setup.
designer
1
Reply
Very interesting. This will improve the drying significantly. I cheated mine already with a different power supply. If you bump up the voltage from 24 to 27 you get 60watts instead of 46ish. Which i had trouble to get to 70 degrees before. i swapped the fan already to draw in. Now it gets to 70 quickly and i can reach down to 12% humidity. Going to print this soon and will get back to you how it works with higher voltage.
designer
6
Reply
Print Profile
PLA 0.12mm layer, TPU 0.2mm layer
Excellent conversion
Show original
profile
1
Reply

License

This user content is licensed under a Standard Digital File License.

You shall not share, sub-license, sell, rent, host, transfer, or distribute in any way the digital or 3D printed versions of this object, nor any other derivative work of this object in its digital or physical format (including - but not limited to - remixes of this object, and hosting on other digital platforms). The objects may not be used without permission in any way whatsoever in which you charge money, or collect fees.