Downlighter Ceiling Hole Liner


Print Profile(10)


Description
I was installing some downlights in my kitchen and wanted to avoid what i have seen at other houses, whereby over the years, the removal and reinsertion of the downlighters to replace bulbs damaged the ceiling and caused chunks of the plasterboard/drywall to come loose, eventually meaning it has to be repaired and repainted. The damage is caused by removing down lighters for bulb changes and redecorating due to the large springs used to hold the fitting close to the ceiling as these remove chunks of delicate plasterboard every time they are pulled downwards to release the light
This model was designed to reinforce new undamaged cut outs in the ceilings. It was designed to require no access to the ceiling space, fitted through the cut out to protect the topside of the ceiling. The model is not visible from below and do not protrude through the cut out, therefore allowing the flush fitting of any standard downlighter.
Pre-Install Considerations
I have designed the model to scale easily and have released versions that accomodate downlighters in 65mm, 70mm, 75mm, 80mm & 85mm as these were the most popular range of sizes that i could find.
The frame does add some thickness to your hole requirements, but i have tried to make this easy. For example, your downlights require a 65mm hole, then with the frame, you simply add 5mm, so you'll need to make a 70mm hole. For whatever size you need, simply add 5mm to find the hole size you'd need to put into the ceiling.
The protectors are offered in 9.5 or 12.5mm depths which should accomodate most thicknesses of plasterboard/drywall.
How To Install
If you have access to the ceiling, do it from above as you may as well.
- Simply add a small amount of adhesive/decorators caulk to the underside of the large ring and press down so the large ring is sat flat against the ceiling and the “tube” pokes through the plasterboard into the room where the light fixture will be.
If you don't have access to the ceiling:
- As before, Simply add a small amount of adhesive/decorators caulk to the underside of the large ring
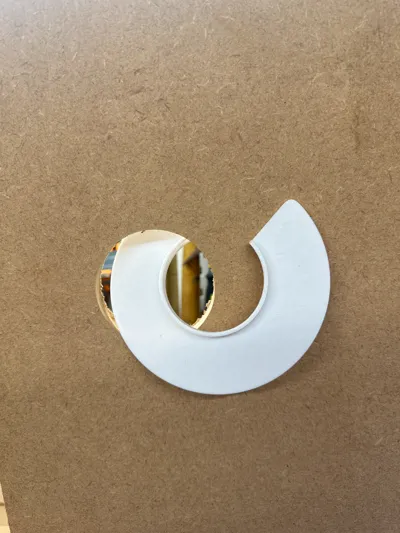
- Grab the protector ring and flex it using the cutout, it's a little weird to explain, but put one end of this into the hole and kind-of spiral it into the ceiling space. There is a picture explaining this in the gallery.
- Finally, reposition it so the “tube” pokes through the plasterboard into the room where the light fixture will be.
- Pull down to seal the adhesive to the plasterboard and the protector ring.
I do not have any photos of me installing these in the ceiling, but i have added to pictures showing them installed in a MDF board as an example.
License
You shall not share, sub-license, sell, rent, host, transfer, or distribute in any way the digital or 3D printed versions of this object, nor any other derivative work of this object in its digital or physical format (including - but not limited to - remixes of this object, and hosting on other digital platforms). The objects may not be used without permission in any way whatsoever in which you charge money, or collect fees.
Comment & Rating (4)