Search models, users, collections, and posts
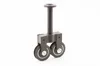
Filament Guide for IKEA LACK Table (with bearings)
IP Report


Print Profile(1)
0.16mm layer, 2 walls, 15% infill
Designer
3.3 h
3 plates
Open in Bambu Studio
Boost
66
135
0
3
73
0
Released
Description
Summary
I improved my own version of the filament guide for the IKEA Lack table.
NOTE: All parts (V1, V2, V3) are compatible between each other. It is your choice which one to take.
This one has two rolls to guide the filament sideways. This prevents the filament from getting stuck at the end of the filament guide (particularly while printing large objects at a certain height).
This one is for 1.75 mm and also 3.00 mm filament at the time. Let me know if you need other diameters, then I will build them for you. There is also 1 version to add a 4 mm PTFE Tube now!
Which parts to print?
- Pick ONE from each folder that suits your needs the best!
- For example guides for different filemant diameters (1.75 mm oder 3 mm)
- Or Rollers with a rounded or conic shape
- All parts are fully compatible with eachother!
Mounting Instructions:
- PRINT THE PARTS AS THEY ARE ORIENTATED IN STL-FILES!
- First stick the filament guide into a hole in the table (drill 10 mm diameter hole in the table top)
- Then add the "nut" (make sure the larger ends point left and right! If not, losen the nut, turn the filament guide a bit and then tighten the nut again)
- Place the two rolls on the 608-bearings
- Stick the two 608-bearing onto the plate and place the plate on the nuts
- Screw the plate onto the nut. You can use any screws that will fit through the hole.I use plastic-screws, but you can also drill bigger holes and take metric screws for example. If you want be to design this for metric srews, let me know in the comments.
License
This user content is licensed under a
Creative Commons Attribution-Noncommercial
Comment & Rating (0)