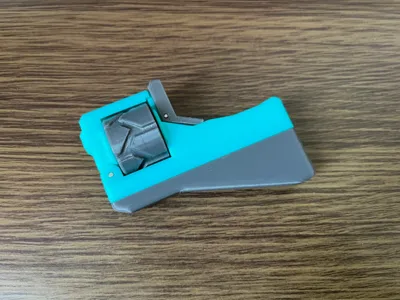
Webley Revolver Dice Pusher with Magnets


Print Profile(1)
Description
A revolver dice magnetic pusher designed after the Webley-Fosbery Automatic Revolver.

Boost Me (for free)
If you think this model is pretty good, please feel free to boost me, thank you very much!
Non-printable items required:
| Name | Countersunk dowel pin | Dowel pin | Dowel pin | Dowel pin | Strong magnet |
| Specifications | 3mm diameter, 25mm length | 2mm diameter, 12mm length | 1.5mm diameter, 12mm length | 1.5mm diameter, 6mm length | 4mm diameter, 2mm thickness |
| Quantity | 1 | 2 | 1 | 2 | 8 |

Optional accessories: Teflon tape (width 15mm, thickness no more than 0.2mm, length about 80mm)
Attaching Teflon tape makes sliding smoother, but it's not necessary.
Printing instructions:
You can print in different colors according to the introduction image or the printing configuration, or you can match the colors according to your preferences.


Supports: The revolver and the latch need to add supports when printing (supports are already added in the print configuration), use manual tree-shaped supports, draw supports using the support filling tool in the locations shown in the figure below, where the revolver needs to draw supports on the six overhanging surfaces of the slide.


Multi-color printing: The dots on the bullets can be printed in multiple colors using AMS, paused color changing printing, or printed in single color and then colored with a marker pen. The color changing positions for AMS multi-color printing and paused color changing printing are the top two layers. AMS multi-color printing uses a height range for coloring. Pauses the print G-code before the last two layers for paused color changing printing.

Other settings: When printing bullets, choosing random seams can make the bullets load more smoothly. Choosing Arachne for wall generator can make the dots get better printing effect.

Installation instructions:
Install magnets: Use glue like 502 to stick magnets to the magnet positions. Pay attention to the magnetic poles: The magnetic poles of the three on the slider side are the same, the magnetic poles of the three on the base side are the same, the slider and the base attract each other; the base and the latch repel each other.

Use a countersunk dowel pin to connect the revolver and the revolver seat, pay attention to the direction of the revolver.

Use the corresponding dowel pins to fix the base and the latch, the revolver seat and the base, and finally insert the dowel pin on the slider as a limit pin (if you have prepared Teflon tape, please paste the Teflon tape first and trim the four corners and dig a hole).

吸 the slider to the base, pay attention to the front and back direction, finally load the bullet and you are done.

License
You shall not share, sub-license, sell, rent, host, transfer, or distribute in any way the digital or 3D printed versions of this object, nor any other derivative work of this object in its digital or physical format (including - but not limited to - remixes of this object, and hosting on other digital platforms). The objects may not be used without permission in any way whatsoever in which you charge money, or collect fees.
Comment & Rating (2)