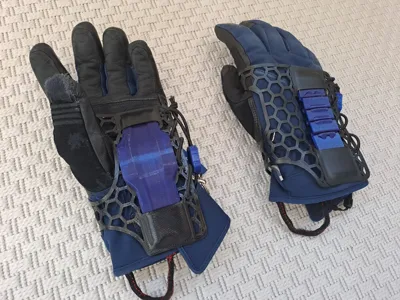
Snowboard wrist protection


Print Profile(4)


Description
This are some wrist protections to use over your gloves for sport practice, namely snowboard, but can also be used for skating or anything similar. They can be very useful:
- Will protect your hands, and mainly wrists, from direct impact and extreme torsion when falling hands first into the floor
- Easy to use, they don't require you to take them out when removing your gloves
- "Hands free", as they stay strapped to your gloves, so one less thing to grab
- Pretty comfortable when wearing due to TPU elasticity
- Cheap in terms of filament
- Can be scaled to better fit your hands/gloves
Now obviously, and as a disclaimer: these protections are not certified. So you have to use them at your own risk.
Nevertheless, I hope they might be of good use for your and help keep your wrists secure from injuries. At least for me, they already helped in some nasty falls.
Enjoy!
Motivation
I started snowboarding a couple years ago and was warned by friends that one of the most common beginner injuries is braking your wrists, as you tend to instinctively open your hands to protect yourself when falling face first.
At the time I bought some cheap skate wrist guards, which did the job, but had some caveats:
- To remove the gloves I needed to remove them first
- After removing them it was one more thing I needed to grab
- They where not designed to be used over snow gloves, so they where tight and uncomfortable
- It blocked too much the motion range of my hands for my taste
Thus, I decided to try and print some protections myself using a similar design.
I had been looking for a good excuse to experiment with TPU printing and this was it!
Materials
So, for this print you will need some TPU95 for the flexible parts and PLA or other rigid filament for the actual protection parts.
To tie everything together I used some elastic cord as you can see in the assembly video.
The cord has about 3.5mm diameter and 2 meters of cord should be more than enough.
The elastic cord is probably the best option is terms of elasticity, friction and durability, however I decided to add an STL of a cord if you wish to print it instead in TPU. I believe it will work just fine as well.
Before Printing
I included a PDF file which contains a drawing of the TPU glove. You can use this to quickly print in a sheet of paper, cut around the outer borders and experiment by wrapping it around your hand with the glove on to understand if you will need to scale the parts to better fit your hand size.
Printing
I highly suggest you print everything using a 0.6 mm nozzle. The thicker walls will make everything stronger and more resistant to bending. Also for TPU the increased nozzle size can be helpful to avoid clogging.
For the same reasons I also suggest you print slowly to improve the layer adhesion as much as possible.
Despite this recommendation, I also added 0.4 nozzle print profiles as I know not everyone has bigger nozzles.
Now, as you can see in the assembly video, the TPU part has some pockets to insert and hold the PLA protections.
As you may know, TPU supports are painfully hard to remove, and also TPU is far from the best filament to bridge accurately. So, in order to print this, you will have to print and manually insert some custom supports I prepared and included in the files.
In the print profile for the PLA parts you will see these pieces. Print them first.
The TPU print profiles have a Pause command just before the start of Layer 8. You should use this pause to insert the supports into the correct positions as pictured below. Make sure they are correctly placed and press them down if needed. Pay attention when resuming print to make sure the nozzle doesn't hit the supports and creates some mess, ruining the print. I highly suggest you print slowly so you can intervene if necessary.


I do not own an AMS so maybe all this trouble could be avoided by using one, however I also read it does not deal well with TPU filaments, so I'll leave that experimentation to any adventurous soul who wish to try it.
As you will notice all the PLA protections are printed standing on their sides. This is to make sure they can be as strong as possible and the impact forces are spread along the layer directions.
The back protection is supposed to bend up to a certain point, to make sure you have enough room to naturally bend your hands backwards but still offering some level of protection.
Post Printing
Follow the assembly video at the end to see how to fit everything together.
The lace locks are optional and can be used to help keeping the stretch cords somewhat tight if you don't wish to have them completely loose.
I decided to design them as a single piece to avoid cumbersome supports and to make the spring mechanism as strong as possible. So instead the required supports are included as part of the design, therefore after printing you will need to cut and/or pry them out with some pliers as pictured bellow.
After removing these bits, push on the sides until the remaining minimal supports break inside and the spring become free.
After this I suggest you use some small flat screwdriver to try to scrap off any little bits that might be left and scrap against the spring, interfering with its movement.

Documentation (1)
License
You shall not share, sub-license, sell, rent, host, transfer, or distribute in any way the digital or 3D printed versions of this object, nor any other derivative work of this object in its digital or physical format (including - but not limited to - remixes of this object, and hosting on other digital platforms). The objects may not be used without permission in any way whatsoever in which you charge money, or collect fees.
Comment & Rating (14)