Search models, users, collections, and posts

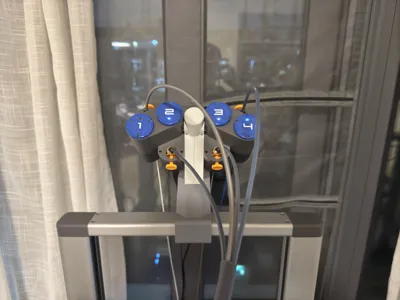
Top-mounted AMS Lite A1

Remixed by

Print Profile(4)

All
A1
P1S
P1P
X1 Carbon
X1E
X1
H2D
H2D Pro
H2S
P2S
H2C
X2D
A2L
A1 mini

v1.1
v1.1
Designer
7.1 h
2 plates
5.0(94)

v1.0
v1.0
Designer
7.3 h
2 plates
5.0(5)

0.16mm layer, 3 walls, 15% infill
35 min
1 plate
4.9(8)

0.2mm layer, 2 walls, 15% infill
2.5 h
1 plate
5.0(1)

Open in Bambu Studio
Boost
475
1155
172
180
1.2 k
690
Released 

Bill of Materials

Maker's Supply Kits and Parts
Select all
M3x20 SHCS Machine Screw (10PCS) - AA040

Description

This 3D-printed model is designed specifically for the Bambu Lab A1 AMS Lite and supports top-mount installation. I modified the original design from Brandon Li , to address the arrangement of the feeder units. The original model arranged the four units in a reverse 4-3-2-1 order, which made adjusting material colors in the software less intuitive. I redesigned the mount interface and increased the model’s height to prevent the feeder units from conflicting with the top mount bracket. Now, the feeder units can be arranged in a straightforward 1-2-3-4 order, making the process much easier to manage.


The AMS Lite used 4 screws to secure the feeder units, but the original design reduced this to 2, which raised concerns about stability. To address this, I restored the use of 4 screws for securing the feeder units, ensuring a more stable and secure fit.


Additionally, the chamber in this model is larger than in the original, allowing more internal space for cable routing, though this requires slightly more material to print. My model includes only the chamber, lock, screw, and the normal numbers cup(optional). The Top Mount Bracket can be downloaded from the Original Design, and my model is fully compatible with it. If you’ve already printed the original model, you’ll only need to print two more chambers. The lock, screw and Top Mount Bracket do not need to be reprinted.


Screw Specifications:

  • 5x M3*20 screws: 2 for securing the Top Mount Bracket, 3 for securing the chamber. M3*16 also fits.
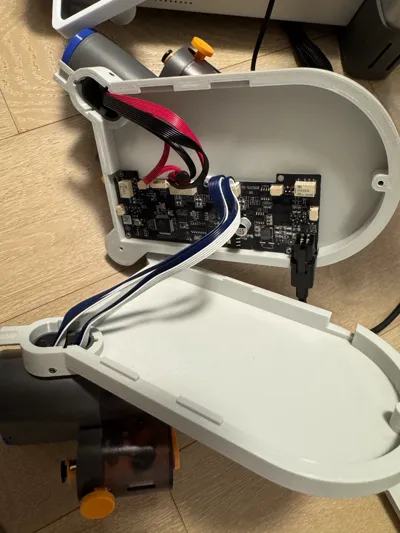
  • 3x M2*6 screws: For securing the AMS Lite motherboard using the screws already attached to the motherboard—no extra purchase required.
  • 4x BT2x5 screws: For securing the feeder units using the original screws—no extra purchase required.

Refer to the images for guidance on motherboard wiring to help with the installation process.

How to Remove the AMS Feeder Units

How to Disassemble the AMS lite Main Body


---------------------------------------------------------------------------V1.1---------------------------------------------------------------------------

Suggestion from @user_4234308418. Move the feeder units back a bit to increase the distance from the tool head.

I've updated two chambers and the lock to v1.1. You’ll need to print these three items. Everything else remains unchanged and is compatible with the original design.

Boost Me (for free)

Comment & Rating (172)

(0/1000)

Boosted
Print Profile
v1.1
Worked out well. Thanks.
profile
5
Reply
bro can you share what are those that covers your ams ptfe tubes from tool head? looks cool!
0
Reply
Boosted
Replying to @waypoint18 :
Its the diamond back chain from here. https://makerworld.com/en/models/780999#profileId-718099
(Edited)
2
Reply
this is exactly the setup I would like with the poly maker drybox system to ! great work 😉
0
Reply
perfetto!!
The designer has replied
2
Reply
But where can I find the bottom part that attaches to the printer
Show original
0
Reply
Replying to @Eathon_Tao :
Tnk
0
Reply
Thank you for your work Unfortunately I only saw the remix now and will print it because of the securing with two screws The only thing that still bothers me is the cable at the back Once it gets caught or pulled too hard and the AMS board is broken Can't we install some kind of protection?
(Edited)
Show original
4
Reply
Print Profile
v1.1
Printed in Petg-cf as it was loaded at the time, excellent edit with more room for electronics!
0
Reply
Hello, where did you get those PTFE rear AMS fittings?
(Edited)
Show original
0
Reply
Replying to @Lululu :
Just search "Ams Lite Ptfe" and pick the ones to match whatever fittings you have handy or access to. These are to suit pc-4-m10.
0
Reply
But where can I find the bottom part that attaches to the printer
Show original
0
Reply
I wanted to thank you for your work; everything went perfectly, truly a fantastic job. Thank you again!
2
Reply
Boosted
Print Profile
v1.1
Thanks. Great.
1
Reply
how to you like this set up. I’m thinking of doing this print to connect the pi 4 creality dryer. so curious how you like it ?
0
Reply
Print Profile
v1.1
Absolutely magnificent! I adore it! And with the split 2-tube Bowden, it's incredibly convenient to have 5 spools mounted! I adore it!
Show original
1
Reply
how does 2 tube Bowden work?
0
Reply
Boosted
Nice enhancement of a very beautiful design. The AMS Lite is usefull but bulky, this retains the functionality but bring modularity to a next level. Hooked up my dryboxes directly to the AMS by PTFE. Now the filament is protected from start to end.
1
Reply
But where can I find the bottom part that attaches to the printer
Show original
0
Reply
Boosted
Well done thanks
1
Reply
Print Profile
v1.1
Looks great in marble, thanks!
1
Reply