Pocket Sized Tiny RC Aliens APC


Print Profile(1)

Description
Thanks for checking out my model! Interested in supporting my work or selling prints?
Support Crew – Show some love and help keep the projects flowing
Galactic Maker Foundry – Sell physical prints of my original designs
Foundry License+ – Sell prints and use my photos for listings
🎉 Supporter-only Discord coming soon – get early access, tips, and sneak peeks!
Membership
Join here to support or get a license
Inspired by the iconic APC from the movie Aliens, this 3D-printed RC Tiny APC brings the thrill of sci-fi to life! Featuring tank-style movement with skid steering, this model is designed for hobbyists who love remote-controlled vehicles with a touch of cinematic flair. Built around easily sourced parts, it uses continuous rotation servos to drive each side's wheels, offering precision movement. Whether you're a fan of Aliens or just want to build something unique, this APC is perfect for any enthusiast with basic RC knowledge.
The APC is controlled using an ELRS transmitter and receiver setup, powered by a 2S 550mAh LiPo battery (or 18350 Li-ion cells for a smaller form factor). Its modular design and clever use of magnets make assembly a breeze, while the skid steering allows it to handle like a tank. With a few tools and standard RC components, you’ll be driving this mini APC across any terrain in no time!
Bill of Materials (BOM):
- Electronics:
- Servos: 2x MG90 or SG90 360-degree continuous rotation servos
- Receiver: 1x HappyModel EP1 ELRS receiver (running PWM firmware)
- Transmitter: 1x ELRS-capable transmitter (e.g., FrSky X-Lite with HappyModel ELRS TX module)
- Voltage Regulator: 5V, 1A minimum (DC-DC step-down)
- Battery: 1x 2S 550mAh LiPo or 2x 18350 Li-ion cells (alternative power option)
- XT30 Female Connector
- Hardware:
- Bearings: 4x 8x12x3.5mm bearings (or substitute with printed bushings)
- Magnets: 10x 10mm x 1mm round magnets
- Screws:
- Servo mounting screws (included with servos)
- Wheel screws (included with servos)
- Wiring and Soldering Supplies:
- Assorted wire (for power connections and servo/receiver connections)
- Solder and soldering iron
- Heat shrink tubing (optional, for clean wiring)
- Adhesives:
- CA glue (for securing servos, magnets, and parts)
- Optional Accessories:
- Elastic bands (for extra traction on servo-driven wheels)
Assembly Instructions:
- Print all parts:
Ensure you have all your parts printed and ready to go before starting. The APC is designed to fit 8x12x3.5 bearings, but you can substitute printed bushings if needed. - Install bearings & axles:
Fit the bearings into the designated slots for the non-driven axles. Use nuts to secure the axles in place. - Assemble the wheels:
Attach the wheels to the servos using the screws provided with the servos. This makes it easier to handle them later when inserting the servos into the APC body. - Install servos in APC body:
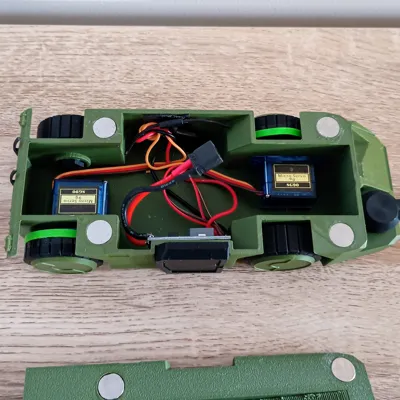
Push the wheels onto the servos and remove to make it easier to put on later, then place the servos into the APC body. Align the servo spindles opposite the center hole on the other side, ensuring proper positioning. Secure the servos with CA glue or similar adhesive, then attach the wheels with the provided servos screws. The wheel hub caps should friction fit into place. - Wiring:
- Solder the servo and receiver wires to the output side of the 5V regulator. A helpful tip: strip the wire, twist the three wires together, then tin them before soldering.
- Solder the female XT30 connector to the input side of the regulator. Be mindful of polarity: the XT30 plug should have + and - markings to guide you.
- Tidy up the wires:
Keep your wiring neat inside the body to prevent interference. Once the wiring is secured, glue the magnets in place (10mm x 1mm magnets).- Front slots (top body): 1 magnet per slot
- Rear slots (top body): 4 magnets
- Bottom front slots: 4 magnets each
- Bottom rear slots: 1 magnet each
Ensure proper polarity when installing the magnets to allow the APC to snap together correctly.
- Attach extra parts:
Add the APC's door, cannon, and other details using CA glue. The cannon rail helps join the top and bottom halves of the body—once the glue sets, you can snip the rails close to the seam line for a clean finish. - Bind receiver to transmitter:
Follow your transmitter’s binding process to pair with the receiver. Once bound, your APC is ready for action! Optional: Add rubber bands around the wheels for extra traction. Unless you have soft, grippy TPU, there's little benefit to printing flexible parts.
Final Notes:
This APC is a straightforward build, ideal for fans of both RC and sci-fi. For additional guidance on assembly and setup, feel free to check out other Tink Trak builds for similar techniques and inspiration.
License
You shall not share, sub-license, sell, rent, host, transfer, or distribute in any way the digital or 3D printed versions of this object, nor any other derivative work of this object in its digital or physical format (including - but not limited to - remixes of this object, and hosting on other digital platforms). The objects may not be used without permission in any way whatsoever in which you charge money, or collect fees.
Comment & Rating (5)