the knight chess piece mold / Chess Knight Mold


Print Profile(1)

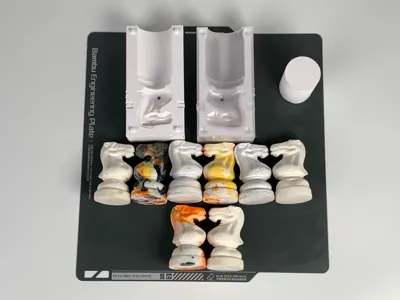
Description
This is a mold designed to recycle 3D printing waste (PLA) into chess knights. It can process 40g of plastic at a time. While PETG can be used to print the mold, its lifespan as a mold is limited. For long-term use, it is recommended to print the mold using high-temperature resistant carbon fiber reinforced materials (such as PET-CF, PA-CF, PPA-CF). I have tested PPA-CF material, and it is very suitable for use as an injection mold, allowing for long-term use without thermal deformation. However, it is expensive.
Tools required: oven, 3M respirator, silicone baking tray, 4-inch G-clamps (3), M4 25mm screw (1, as a demolding ejector pin), flat screwdriver, hammer.
Process:
- Place 40g of PLA in an oven and heat at 210°C for about 15 minutes.
- Secure the mold with G-clamps.
- Pour the melted plastic into the mold, insert the piston, and press down firmly on the piston (for about 30 seconds). (The plastic must be melted to a slightly viscous state for easy molding; otherwise, the melted plastic cannot fully fill the mold.)
- After about 20 minutes, use a flat screwdriver to open the mold and use the M4 screw as an ejector pin to demold.
- Remove burrs and sand the bottom with sandpaper.
This is a mold designed to recycle 3D printing waste (PLA) into chess knights. It can process 40g of plastic at a time. While PETG can be used to print the mold, its lifespan as a mold is limited. For long-term use, it is recommended to print the mold using high-temperature resistant carbon fiber reinforced materials (such as PET-CF, PA-CF, PPA-CF). I have tested PPA-CF material, and it is very suitable for use as an injection mold, allowing for long-term use without thermal deformation. However, it is expensive.
Tools required: oven, 3M respirator, silicone baking tray, 4-inch G-clamps (3), M4 25mm screw (1, as a demolding ejector pin), flat screwdriver, hammer.
Process:
1, Place 40g of PLA in an oven and heat at 210°C for about 15 minutes.
2, Secure the mold with G-clamps.
3, Pour the melted plastic into the mold, insert the piston, and press down firmly on the piston (for about 30 seconds). (The plastic must be melted to a slightly viscous state for easy molding; otherwise, the melted plastic cannot fully fill the mold.)
4, After about 20 minutes, use a flat screwdriver to open the mold and use the M4 screw as an ejector pin to demold.
5, Remove burrs and sand the bottom with sandpaper.
License
You shall not share, sub-license, sell, rent, host, transfer, or distribute in any way the digital or 3D printed versions of this object, nor any other derivative work of this object in its digital or physical format (including - but not limited to - remixes of this object, and hosting on other digital platforms). The objects may not be used without permission in any way whatsoever in which you charge money, or collect fees.
Comment & Rating (11)