Front spool conversion by central filament sensor


Print Profile(1)
Description
Boost Me (for free)
Update 16.03.2024:
A new version (V3) is now available and got slightly changes to fit better into the extrusion. Feedback very much appreciated!
Update 24.02.2024:
A new version with a slotted hole is now available. This allows the position of the sensor to be changed. See last picture.
Update 02/2024:
V2 is now available. This version contains filament clips on both sides! See last picture.
Convert your printer to front spool mounting
Rotate the original spool arm to archieve ergonomic spool change.
Double spool ready
For those who dont want a double spool config, there is a version with holes at left / right - so you can choose your desired side.
For those who don't want to decide at all, there is a holder with a slotted hole. Here you can loosen the screw of the sensor, slide it and screw it tight again. Three predefined positions (left / center / right) are already available.
Supports simple and quick filament change / color change
You can easily and quickly change the filament / color with a second spool holder (I used this one). Meanwhile, you can prepare for the next filament change without having to rush.
Better guidance and tension
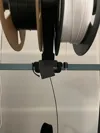
With this holder, you move the filament sensor to the center below the spool holder and thus improve the guidance and tension of the filament compared to the original mount point.
Compatible with all 2020 V-Slot extrusion rails
The holder is specially designed for the following Elegoo models:
Neptune 3 Plus / Max
Neptune 4 Pro / Plus / Max
Neptune 3 (standard & Pro) and 4 (standard) are not compatible as these models do not have 2020 extrusion!
Print
The model is designed to be very accurate / tight. If you have not calibrated your printer, it is better to print the model with +- 1-2% scale.
Print up side down and use supports.
Installation
1) Unscew the original spool arm, the filament sensor and it's brace and keep all scews.
2) Place the holder on the 2020 extrusion and press from above - it snaps into place audibly.
3) Install the original spool arm reversed (pointing in your direction) with the same hex scews
4) Install the filament sensor - No additional screw necessary, simply use the existing one from the filament sensor.
Do you like my work? I would be very happy if you would support my work on Ko-fi.
Differences of the remix compared to the original
- changed dimensions to fit with the reversed original spool arm
- Mount for the 2020 extrusion enhanced in stability
- simplified the whole design to make it more stable
- rounded some edges
- made it possible to attach the filament sensor after installation of the mount
- added filament clips in V2

Comment & Rating (0)