Simplified Filament Winder v4


Print Profile(1)

Description
Support Me (for free)
Give it a boost to make the model better!
Hi everyone! I am meflly, and over the past few months, the universal spool version of the Filament Winder v3 has been loved by many. Thank you for your support! Based on your active feedback, there are still areas where v3 needs to be improved and features that need to be added. To make winding filament enjoyable and convenient for everyone, the v4 version has been released! I will showcase its new improvements so you can quickly use it:
————————————————————————————————————————————————————————————
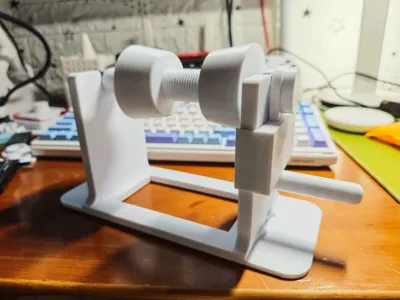
1. Retention of the Universal Spool: It still builds upon the structure improvements of v3. If you find v3 sufficiently convenient but like the new features of v4, you can continue using the v3's latch structure (handle, spool holder) in combination with the new base. This structure greatly optimizes compatibility with spools (50-60mm center hole spools are universally compatible).
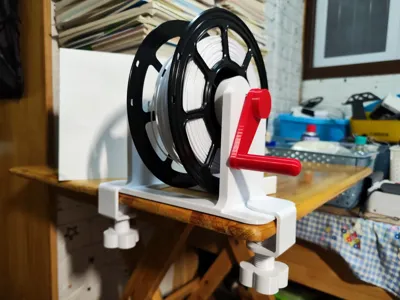
2. Latch Structure Added to the Base: Some friends have reported that the hand-held filament winder or placing it on the table cannot be fixed, leading to difficulties or an unsatisfactory experience during the winding process. Therefore, a latch structure has been added to the base. It can securely fix the base to the table without damaging your table (such as screws, drilling, or extra purchased suction cups), making your filament winding operation convenient, as shown in the cover image.
The latch has been adapted for tables of different thicknesses: The latch is 35mm in height overall, and after adding the clamp (3mm), it can fix tables with a thickness of 32mm. The latch is squeezed against the table from both sides using a spiral mechanism to ensure fixation. Therefore, please pay attention to the introduction of structural strength issues below, which is very important!
The latch is adapted for multiple scenarios: Two orientations have been set on both sides of the base fixing position, vertical and horizontal: When facing the table edge, you can use horizontal fixation. If there is no edge to fix, you can use the vertical placement method to fix both sides to the table, ensuring that the bracket is sufficiently stable. Both orientations are possible, and the structure is the same on both sides. The base does not need to be specified in a fixed direction. It is ready to use as soon as you get it!


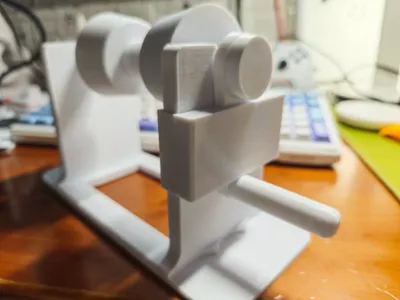
3. Optimization of the Spool Latch Structure: In the v3 version, the universality of the latch structure received praise, but there were still shortcomings in terms of convenience. Therefore, in the v4 version, I improved the thickness of the center threaded rod (23mm), while the outer diameter of the 608 bearing is 22mm. This means that after you use a plastic 608 bearing and securely clamp it to the connecting rod, you don't have to worry about the spool not being able to be installed and fixed. The 608 bearing can be adjusted without being disassembled after installation or uninstallation, allowing you to install the spool and wind it.
4. Support for Locking Fasteners Added: In the v4 version, locking fasteners have been added. When you are not using the filament winder, you can latch the locking fastener onto the rocker arm to prevent the rocker arm from driving the filament winder to rotate. The rocker arm can be locked, meaning the entire rotating mechanism is locked. And because the main body of the base has not changed much, the locking fastener can still be used on the base of the v3 version. If you don't want to use the v4 version but still need locking, you can just print the locking fastener, which is convenient for storage.

It is still recommended to use printed 608 bearings. They can be securely fixed to the connecting column without any risk of detachment and completely meet the requirements for use. They are integrated with the model, making it more aesthetically pleasing. Most importantly, they won't rust!!!!
——————————————————————————————————————————————————————————————
Structural Strength (Important!) The model encountered structural strength issues during initial printing experiments, which raised my concern. If you encounter these problems or are about to print, I hope this helps!
1. Material Use: The quality of the material directly affects the quality of the model. Therefore, I recommend using PETG material or higher strength material for printing. Make sure to dry the material before printing to prevent the model from getting damp, which can lead to a decline in strength due to material properties, affecting its use.
2. Material Selection: Even for materials of the same type, different brands may have varying strengths. Pay attention to the strength of the material's deformation and fracture, and try to choose mainstream brands or mid-range materials. Cheap low-cost materials may lead to insufficient model strength and an increased risk of fracture and damage.
3. For the surface, those with AMS can choose to use PLA for support, and change the flushing ratio to 1.6 to ensure the material is completely flushed, guaranteeing structural strength! The surface will have absolutely excellent quality! (Using PLA support for PETG, those who have used it say it's great!) If you are unsure, you can ask in the comments section!
4. For vulnerable parts (knobs, connecting columns, latches, etc.), strength parameters have been processed, and some parts have up to 5 walls and 60% infill to ensure structural reliability. However, you still need to pay attention to the impact of the above three points on strength. If you think the strength is still insufficient, please modify the infill and wall count yourself!
——————————————————————————————————————————————————————————————
The filament winder has received enthusiastic help from everyone, and I am very grateful for the questions you have raised. I will check and fix them one by one. Thank you for supporting my model. The original intention of designing this filament winder was to make it small, easy to use, and consume a small amount of material, allowing you to wind filament freely without damaging anything. However, the weight has now reached around 300g, and it cannot be made more simple and save materials. Unless there is a problem, this will be the last (simplified version). If there are minor problems, they will be directly covered and updated in the current model after fixing. If there is a lot of feedback on problems, but only a small number of parts need to be added or no parts need to be added, the simplified version will still be updated. I will make a regular version of the filament winder in the future if you need it!
Once again, thank you for your support!
License
You shall not share, sub-license, sell, rent, host, transfer, or distribute in any way the digital or 3D printed versions of this object, nor any other derivative work of this object in its digital or physical format (including - but not limited to - remixes of this object, and hosting on other digital platforms). The objects may not be used without permission in any way whatsoever in which you charge money, or collect fees.
Comment & Rating (39)