Working Replica Steam Engine (Air Powered "DASV")


Print Profile(1)

Bill of Materials


- HeatInserts(HasAllM2andM3) x 1: https://a.co/d/2VaBO13
- 8mm aluminum rod x 1: https://a.co/d/3CzjxCI
- 1/4" aluminum rod x 1: https://a.co/d/6wRDsv2
- 3/16" aluminum rod x 1: https://a.co/d/auwBgrq
- 38mm OD x 36 MM ID brass tube x 1: https://a.co/d/fdwAyMM
- 1/8" x 1/8" Flexible GraphitePacking x 1: https://a.co/d/irerpls
- 6806-2RS Deep Groove Ball Bearings 30mm Inner Dia 42mm OD 7mm Bore x 1: https://a.co/d/f1k7CJQ
- Ball Bearing 693-2Z 3mm x 8mm x 4mm x 1: https://a.co/d/84fReBG
- Socket Grub Screw Assortment Kit x 1: https://a.co/d/bjJAwUh
Description
Experience the engineering marvel of a double-acting slide valve steam engine, brought to life through 3D printing! Designed for air power and optimized for makers, this project is perfect for hobbyists, educators, and anyone looking for a fascinating mechanical build. This engine runs on compressed air and showcases the beauty of a classic stationary steam engine design.
Features:
- Double-Acting Design: The engine delivers power on both strokes, making it an excellent model for understanding real-world steam engine mechanics.
- Slide Valve Mechanism: This traditional valve controls air intake and exhaust, mimicking the function of historic steam engines.
- Partially 3D Printed: While many components are 3D printed, a few additional parts are required for complete assembly. With the right materials and tools, you’ll be able to create a functional engine.
- Runs on Air: Forget about the complexity of steam boilers—this engine runs on compressed air and has been tested up to 60 PSI with no issues (I let it run for around a minute).
- Hands-On Learning: This project is perfect for those who want to explore the inner workings of mechanical engines or add an impressive DIY model to their collection.
Recommended Tools:
To ensure proper assembly and smooth operation, the following hand tools are recommended:
- Deburring Tool: To clean up 3D-printed edges and any rough surfaces.
- Metal Files: For fine-tuning the valve rod and ensuring all parts fit properly.
- Hand or Reciprocating Saw: For cutting metal rods and cylinders to the correct length.
- Hex Drivers (1.5 mm and 2.5 mm): For easy assembly of screws and bolts. (A ball end 2.5 mm driver is recommended)
- Drill Bits: Metric drill bits have helped ensure proper “slide” or fit of bolts through parts such as the valve body
- Heat Insert Tool: (I used a 3D-printed heat insert press for installing heat insert nuts—link here!)
Technical Details:
- Bore: 36 mm
- Stroke: 57.15 mm
- Timing: Eccentric/Slide Valve with ~7.14 mm throw
- Flywheel: 193 mm diameter
Materials:
- Print the main parts in PLA or ASA. The flywheel can be printed in PETG for extra weight (optional).
- The pictured model in all black was printed entirely in ASA.
- The Blue/Grey/Black model is ASA, PLA, and PETG
- It can certainly work when printed from PLA, but you will need to keep the crosshead lubricated (grease/silicon spray/oil)
- Note: PETG is not recommended for any sliding or friction parts, as it tends to become “sticky” under friction.
Your favorite CA glue will be needed to attach the base peices together, along with attaching the slide valve plate to the cylinder
- Parts:
5 - M3x6 MM Hex head (cylinder mounting).
1 - M3x8 MM Hex head (valve rod adjuster)
21 - M3x10 MM Hex head (bearing holder+valve rod+cylinder head)
3 - M3x16 MM Hex head (valve rod to fork + Eccentric straps)
18 - M3x25 MM Hex head (ValveChest and crosshead)4 - M3x30 MM Hex head (flywheel)
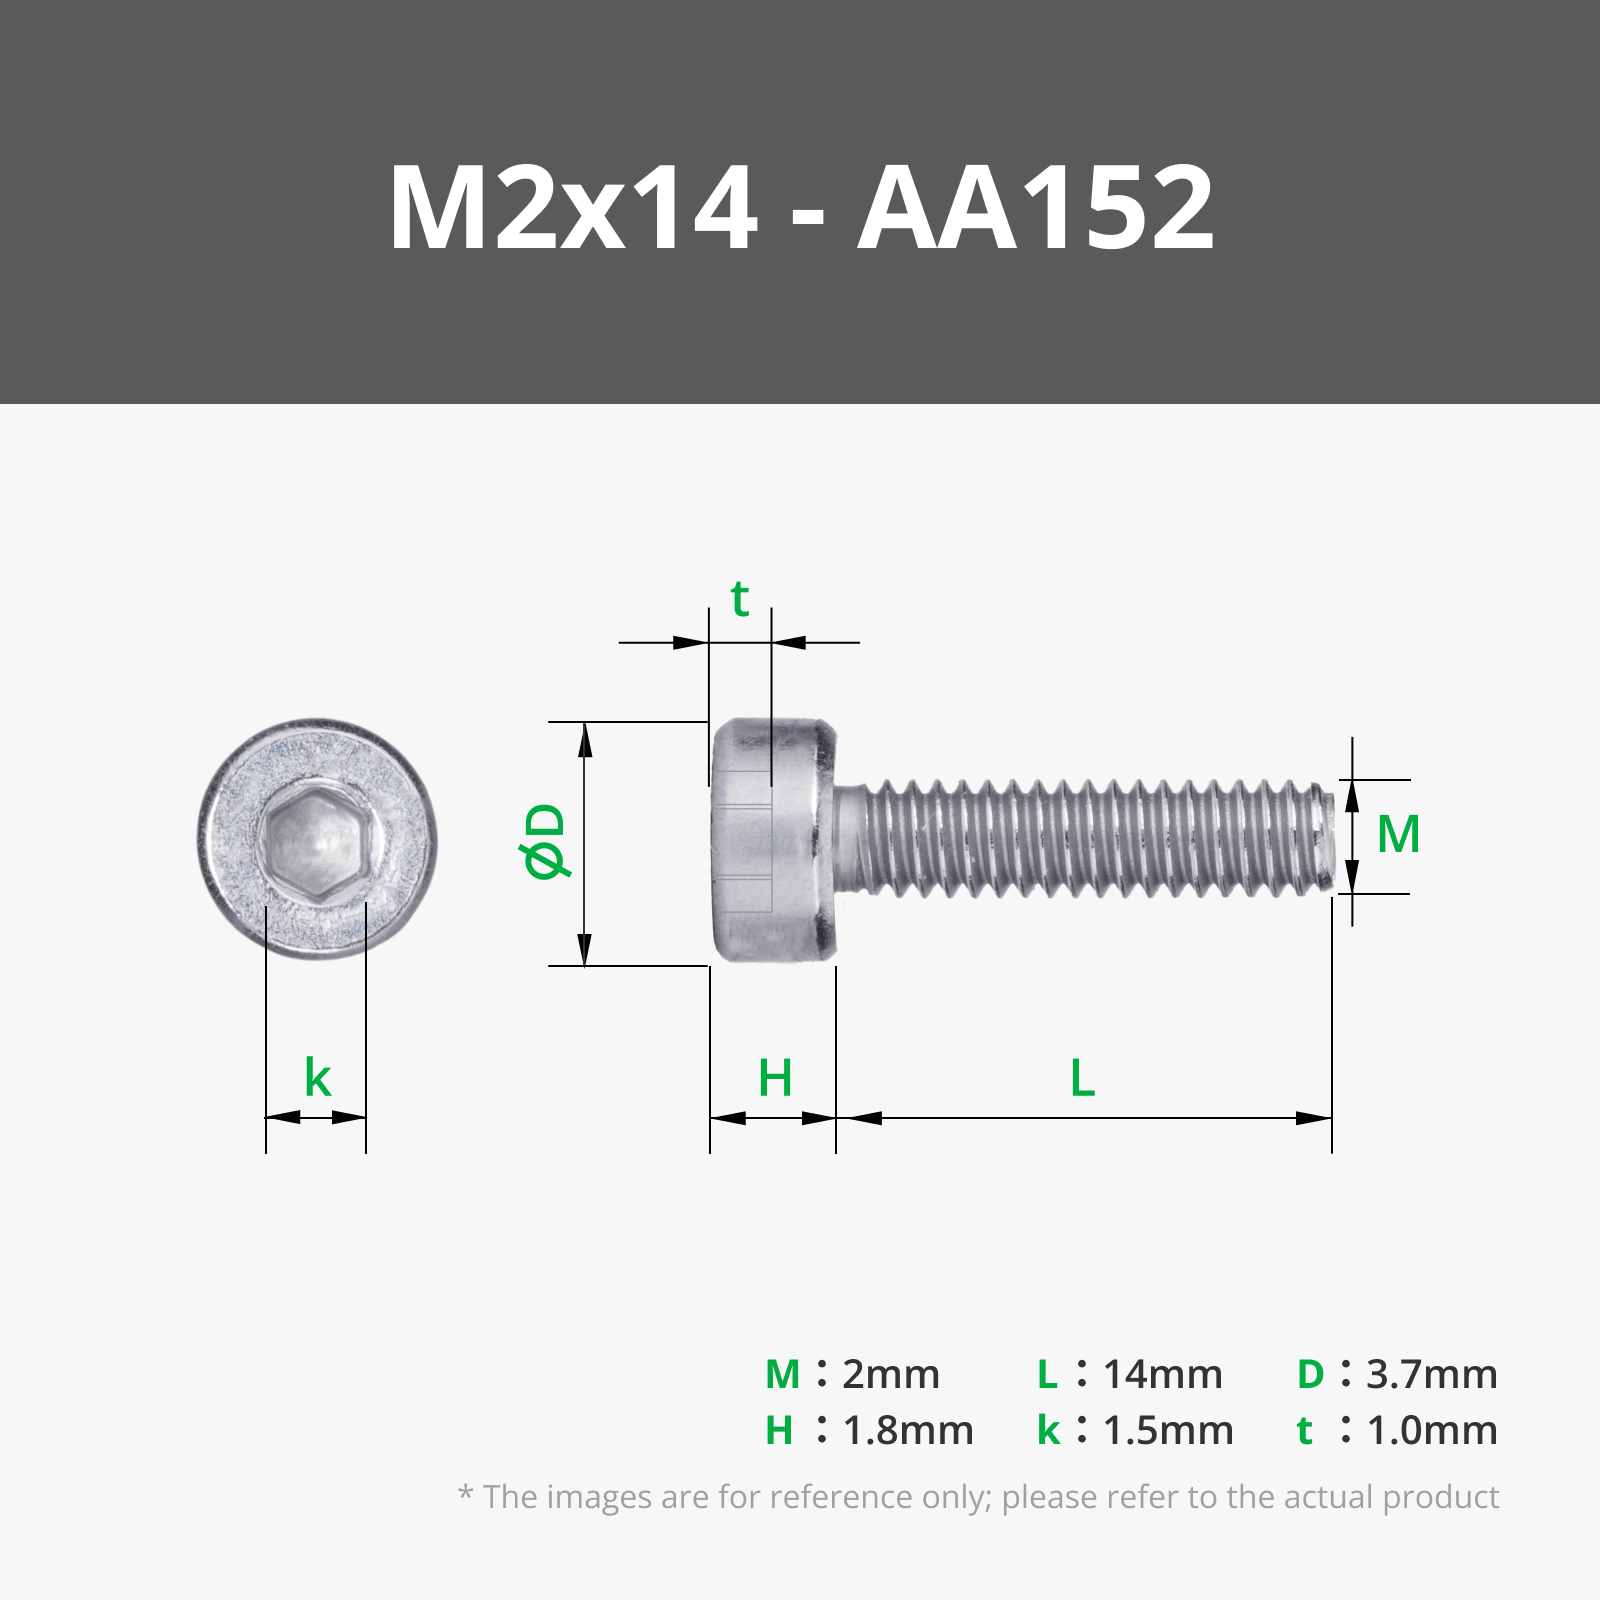
1 - M2x14 MM Hex head (pushrod to crosshead)1 - M2x16 MM Hex head (pushrod to crankboss)
19 - M3 Nut1 - M2xH2 insert (crosshead)
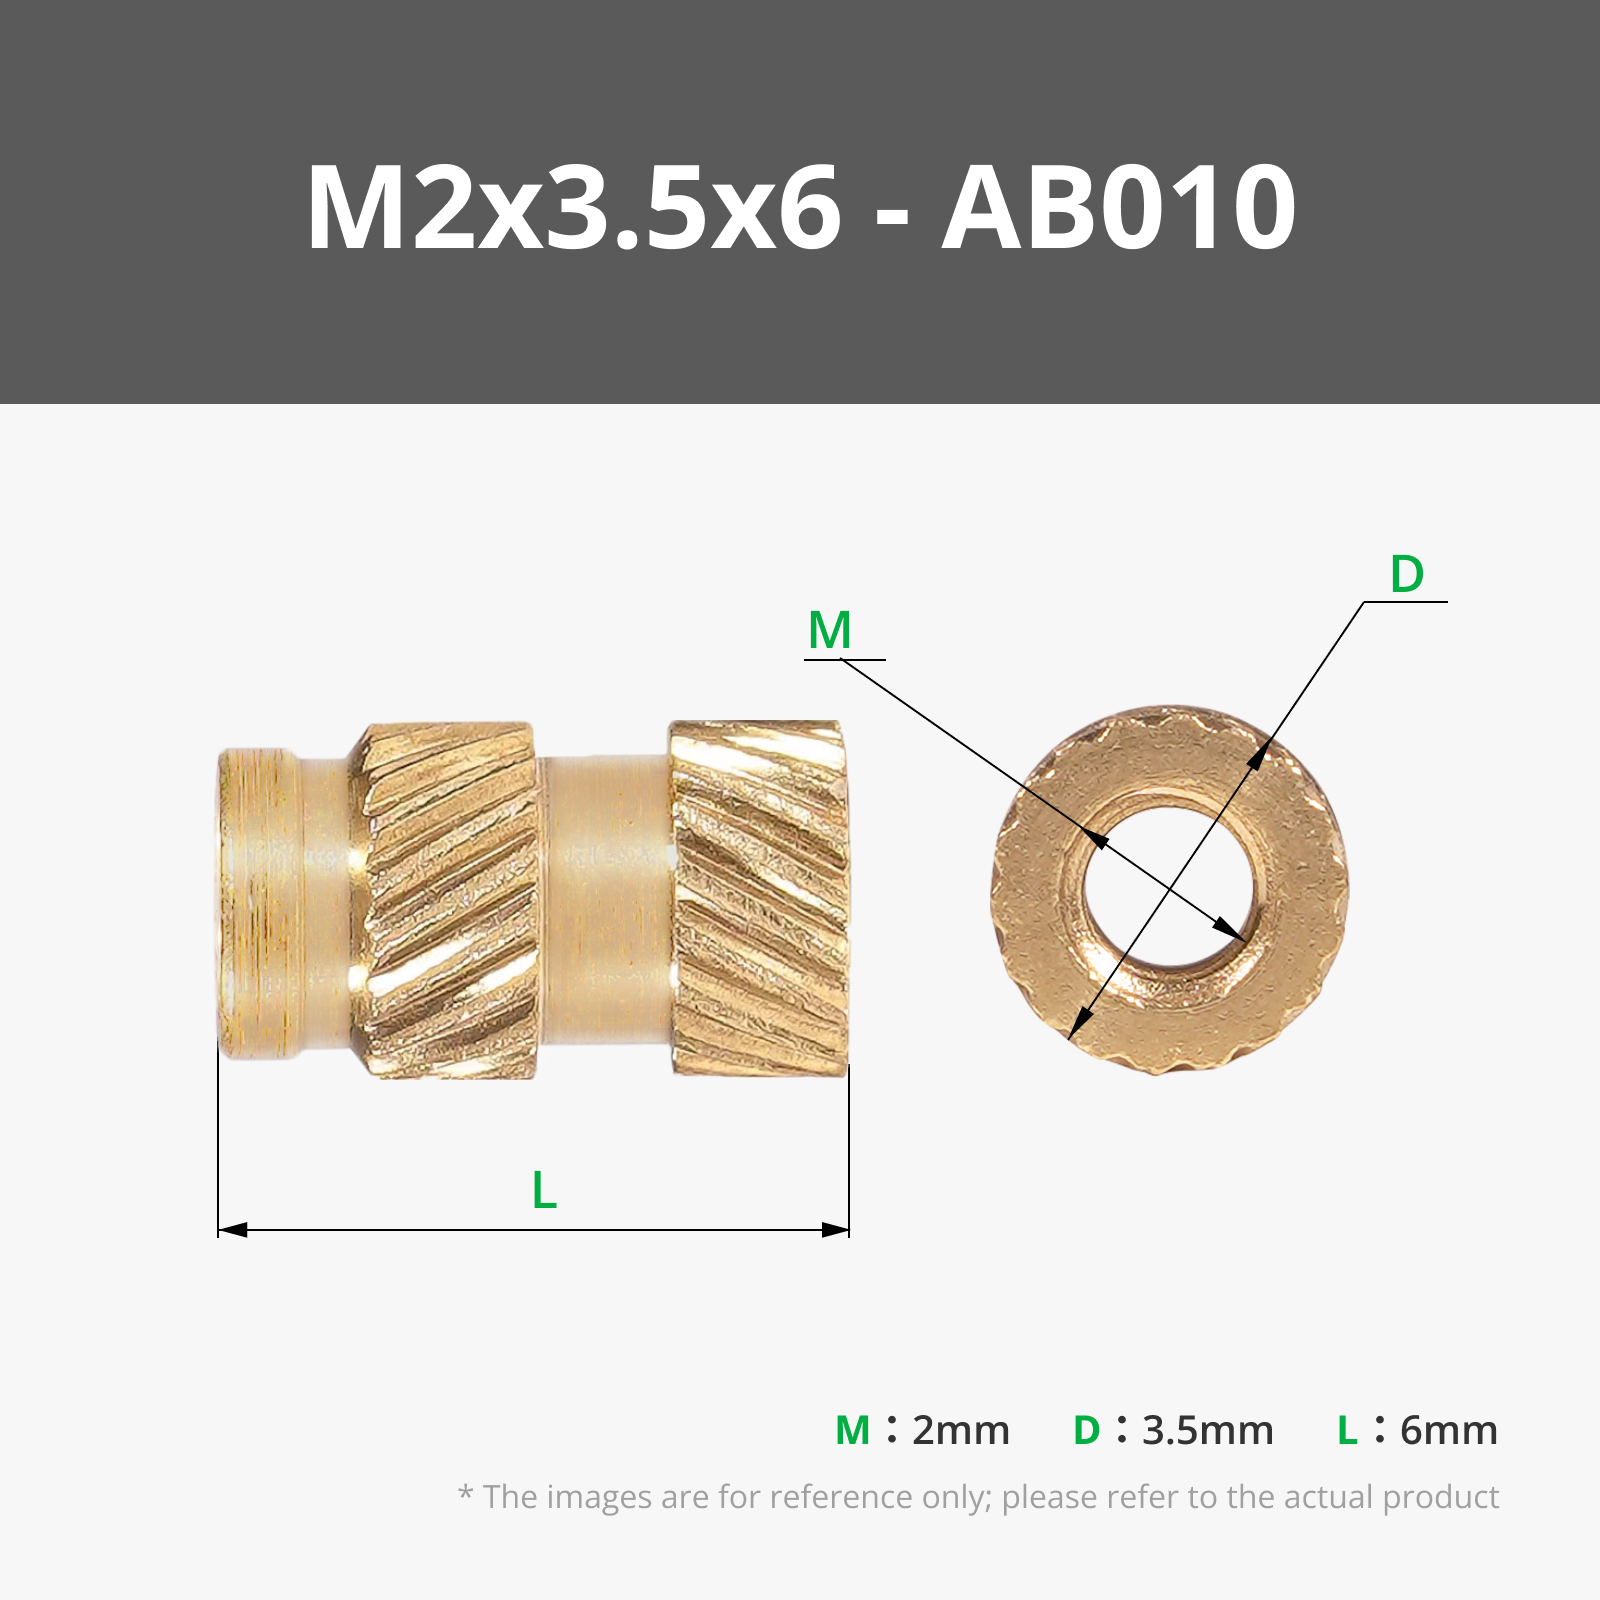
3 - M2xH6 inserts (crankboss and Eccentric strap)35 - M3xH4 inserts (cylinder head+base+forks)
4 - M3x4 MM grub screw (forks)
3 - M3x10 MM grub screw (crank boss and eccentric)
4 - 3x4x8 mm bearings (connecting rod)
4 - 608 bearings (crank)
1 - 7x30x42 bearing (eccentric)43 - 8MM ball bearings (optional but will help with both low and high speed operation)
4.5" (114.3 MM) - 8mm aluminum rod (crank) - https://a.co/d/3CzjxCI
5 1/8" (130.175 MM) - 1/4" aluminum rod (push rod) - https://a.co/d/6wRDsv2
4 1/8" (104.775 MM) - 3/16" aluminum rod (valve rod) - https://a.co/d/auwBgrq
2 13/16" (71.4375 MM) - 38mm OD x 36 MM ID brass tube (cylinder wall) - https://a.co/d/fdwAyMM
~1 foot - 1/8" x 1/8" Flexible Graphite Braided Compression Packing (or use PTFE tape and printable piston rings) - https://a.co/d/irerpls*
Print Profile Inclusions:
- Piston Rings - ASA: For my tests, I used graphite braided packing, but I also had success with the 3D-printed rings
- If you are going to use the printable piston rings, PTFE tape can replace the graphite packing* to create the gland seals
- Gaskets - TPU 75A: The gaskets for the cylinder and valve body can be 3D printed with flexible filament, print them in any filament, and transfer the dimensions to contruction paper, or just use RTV/Gasket Maker on the mating surface. (The thickness of the gasket should not exceed 1 mm.)
Pressure Range:
- The engine operates effectively between 2 and 30 PSI. For continuous operation, a maximum of 20 PSI is recommended not to be exceeded. Compressors with >3 CFM output seem to work best.
- 2 PSI on my test model provided about 150 RPM
Assembly:
- Instructions will be available soon!
- I am also working on jigs to help produce the brass cylinder insert and valve rod grooves
I will also be adding “colored” print profiles as they have been printed.
This model has been adjusted numerous times to reduce the overall amount of post-proccessing and to increase it's printability.
- Please be aware that with the larger peices, glue for your selected filament/used print bed may be required.
Whether you’re interested in building a functional model or you’re an educator seeking a practical STEM project, this air-powered engine is a brilliant way to dive into the world of steam engine mechanics.
Download the files now and start your engine-building journey!
*I will try to do my best to respond to comments. Feedback is welcome!
Comment & Rating (29)