Search models, users, collections, and posts

Universal Boom Mic Arm

IP Report

Print Profile(1)

All
P1S
X1E
X1 Carbon
P1P
H2D
H2C
X1
H2S
X2D
H2D Pro
P2S
A2L

0.6mm nozzle, 0.24mm layer, 3 walls, 15% infill
Designer
6.7 h
1 plate
4.1(20)

Open in Bambu Studio
Boost
284
679
38
26
1.4 k
370
Released 

Description

⚠️ This is now an old design. A fully parametric arm design is now available and is the recommended version — Parametric Universal Boom Arm. This new version is easier to remix, uses less filament, and was built with a slightly increased knowledge of CAD :D.


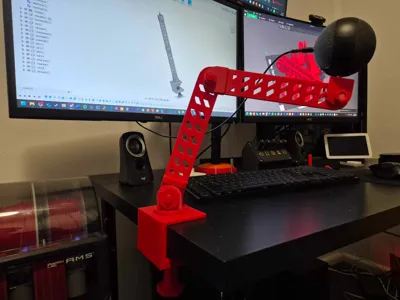
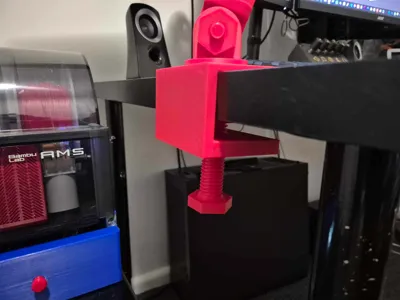
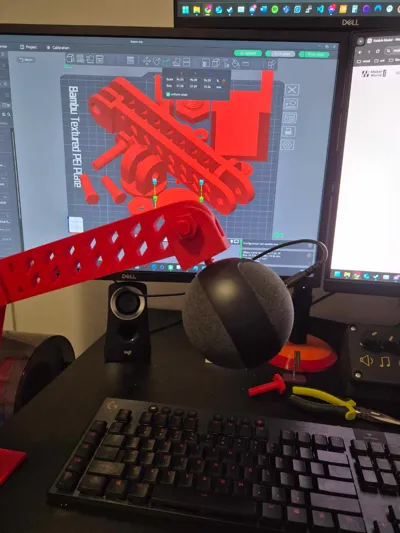
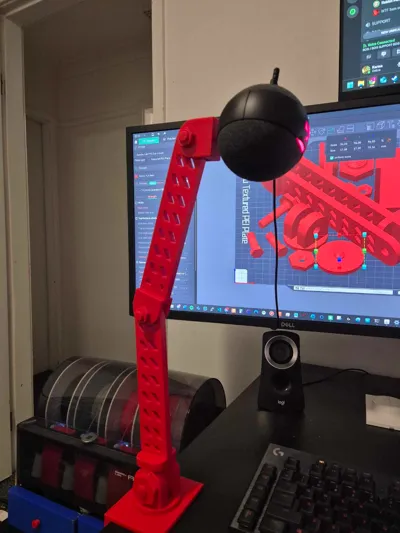
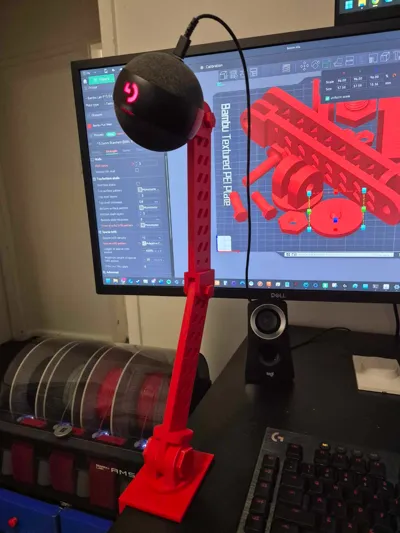
This is a desk clamp microphone arm stand with 3 degrees of freedom that has been fitted with a swappable microphone screw attachment and desk clamp. The mic screw are attached via screw holes and can be modified to what ever you want if you can design it :).


The mic screw is attached to the mic arm with a 3D printed M8x1.25 thread that then turns into a custom made Logitech mic screw.


I printed this arm with a P1S:

Nozzle size: 0.6mm

Wall layers: 3, (recommended high wall count especially for the mic screw)

Supports: only used on the bolts as they we printed horizontally (avoids layer line failures)

infill: adaptive cubic 15%

Rough print time: 6.5hrs

Total filament used: 332g


Note: The nuts in the .mf3 file have been scaled to 110% and the clamp bolt and clamp head were scaled to 98% and 96% respectively as this lead to a better fit for me. If using the STLs some scaling may be required to the previously listed parts.


Update: 

  • Attached the Step file for the project 


Comment & Rating (38)

(0/1000)

Print Profile
0.6mm nozzle, 0.24mm layer, 3 walls, 15% infill
A few adjustments were necessary for the screws (they had to be reduced to 90% of their original size). The support seems solid, now we'll have to see how long it lasts.
2
Reply
hi so just by changing the screws to 90% it works well?
0
Reply
As others have said, you have to print the screw parts at 90% scaling. Pictured are the screws that need their sizes changed. I also had to make my own adapater screw for the head of the unit to connect to my Razer Seiren v2, but that was easy enough.
1
Reply
Hello, could you pass me the adapter, don't know it will fit since I have the seiren mini
0
Reply
I printed this with a P1S using the provided settings. I did not make any size adjustments to the screws. I used dried and calibrated Elegoo PLA with a 0.4mm nozzle and 0.2 layer height. I had to paint the supports for 2 of the horizontally printed bolts. For the most part, this is a really good model. All of the bolts were able to be screwed into their nuts and the large one into the base right off the build plate, even with some roughness from the supports. For the large screw, the fit was tight, but after working it in and out a few times, it became easy to adjust. I had to use a tap and die to get the flat screw and the base part that rotates to go together. (I think that had more to do with needing x/y hole compensation) The base plate should be stronger/thicker on the back part. I barely tightened it and could hear it cracking. It would be less trouble to use metal hardware for the smaller bolts. The mic screw broke off in my mic the first time I tried to adjust it.
0
Reply
Boosted
Print Profile
0.6mm nozzle, 0.24mm layer, 3 walls, 15% infill
Work fine, a little bit lighter to support my Fifine AM8
0
Reply
I’m putting it together the screws for the microphone (the one on top), the middle and the base feel fine (the bottom one). In the second picture the three screws need to be adjusted. The one on the left that goes underneath the microphone arm needs to be slightly smaller but I do want to make a suggestion making it more like the middle joint in the arm allowing it to turn and tightening it with a nut. the middle screw is extremely hard to turn and you might need a wrench to turn it but overall I feel like it just adds a lot of support so I have really no complaints though it will be hard to turn by hand if that’s what you were planning on doing. if I can remix and add I’d love to!
0
Reply
Print Profile
0.6mm nozzle, 0.24mm layer, 3 walls, 15% infill
Just needed the adapter but it fits perfectly!
0
Reply
Print Profile
0.6mm nozzle, 0.24mm layer, 3 walls, 15% infill
Perfect. I only modified the mount for my 3D scanner
Show original
0
Reply
The screws didn't want to go in, not even one
0
Reply
Put the screws 90% size
1
Reply
i recommend contentric pattern for top + bottom surfaces
1
Reply
the short screw that connects the base to the base hinge doesnt screw in. Is there something I'm doing wrong?
0
Reply
some other guy said to print it 90% of its original size
1
Reply