Hitchhiking Ghosts - Disney Haunted Mansion - Glow


Print Profile(1)

Description
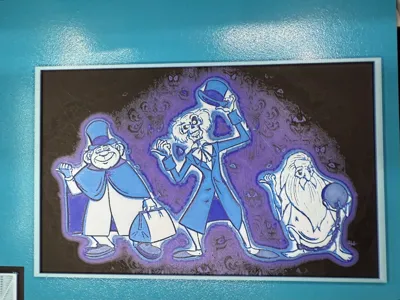
Since I was a child, the Haunted Mansion was my favorite ride at Disney. I loved everything about the ride, but the thing I remember most is watching our doom buggy pass by mirrors showing a ghost riding along between my mother and I. I've loved the hitchhiking ghosts ever since.
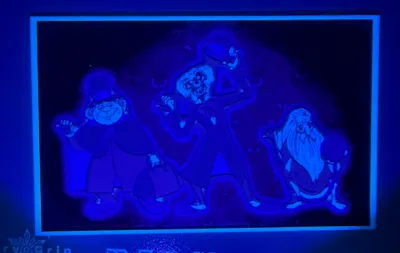
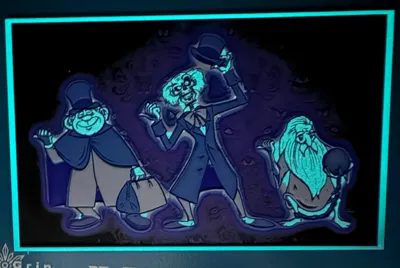
This model is my attempt at making a hueforge of the hitchhiking ghosts, featuring the haunted mansion wallpaper in the background. It uses 7 different filaments including Glow in the Dark Blue, but can be printed with just one AMS or even without an AMS if you're willing to manually change the filament each time it pauses. Here are the filaments needed and when to change them:
Project: HitchhikingGhostsv3.hfp
Print at 100% infill with a layer height of 0.04mm with a base layer of 0.24mm
The Model is 200x125.02mm in size
You may print at higher layer heights below the Min Depth of 0.48mm
The Max Depth is 3.2mm and the Actual Depth is 2.7mm
Filaments Used:
PLA BambuLab Matte Charcoal Transmission Distance: 0.3
PLA BambuLab Basic Purple Transmission Distance: 1.4
PLA BambuLab Basic Blue Transmission Distance: 4
PLA BambuLab Basic Jade White Transmission Distance: 5
PLA BambuLab Basic Blue Gray Transmission Distance: 1.5
PLA BambuLab Basic Cyan Transmission Distance: 2.2
PLA BambuLab Glow Blue Transmission Distance: 3.8
This print uses 7 unique filaments
Swap Instructions:
Start with Charcoal
At layer #13 (0.72mm) swap to Purple
At layer #22 (1.08mm) swap to Blue
At layer #26 (1.24mm) swap to Jade White
At layer #29 (1.36mm) swap to Blue Gray
At layer #30 (1.4mm) swap to Cyan
At layer #47 (2.08mm) swap to Jade White
At layer #62 (2.68mm) swap to Blue for the rest.
**How to print more than 4 colors hueforge with 1 AMS**
- Because a hueforge is essentially laying different colors on top of each other it is possible to print more than 4 colors in a hueforge. In a nutshell we take advantage of the filament run out sensor to pause the print for us and then allows us to change any other filaments at the same time.
- The example below is for a 5-color print but carry on the same idea if you need more.
- Load AMS slots A1, A2, and A3 with the first 3 colors used. Leave the 4th slot unloaded.
Send to print. When asked which AMS slots have which colors assign the first 3 colors on A1 – A3 and the fourth color in the print to A4 (keep in mind it will not show a loaded color because it isn’t loaded). The fifth color will be assigned to A1 (I like to keep it sequentially but any other slot besides A4 will do)

The printer will give a warning that some of the assigned colors are not mapped in the AMS just click confirm.

- The printer will start printing and print automatically until it reaches the 4th color. It will tell you the filament ran out and you need to replace it. At this point I would load my 4th color AND my 5th color into the AMS A1 slot like I assigned it.
- Continue the print and that’s it! You can repeat this as many times as you need but just doing this once allows you to print 7 colors with just one swap.
Comment & Rating (2)