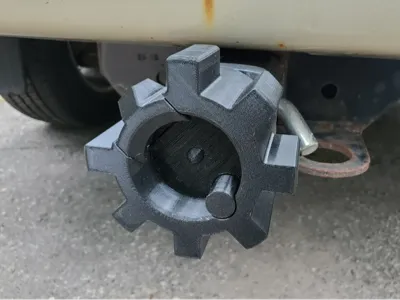
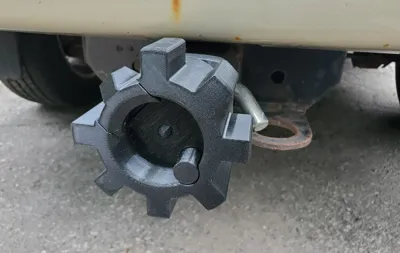
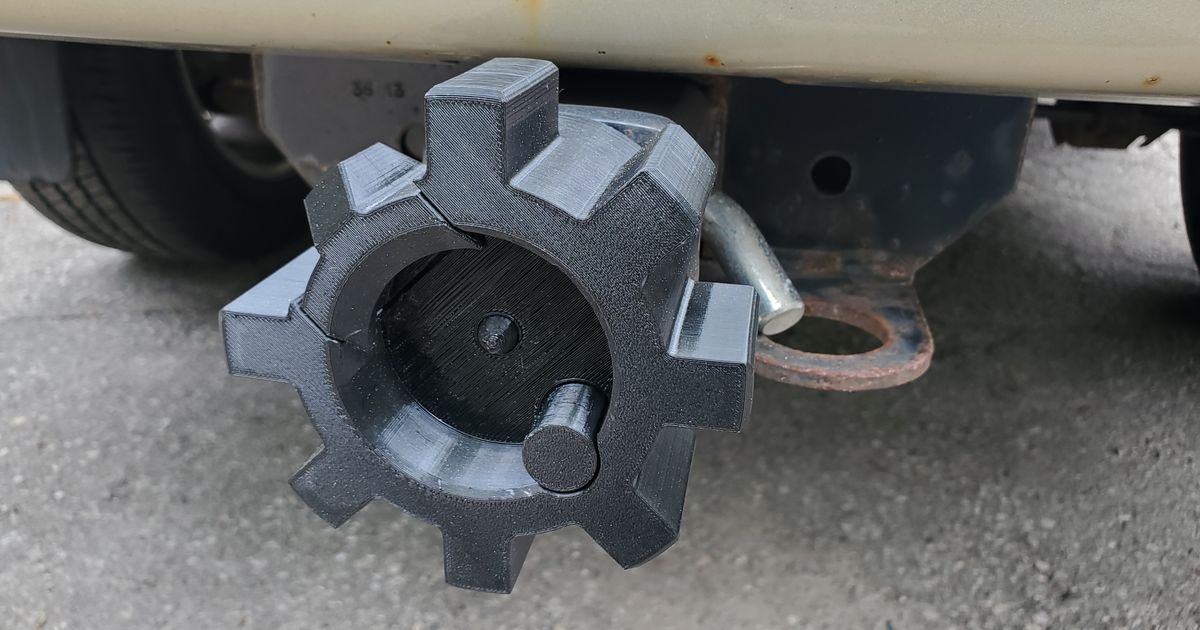
AR Bolt Face Trailer Hitch Cover


Print Profile(1)

Description
AR-15 trailer hitch cover, Mk 2. by Ron Harding | Download free STL model | Printables.com (Original Source all credit to: Ron Harding)
This is basicly a rehost of Ron Hardings work, I simply modified everything so that it works in the Bambu Ecosystem.
Share your passion for shooting sports, without attracting unwanted attention from haters. Those who know what it is, know what it is. To everyone else, it's just some kind of gear or something.
Features:
- Dimensionally-accurate (but scaled up) AR-15 bolt head.
- Installs using standard hitch-receiver pin.
- Two-part print.
- Reinforced with embedded steel threaded rod.
Additional tools/materials required:
Links provided for the readily available items I found on amazon.
- 105mm length of #8-32 threaded rod. (Comes in 12 inch segment, will need tool to cut down such as hack saw or grinder)
- Two #8-32 “nylock” nuts.
- Two 1/8"x3/4" flat washers.
- Good epoxy (JB-Weld, etc.)
Print Instructions
I printed this and set up the profiles for Bambu PETG HF on a X1C.
Slice the bolt head, with the following particulars:
(Note: If you use the provided 3MF Files and profiles I have completed these steps already)
- It should be oriented with the bolt-face down on the print bed.
- Supports enabled everywhere.
- 15% grid infill.
- Add a support-blocker, loaded from the provided “modifier.stl” object. (This prevents supports from being generated inside the nut/washer cavity.)
- Add a modifier, loaded from the same provided “modifier.stl” object. In that modified region, set the infill to 30% gyroid. This strengthens the area immediately around the nut/washer.
Add a “Pause Print" (M601) at a height of 30.80mm, where it's just starting to bridge over the nut/washer cavity.
(Once again, this is not Nesissary if you use the Provided files but I would double check)
- After slicing, verify:
- Supports are being generated inside the bolt face.
- Supports are not being generated inside the nut/washer cavity
- Denser infill around the nut/washer cavity.
- A pause just before the bridging over the nut/washer cavity.
- Start printing the bolt-head.
- At the pause, drop the nylock nut into the cavity, nylon-side first.
- Place the washer over the nylock nut.
- Resume print.
For the hitch bar:
- Slice the hitch bar, with the following particulars:
- Placed on its side, with the cross-pin hole oriented up-down. (This will get the greatest strength of the print oriented in the direction we want it.)
- No supports (didn't need any for me.)
- Print the hitch bar.
Assembly:
- Pull support material out of the bolt face.
- Cut a piece of #8-32 threaded rod, 105mm long.
- Thread the rod into the back of the bolt-head until it bottoms out. To make it easier to turn, spin a nut onto the end, and then a second nut jammed up against the first with a wrench. That will give you a temporary hex head on the rod you can use to turn it.
- Test fit the hitch bar onto the bolt-head, with the cross-pin holes at the far end away from the bolt-head. Make sure the end of the threaded rod is not going to interfere with the hitch-pin. Shorten it if necessary. Remove the hitch bar from the bolt-head.
- Mix up epoxy and slather it in the recess in the back of the bolt head.
- Reinstall the hitch bar. It should be oriented so that when the bolt-head's extractor hook is at 10 o'clock, and the ejector pin at 4 o'clock, the cross-pin holes in the hitch-bar will be horizontal. Bed the hitch-bar down in the epoxy.
- Install a flat washer, and nylock nut through the back of the hitch-bar, and tighten them down.
This remix is based on
License
You shall not share, sub-license, sell, rent, host, transfer, or distribute in any way the digital or 3D printed versions of this object, nor any other derivative work of this object in its digital or physical format (including - but not limited to - remixes of this object, and hosting on other digital platforms). The objects may not be used without permission in any way whatsoever in which you charge money, or collect fees.
Comment & Rating (13)