


Print Profile(1)

Description
See other garden hose related things I made here
Say goodbye to your broken garden hoses with the Garden Hose Healer! This 3D printed clamp set with threads is designed to fix broken or cut hoses by adding a female garden hose end. Its robust construction and design ensure a secure fit and prevent leaks, making your hose as good as new. The print-in-place spinning versions here allows you to turn the female coupling portion separate from the hose barb.
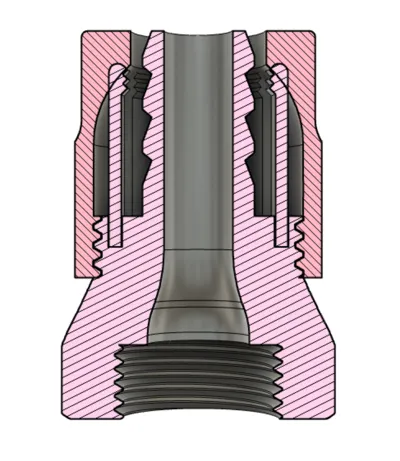
Design: The Garden Hose Healer features a practical and sturdy design, with separately printed pins that securely attach a female garden hose end to a cut hose. The retaining barb and clamping pin design with cap provide a tight seal, ensuring no water escapes. This mender is perfect for anyone looking to extend the life of their garden hose without the need for a complete replacement. The pins are printed separately and inserted to maximize their strength and avoid them snapping off during assembly.
Revive your garden hose and restore the flow with the Garden Hose Healer! 3MF and STEP files included.
Boost Me (for free)
If this helps you, a boost would be nice.
Features:
- Retaining Barb: Ensures a secure grip on the hose.
- Clamping Pin and Cap Design: Provides a tight seal to prevent leaks.
- Easy to Use: Simply attach to the cut end of your hose and tighten.
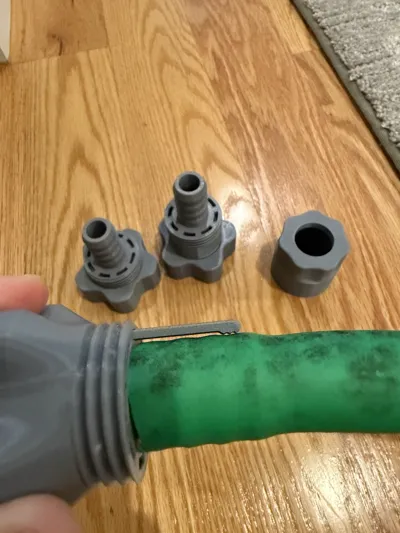
- Fixed and Spinning Variants: Choose to print the solid version if you don't need the female side to spin, or the print-in-place spinning version (more versatile, more challenging print).
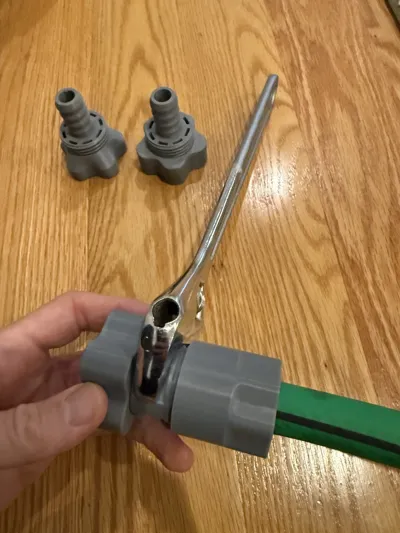
- Spinning has two versions, I recommend the larger one with flats for use with a helping wrench to tighten down the clamp cap. Without using these flats you'll need to rely on the tension from the washer between the male/female side to be able to tighten the clamp down, and it might not be enough torque.. but I provide this version in case you want it.
Printing:
- Material: Printed with durable ASA, this model is built to last. PETG can work too, but I would advise against PLA simply because it creeps over time.
- Layer height: Prints well at 0.16 or 0.12 layer height in ASA. For good threads, thinner layers are recommended. If you haven’t shrink-corrected your ASA printing profiles, you may need to enlarge the model to ~100.7%. Should fit just fine for PETG prints, but you may wish to enlarge to 100.3%.
- Orientation: I recommend printing as shown in the pictures. A small amount of organic supports ARE needed. Paint them on as shown here (infill/walls are hidden to show where supports lie in this slicer picture!). Note that this is essentially the same for both spinning and non-spinning, but for the spinning versions the upper part is printed completely on this support!


Assembly:
- First, slide the clamping cap onto the hose itself to tighten down at the end.
- Second, make sure you put a printed TPU or rubber (existing/purchased) hose seal in the female hose thread side. This is needed to prevent any leaks, particularly with the spinning version!
- Next, insert the barb into the cut-off part of the hose. Since this will be tight, it may help to rub a little vegetable oil on the barb ahead of time.
- Important note: Some hoses have annoying interior construction that can prevent a good seal. In order to get a good seal it's very important that if your hose has any significant internal ribbing like mine does (see below) that you trim them back where it contacts the barb to create an even circular interior. This will ensure a good even seal and prevent water from escaping around the clamps/barb.
- Before Trimming:

- After Trimming off troublesome ribbing:

- Next, install the 8 pins so that the little teeth point inward near the top of the barb as shown. They should press-fit in place. If they don't for some reason, they're easy and quick to reprint at a slightly smaller size (99.5-99% should do it).
- Lastly, put the cap back on and screw it firmly clockwise to cause these pins to compress down on the hose. You may use a pair of pliers to torque it if you wish. The threads may be tight initially and a little bit of working them back and forth ahead of time and/or a little vegetable oil may make this part smoother. Depending on the thickness of your hose you may not be able to completely screw the cap all the way, and this is OK. The point is to have the cap compress the retaining pins. Your final result will look like this (photo here of non-spinning version, but basically all the same).


Comment & Rating (38)