Search models, users, collections, and posts

Hidden under desk drawer

IP Report

Print Profile(7)

All
A1 mini
H2C
X1
A1
H2D
H2S
P1S
X1E
H2D Pro
P1P
X1 Carbon
P2S
X2D
A2L

4X joints (0.2mm layer, 2 walls, 25% infill)
Designer
1 h
1 plate
4.7(23)

Tray type 1 (0.2mm layer, 2 walls, 15% infill)
Designer
1.3 h
1 plate
4.8(11)

Tray type 3(0.2mm layer, 2 walls, 15% infill)
Designer
1.1 h
1 plate
4.8(10)

Main mechanism parts (0.2mm layer, 3 walls, 25% infill)
Designer
2.8 h
1 plate
4.5(31)
Click to see more

Open in Bambu Studio
Boost
2034
4904
144
106
1.7 k
670
Released 

Description


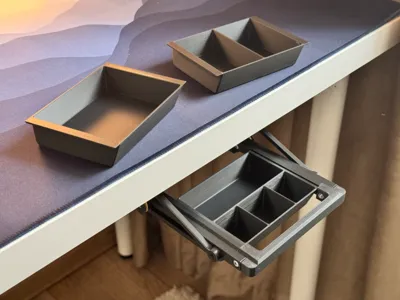
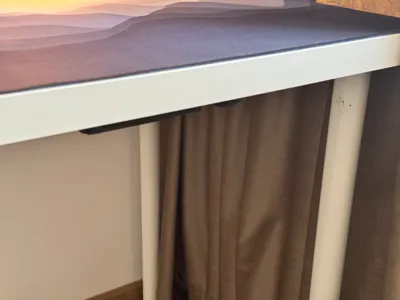
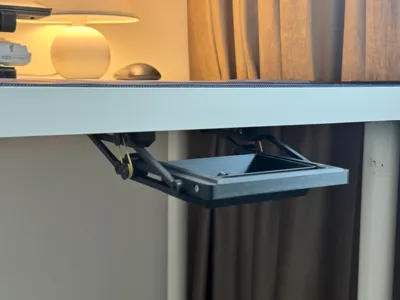
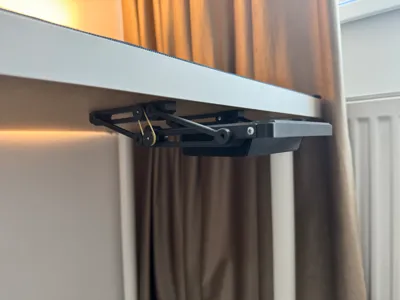
Cool under desk drawer with pull mechanism designed to store small parts under your desk. You can add as many drawers under your desk as you want.


Membership

Thanks for your support;3

Join

1) Key features:

  • Fast assembly
  • Functional design
  • Stays hidden
  • Easy handle
  • Common materials

2)List of parts:

  1. x2 parts (Left and Right) to be screwed in bottom of table

  2. x2 parts (Left and Right) to hold tthe tray

  3. x4 parts to assembly parts above together


  4. x4 parts of sliders

    5. x1 handle part

    5. x6 M3 x 16 Screws

    6. x2 M3 Nuts

    7. x2 Rubber bands for sliding mechanism


    3) Assembly guide

    1. First, download and print all the parts. Make sure you have the parts for the right and left side of the drawer.
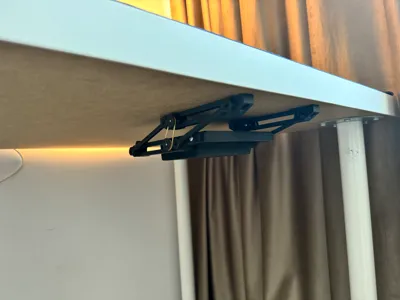
    2. Assemble the sliding parts with the help of screw m3.


      c. Assemble the suspended parts using the handle and m3 screws and nuts.


      d. Insert the joints on both sides of the mechanism.


      e. Thread the mechanism into the bottom of the table with the help of 2 wood screws.


      f. After correctly fixing the mechanism, extract the handle and insert the tray that you like.


      g. Adjust the tension of the rubber bands according to your needs. The drawer must behave rigidly under the action of weights that you want to store.


4) Congrats for your work. Please ask for issues and suggestions. If you like this original design please support me =3.

Boost Me (for free)

Comment & Rating (144)

(0/1000)

Print Profile
Main mechanism parts (0.2mm layer, 3 walls, 25% infill)
Create a bigger version. love the concept and works great!
4
Reply
How much percentage did you increase for this print. Did you increase the size for all the parts uniformly?
0
Reply
Print Profile
130% Bigger - Maximum printable on A1 Mini
Works great! I used the 130% print profile, but then increased the tray to 160% on the X axis and the handle to 160% on the Z axis. This way it fits pens correctly and assembled perfectly with M4 x 20 fasteners.
profile
4
Reply
Great design and a joy to print. Great work! I have created a print profile for a 130% larger version for the A1 Mini (the maximum printable on the A1 Mini). Have fun with it.
2
Reply
In your print profile, you said you printed the plates at 166%, but everything is at 130%. Did you only print the trays at 166% or everything? If you print everything at 166%, is that when you need M4 screws? or do you need the M4 screws at 130%
0
Reply
Replying to @Deathtronis :
Sorry, the 166% is a typo. All parts have been enlarged by 130%. The holes no longer fit as perfectly as in the original, but it is then possible to assemble the drawer with M4 bolts and nuts without much effort. PS: I have corrected the typo in the print profil description.
(Edited)
0
Reply
Great design! Don't know why the rubber bands are needed, I didnt use them and it works just fine.
1
Reply
That's good to know, the rubber bands look like a potential weak point to me from the point of view of longevity. On that basis I'm going to give this a shout.
0
Reply
love this print I scaled it up to hold a controller
1
Reply
Print Profile
Main mechanism parts (0.2mm layer, 3 walls, 25% infill)
Top! Scaled to 200% and used M6 screws
The profile uploader has replied
Show original
0
Reply
thanks for feedback)
0
Reply
Print Profile
Main mechanism parts (0.2mm layer, 3 walls, 25% infill)
good design. printed with pla. Screws didn't fit the holes as the holes were too big. I ended up using super glue to where the screws were called out. stuck it onto the user part of my shelf with Velcro command strips.
0
Reply
Print Profile
Real BIG one!
Nice print, resized tray and brackets mainly for the practise.
0
Reply
Print Profile
Real BIG one!
it's a great place to hide my.... lol
0
Reply
Print Profile
130% Bigger - Maximum printable on A1 Mini
I used longer screws and its good
0
Reply

License

If you want to use this model commercially, please join my membership.
Join Now
This user content is licensed under a Standard Digital File License.

You shall not share, sub-license, sell, rent, host, transfer, or distribute in any way the digital or 3D printed versions of this object, nor any other derivative work of this object in its digital or physical format (including - but not limited to - remixes of this object, and hosting on other digital platforms). The objects may not be used without permission in any way whatsoever in which you charge money, or collect fees.