Classic Analog Clock for Clock Components Kit 011


Print Profile(1)

Bill of Materials

Description
Hello, there! It’s about time you stumbled across this 3D print! I guess it's time to clock in your next 3D print! :) (bad puns intended)
Overview
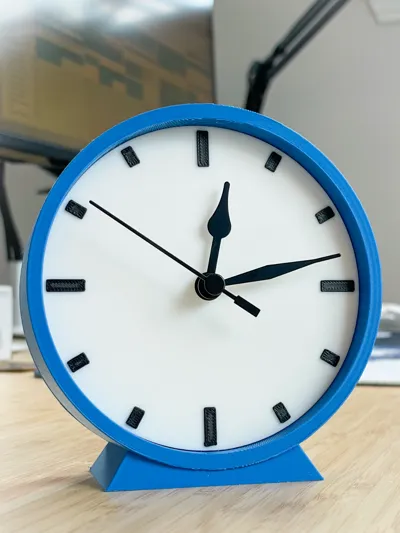
This classic analog clock brings a timeless touch to your home office with its simple, elegant design. Whether you're looking to enhance your decor or need a functional yet stylish timepiece, this 3D printable clock delivers both. This clock assembles easily and is designed to work with Bambu Lab's hardware kit, Clock Components Kit-011.
Features
- Designed for Bambu Lab's Hardware Kit, Clock Components Kit-011
- Easy-to-assemble design
- Clean and simple aesthetic
- Removable back cover for easy access to time updates
- Gentle upward angle for better viewing on an office desk
Acknowledgement: Link to Clock Inspiration

Pre-Requisites
- Bambu Lab Clock Components Kit-011 - Link to Bambu Lab Store
- More than one color filament for clock-face contrast (optional)
- Personally, I used the following filament:
- Bambu Lab PLA Matte - Marine Blue (body)
- Bambu Lab PLA Basic - Jade White (clock face background)
- Sunlu PLA+ - Black (clock face tick marks)
- Personally, I used the following filament:
This print does not require an AMS to print in multiple colors. I modeled this and printed it with just my Bambu Lab A1 in mind.

How to Print (Multi-Color with/without AMS)
- Download and open the Print Profile in Bambu Lab
- Update your printer settings in the slicer; by default, it should have all of the settings I used to print my model
- Check your Nozzle, Plate Type, and Filament (if you make changes, you can choose to keep modified profile settings)
- If you are not using an AMS, remove extra filaments by clicking the minus (-) button to leave one filament (we'll cover multi-color prints later)
- Review the print profile settings and tweak to your preferences
- I do recommend leaving supports for the main clock body turned on; these are applied at the Clock-Body object level
- I have brim turned on for the clock body and base, but you can turn these off; I had first-layer adhesion concerns
- Slice and Print Plate 1 (Clock Body and Back) once your settings are to your liking
- For Plate 2 (Clock Face), if you do not have an AMS (like me), you can achieve multi-color printing by adding a pause in the slicing process
- Slice the plate to preview the print process
- Pull the layer view to Layer 11 on the right vertical sidebar of your slicer (image below)
- Right click on the the layer slider once it is set on Layer 11 and add a “Pause" (by default, I've included this pause)
- AMS users, please remove this pause for your convivence
- Load the filament with which you would like the clock face to print with first (the face's background color - I chose white)
- Print Plate 2 (Clock Face)
- During the printing process, if you added the pause, your print will pause at the start of Layer 11
- At this point, unload your first filament
- Load your second filament which will print the “tick” marks on the clock's face (I chose black)
- Resume printing
- Collect your parts and get ready to assemble!

How to Assemble
- Carefully remove brims and supports from the clock body and back (I was able to remove supports by pulling from the bottom of the supports)
- Place a AA battery into the clock hardware
- Place the black, rubber washer onto the clock hardware (the indented side should be placed face-down on the hardware)
- Place the clock hardware into the back of the clock's body (image below)
- While holding the hardware to the back of the clock, place the brass-colored washer on the other side of the clock
- Following the washer's placement, screw the brass-colored nut onto the hardware to secure the hardware to the body
- Carefully line up the clock's face with the body of the clock (do this carefully, because the face can be difficult to remove)
- Once the face is aligned, press firmly to fit the face into the body while maintaining the face's alignment
- With the face in place, assemble the hands:
- Fit the hour hand in first (this the short hand)
- Fit the minute hand in second (this is the long, wide hand)
- Fit the second hand onto the small pin in the center (this is the long, thin hand)
- With the hands in place, give the second hand a little nudge, clockwise, to get the clock moving
- You can use the dial on the back of the clock's hardware to adjust the time
- Place the clock's back onto the clock's body to complete the build
- Enjoy!

Conclusion
At the time of this post, I'm less than a month into this 3D Printing hobby and 3D modeling. This is one of my first designs, so I would love to see photos of your prints!
If you really love the print, feel free to gift me a boost! That'd mean the world. <3
Check out my other designs in this collection: https://makerworld.com/en/collections/2493534
Boost Me (for free)
If you love the print, boost to help fund future filament for my 3D printing journey and help others find this print too!
License
You shall not share, sub-license, sell, rent, host, transfer, or distribute in any way the digital or 3D printed versions of this object, nor any other derivative work of this object in its digital or physical format (including - but not limited to - remixes of this object, and hosting on other digital platforms). The objects may not be used without permission in any way whatsoever in which you charge money, or collect fees.
Comment & Rating (30)