Small Axial Flow Cyclone Dust Separator


Print Profile(1)

Description
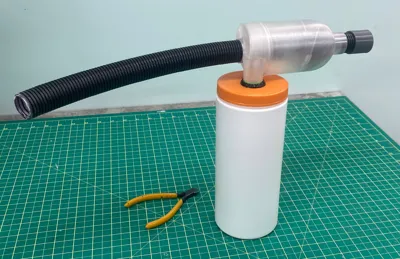
I have a small Stepcraft CNC router in my house and to keep the noise down I use a small Miele cannister vacuum cleaner with a bag and a secondary HEPA filter on a low noise setting to capture the dust and particles from cutting.
I needed a small dust separator to save space on my countertop. The vacuum bags fill up quickly without any dust collection.
Cutting MDF generates particularly fine and light dust so a regular dust collector doesn't do a great job without high airflow and is too big for my space.
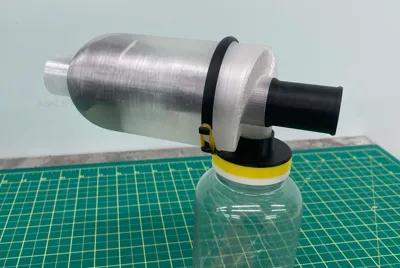
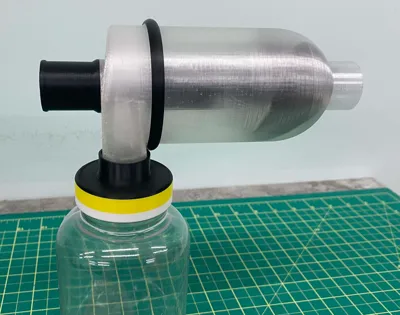
The design here has a small collection container that can be quickly removed and emptied between jobs and realistically I couldn't fill it on one job anyway. If I use a clear bottle I can see how full it is.
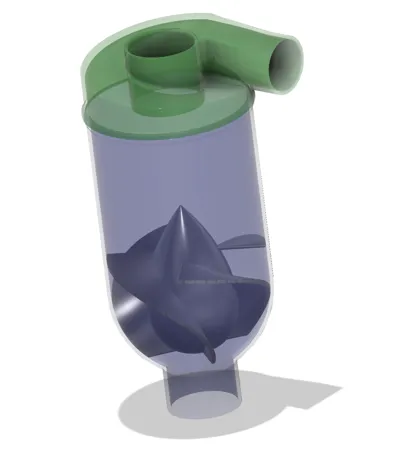
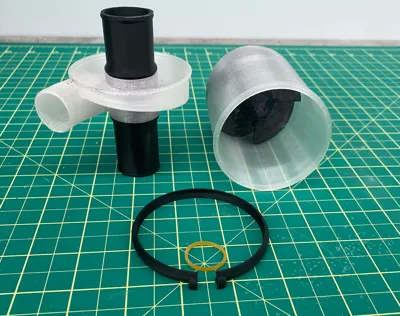
The cyclone has 4 parts.
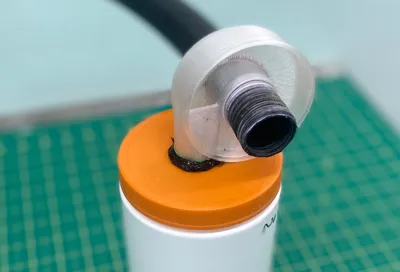
- The outer tube constrains the airflow, it has a 28mm OD inlet which attaches to my CNC dust extractor tube
- The impeller has 4 blades and the air flows around the low drag teardrop shape without reducing the cross sectional area. The blade angle to airflow direction is a few degrees (about 5°) at the inlet side and about 80° degrees at the back side. This twists the airflow to fling heavier particles to the outside.
- The back splitter catches the particles on the outside of the tube and directs them into a collection container. The clean air stays in the middle of the vortex where it is pulled out the centre pipe into the vacuum.
- The dust collector, in my case is a sturdy plastic container with a hole in the lid. Just twist it off to discard the dust. It is a good idea to make it heavier or give it a heavy base so that it can stand on the table without falling over easily.
The 28mm diameter outlet hose can be pushed in or out to see if the collection efficiency will improve, I have mine about 1 diameter (28mm) away from the back of the teardrop
I used clear PLA to be able to see how well the dust is separating to the outer edges. In my case it takes 2 turn before exiting into the collector. I could shorten it or decrease the angle at the back of the impeller (to reduce the resistance to airflow) but for now I seem to have enough extraction capacity to catch the router cuttings. The layer line catch dust, if possible smooth all surfaces over which air flows.
Obviously it won't pass large flakes of wood or long hair, they will tangle in the impeller.
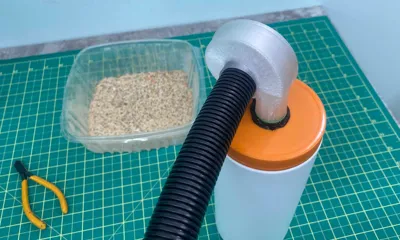
I did some basic tests with 35g of dust comprising mainly MDF dust, some fine ABS and acrylic cuttings, some very fine sandblaster media and some chalk filed from a kids pavement art chalk stick (purple). The little pile weighed 35.88g before being sucked up and upon emptying the container it weighed 35.84g. The 100g scale was drifting a bit so I couldn't say how much passed through the cyclone but I could see slight purple discolouring of the inside of the exhaust section of the vacuum hose after running the dust through 3 times.
I did suck the dust up slowly at a pace I thought would be similar to a cutting job. I am sure that more would pass through if I plunged the vacuum hose into the pile and just sucked it up as fast as possible.
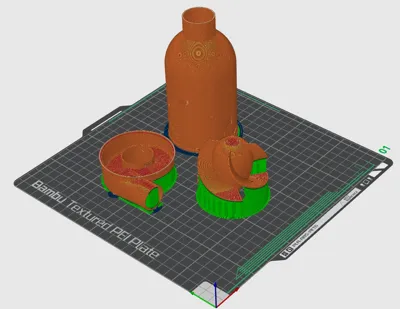
Printing
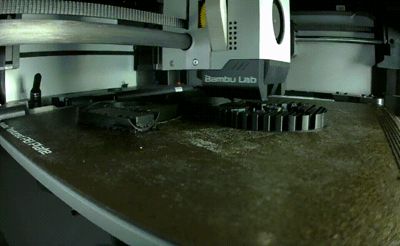
Printing the 3 parts requires support for the impeller and the back section. I used a Bambu X1C with 0.25mm layer height and 0.5mm line width, 3 walls and 20% infill.
Impeller - You may have better success printing the teardrop impeller standing on its sharp point, you can move the point into the buildplate a mm or 2 and use a brim to support it until the support and vanes start being printed. Clearing support will be easier.
My printer takes 3 hours to print the 3 parts with the impeller standing on its sharp end lowered 1.5mm. The slicer says it uses 117g of filament which includes the support and brim.
If I use adaptive layers for smoother curves it takes 20 minutes longer.
If the impeller gets knocked over then you can add adhesive at the point or lower it about 3mm into the buildplate.
Print the two hose adapters with the rounded support end on the buildplate so that the flange has the flat surface facing up and away from the buildplate. It prints the square edge properly this way.
Assembly and Use
My impeller was a tight fit in the tube so I didn't use glue initially but when I tested with a small Shop-vac it moved the impeller back, now it is glued in.
At this stage I just use caulking for the dust collector, I have tried adding a flange but this was less effective than I expected. I suggest you add your own design to the short tube or glue an adapter to it. It will depend on what collector you use.
The top and bottom sections have no solid attachment method, I use caulking which can be removed if I need to open it.
Select the long or short hose to go inside the cyclone, one may work better than the other for your setup and airflow rate.
Files:
There are two “Tops”, the square version has less external support and the support inside the cavity need not be removed. The spiral version has more external (easy to remove) support. Functionally there is no real difference. Both will get support in the outlet port which is a pain to remove but it may not be needed.
The picture show one version that does not have the ramp to the outlet. This just collects dust so there is no file for it.
Step files are included for anyone who wants to remix the model.
The step file with two tops has the spiral and square tops superimposed over each other. Delete the one you don't want.
Updates: 28 Sep 2005
I added 3 parts, two tubes that fit into the back part of the cyclone, one is longer than the other and can be used in place of the flexible hose that. Also added is a simple strap that holds the two halves of the cyclone together in case you don't want to glue them permanently. Use a short elastic band to keep the ends together or a wire tie. Although it fits either way, if you carefully inspect the inside of the strap you'll see one way conforms to the ends of the parts better than the other way.
Remixes:
Anyone remixing this can try a shorter tube, a different impeller, a narrower tube.
It is also common to remove the aerodynamic shape in the middle and just use the vanes to spin the air with a narrow tube, the narrower tube may even separate low density dust better.
Although gravity is supposed to catch the dust, from what I can see the airflow is so compelling that the dust is thrown into the collector, it may be possible to use an inline collector to reduce space even more.
It may work in the more commonly seen cyclone configuration if you switch the inlet and particle collection output around and remove the impeller. I haven't tried this.
The axial flow cyclone is not commonly implemented in commercial vacuum cleaners, the only one I know of is the Eureka Whirlwind NEN110B which uses the classic configuration of the debris passing outside the exhaust and falling down into an integrated debris trap. This configuration may be more versatile or effective.
Comment & Rating (3)