Search models, users, collections, and posts

Bang Box / Balloon Blast Box |Board Game V2

Print Profile(2)

All
A1 mini
P1S
P1P
X1
X1 Carbon
X1E
A1
H2D
H2D Pro
H2S
P2S
H2C
X2D
A2L

V2 Added storage lid and thicker nails
Designer
13.8 h
5 plates
5.0(5)

Box.20 layer, 2 walls 10% Others 16 layer, 2 walls, 30% infi
Designer
13.8 h
5 plates
5.0(1)

Open in Bambu Studio
Boost
93
224
19
6
136
87
Released 

Description

Check out the halloween edition!

https://makerworld.com/en/models/685926#profileId-614537


V2 Based on user feedback I have made a couple of updates :) Thank you for the feedback

  • Added an optional pressure fit lid for the storage of parts
  • Decreased the tolerance in the nails from 0.5mm to 0.1mm by increasing the thickness of the nail body to 6.4mm the holes in the box are 6.5mm (old version of nails 6.0mm are still available in raw files and included a 6.35mm version just incase)
  • Removed 25 hole/nail version in favour of 30 hole version with further reductions in filament use


***Please be aware due to the tightened tolerances altering certain settings such as wall loops may cause issues with parts fitting correctly*** If in doubt about an already printed box print a single nail to test***


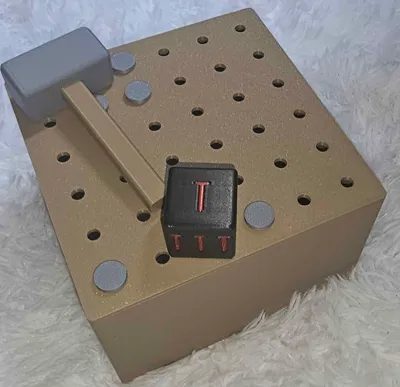
This is the first 3D modelling project I've uploaded! I'm new in the world of both printing and modelling the project was created in fusion360 which is the Balloon Bang Game set featuring a box, nails, a hammer, and a dice. 
 

I searched for a file after watching people play one on YouTube and could only find one behind a paywall, which defeats the purpose of not buying the game…


It's a simple design but fun family game for 2–4 Players that’s easy to print, doesn't require any assembly and only requires the addition of some small balloons (I recommend water balloons as they pop easier when filled with air and up the stakes when filled with water). All components are optimized for durability and minimal filament usage to the best of my abilities.


I’ve kept the design approachable for newcomers to 3D printing like myself and that included making sure it was A1 mini friendly. I chose a dice over a wheel due to the ease of designing and printing. The hammer can be printed in multicolour simply by pausing the print at the desired layer (depending on layer height) and the dice can be coloured by a sharpie or paint marker although is readable in solid colour. Using an AMS to colour will drastically increase the print time.


I welcome any feedback or suggestions from the community to help me improve my design, my printing and my modelling skills.

Whether you're new to 3D printing or an experienced maker, feel free to download, print, and enjoy! If you have any tips for refining this or suggestions for future projects, I’d love to hear from you and have a chance to give back. Thank you for checking out my work!


The nails are quite pointy be careful with small children!

Boost Me (for free)

Boosting is a great free way to support me in buying more filament to learn, experiment and design more models!

Comment & Rating (19)

(0/1000)

After printing this, I found that the nails are a little undersized for the holes on the box. They just slide right in with no need for a hammer so I did some testing. the holes in the box do vary some, but I suppose that could be my printer. Not sure how that works. In any case, I've found that increasing the diameter of the nail by 7.57% gives it enough friction to need the hammer in most of the holes. Also, When printing the die, supports for the icon on the bottom could be beneficial since it doesn't create the icon by bridging across the gap, but tries to bridge lengthwise along the icon. It still worked, but wasn't as pretty. Overall, I think it's a great print. Thanks again.
(Edited)
The designer has replied
designer
2
Reply
Thank you so much, I did leave the nails loose by design I'll make sure to update this and I haven't forgotten about the dice either! I tried making inserts for the existing dice model with mixed results due to the small size. I will need to redo the symbols slightly larger for a V2 dice add supports, but I will also increase the tolerance for the nails. If I remember correctly the holes are 6.5mm and the nails are 6mm in diameter I'll increase those to 6.4mm which is slightly under 7.56% :)
1
Reply
I will try and get these done tomorrow or Monday at the latest, my apologies I got slightly distracted by the Halloween contest and released my second model! :) Again thanks for the support and the continued feedback it genuinely helps!
1
Reply
Replying to @Hydrasam :
that's awesome! Gonna go check out your Halloween entries!
designer
1
Reply
This is great and is now next on my list to print. Have you considered inlays for the die to reduce the need for an AMS? Being able to glue pieces into the recesses would be a really good option to get multiple colors on the die without needing an AMS, or even to speed up printing regardless of having an AMS.
The designer has replied
designer
1
Reply
Great idea! I've experimented with inlays for bigger prints but nothing this small when I get a chance i'll update it!
1
Reply
Sorry for bothering you dude but your feedback has been invaluable, how would you feel about removing the 3xnail side in favour of a second 2 nail? I've been experimenting with inlays and the only way I can get 3xnail to work well and look good with inlays is by further increasing the size of the die once I solve the problem with the die the halloween version with a twist is ready to release :)
1
Reply
Replying to @Hydrasam :
not a bother at all. I think with the size of the box, removing the three nail side in favor of a 2 nail side would be fine. at worst it makes the game last longer. (that's not really a bad thing) haha. I'm working on a scaled up version. So far it looks like 150% will work. Reason being my son has several friends over sometimes and it's fun to be able to add players.
0
Reply
Print Profile
V2 Added storage lid and thicker nails
I ended up making the box a bit shorter and the nails along with them. Then I sized the diameter of the nail after printing the box and my 3 yr old loves hammering in the nails, then I just use a cylinder to hammer them back out. Been working good at least 10-20 in/out cycles so far. We use the hammer tpu head model printed in PLA that looks like a mini sledgehammer and with like 6 walls thick on the head it works great.
0
Reply
Print Profile
Box.20 layer, 2 walls 10% Others 16 layer, 2 walls, 30% infi
Superb game
Show original
0
Reply
Print Profile
V2 Added storage lid and thicker nails
profile
1
Reply
Print Profile
V2 Added storage lid and thicker nails
0
Reply
Print Profile
V2 Added storage lid and thicker nails
0
Reply
Print Profile
V2 Added storage lid and thicker nails
0
Reply
No more