Search models, users, collections, and posts

Sc-Oreo Handheld Oreo Counter Score Keeper 00-99

IP Report
GIF

Print Profile(1)

All
P1S
A1 mini
X1 Carbon
X1
P1P
H2D
A1
X1E
H2D Pro
H2S
P2S
H2C
X2D
A2L

0.2mm layer, 6 walls, 25% infill
Designer
3.3 h
3 plates
4.3(21)

Open in Bambu Studio
Boost
163
448
39
22
362
244
Released 

Description

UPDATE 5/12/25 - Added optional inner ring that only has ‘+’, ‘-’, and ‘0’ if you plan to count positive or negative scores.


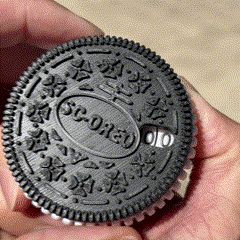
This is my pocket sized “Sc-Oreo” counter/score keeper shaped like an Oreo cookie. The counter will keep track of your score or whatever you need to count from 0-99. The white “double-stuff" center ring rotates to increment the ones place on the counter. The top cookie part rotates to increment the tens place. I designed the Sc-Oreo so there is a detent at each number position so as you rotate the parts, they will conveniently center themselves so the numbers are c

Boost Me (for free)

If you like my design, please send a boost! I printed dozens of these parts in testing to get the tolerances just right.

entered in the viewing window. This will also help prevent the numbers from moving around as you carry it around in your bag or pocket.


Use the Sc-Oreo for golf, bag toss, disc golf, ladder ball, counting birds, fishing…. whatever! I specifically designed this for my wife and I to keep track of our disc golf scores while we play.


PRINTING: I separated the white parts onto a second build plate. Drag them all onto one plate if you choose, but this will result in an excessive amount of color changes of your AMS. Best just to print the white parts separately. Also, the cookie top and bottom pieces are oriented face up so there is some support required. I got better results not using tree supports. I would not recommend changing the support settings. Pulling out support from the main axle hole in the bottom cookie piece might be a pain so be sure not to “auto” the support setting, For a smooth rotating Sc-Oreo, take care to remove all the support material prior to assembly.


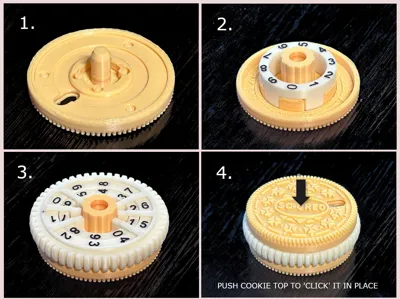
ASSEMBLY: Super easy. Follow the 4-step assembly picture. (step 1) Make sure you are inserting the top disc into the cookie top piece with the correct orientation as shown in the picture, and this disk is fully seated onto the three alignment pegs. (step 2) Press the inner tens place ring onto the cookie bottom. It will click into place. (step 3) Fit the outer white stuff ring onto the cookie bottom. (step 4) The axle on the cookie top piece should “click” into place when pressed into the bottom cookie piece. A drop of household oil on the axle will help key the cookie top into place but it is not required. It might take a little pressure to it to fully seat. If it isn't seating, try rotating the cookie top as you press it into place. The little sprung arms need to find their position on the ribbed housing on the cookie bottom.


USING THE SC-OREO: After assembly, squeeze the parts together while rotating it around several times. This will help loosen up stiff parts or any little filament burrs that remain. It will break in and move smoothly.


Please share a picture of your print! I would love to see it in use.

Comment & Rating (39)

(0/1000)

Print Profile
0.2mm layer, 6 walls, 25% infill
works well, removing the support was a bit of a pain. Next time i would explore printing face down even though thats not how the designer wants you to do it.
The profile uploader has replied
1
Reply
Glad you like it. I favored a better surface finish but acknowledge the support was a bit of a pain. PETG as a support interface, or even better is the bambu PLA support interface that comes free with some printers actually works really well.
(Edited)
1
Reply
Print Profile
0.2mm layer, 6 walls, 25% infill
very good print. little ruff putting together. but nothing a little lube would help. print two, one in red and one in blue for my sons pop dart game.
The profile uploader has replied
0
Reply
looks great! yea, a little stiff at first and it takes some effort to get the halves together but I didn’t want it coming apart once assembled. I must have made at least a dozen tests before I got it where I thought it worked
(Edited)
1
Reply
very well done.
0
Reply
Print Profile
0.2mm layer, 6 walls, 25% infill
my first attempt was with Black ABS. the numbers were misaligned and the stops were off or weak as the core didn’t print properly. Blue PETG-HF worked great. a blue Oreo.
The profile uploader has replied
0
Reply
Looks great! I never tried it in ABS. Sorry that didn't work out but glad you got it with the PETG.
0
Reply
Print Profile
0.2mm layer, 6 walls, 25% infill
The supports were quite tricky to remove. I'm aware that printing it upside-down would result in worse looks, but if each cover was printed in 2 parts and assembled later then it would be best of 2 worlds - reduced supports and good look. Other than that it works and looks pretty. Just be careful, because those little decorative dots (printed as cylinders) break easily. Personally I just wish the 10s ring would rotate automatically (there are other even smaller designs that incorporate that, so it is technically possible). If that's not bothering you and you want a cool looking counter, then sure, go print it. But if you want something more practical that won't require excessive post-processing, then I would recommend a different design.
0
Reply
Print Profile
0.2mm layer, 6 walls, 25% infill
Great creative print. I do think the physical and cognitive effort required to spin the dials to the correct value is a bit high. Design might be better with a single digit, or a slightly different mechanism to increment/decrement.
The profile uploader has replied
1
Reply
Appreciate the thoughts on it. I printed a dozen different tensions of the mechanism with varying detent depth and resistance to turn. Softer resistance seemed to break down the "spring" of the tabs after use so finally settled on what it is now. I toyed with a single digit counter but seemed pointless to only count to 10. It would certainly simplify the design though...
0
Reply
Replying to @cmcraig2 :
so my daughter was interested in it because she plays golf, and a single digit counter is really all she would need for that, so I don't think single digit is as fruitless as you may have initially considered it. I could tell a lot of thought got put into the design though so want you to know I appreciate all that you put into that.
0
Reply
Replying to @Adammillers :
Thank you. I will look into eliminating the tens place digit and uploading a variant.
0
Reply
Could you please create a 65% size of this model When I scale it down with a slicer the text becomes illegible and I would be happy if it could be made even thinner as I want to use it as a green marker
The designer has replied
Show original
0
Reply
I would like to help you with this but this model will not scale down well, as you have discovered. the tolerances between the parts would be problematic and the printed spring parts would not spring well in a smaller size. if you are okay with it not working at designed, I would recommend a 0.2mm nozzle for the text. it would be too much work to redesign it smaller.
0
Reply
Thank you for your reply Redesign is difficult after all For this issue, I plan to solve it by printing at 65% scale and then printing and applying a sticker on top
Show original
0
Reply
the top was hard to attach but did appear to seat. the 10s indicator won’t rotate when I move from 9 to 0. it seems to be stuck in place. applied plenty of oil.
0
Reply
Think I figured it out. When you move to zero you’re supposed to rotate the top of the cookie, not the white dial. Didn’t see that in the instructions.
0
Reply
Replying to @user_1941928336 :
You can also rotate the bottom part while holding the top still - it will have the same effect of going to next 10, but without shifting the position of top window.
0
Reply
Print Profile
0.2mm layer, 6 walls, 25% infill
Easy print. Looks good.
The profile uploader has replied
0
Reply
glad you like it!
0
Reply
Print Profile
0.2mm layer, 6 walls, 25% infill
Very firm to rotate. Functions as intended but a bit stiff.
The profile uploader has replied
0
Reply
Thank you for the review. It will loosen up a bit as you use it. I actually made it a little stiffer after the first prototype because it turned to easily and could have shifted by itself moving around in my pocket.
0
Reply
super
1
Reply

License

This user content is licensed under a Standard Digital File License.

You shall not share, sub-license, sell, rent, host, transfer, or distribute in any way the digital or 3D printed versions of this object, nor any other derivative work of this object in its digital or physical format (including - but not limited to - remixes of this object, and hosting on other digital platforms). The objects may not be used without permission in any way whatsoever in which you charge money, or collect fees.