Waveshare 8DP-CAPLCD Enclosure


Print Profile(1)

Bill of Materials

Description
This is an enclosure I designed for the Waveshare 8DP-CAPLCD touchscreen for the Raspberry Pi 4. If you want to replicate this project, in addition to printing this model you will also need a Raspberry Pi 4, the Waveshare 8DP-CAPLCD, 4 M2.5x5 screws, 2 30mm fans, 2 male to female breadboard jumper wires, a 180 degree USB C male to female adapter, a heastink for the pi is recommended, and a nail or picture hook to hang the display. You'll also need a power supply that can power both the screen and the pi, I recommend the official one. Any other hardware I didn't mention comes with the screen.
Tools needed:
- Your 3D printer
- Philips PH1 screwdriver (For the screws that come with the screen)
- Hex 1.5 driver (For the M2.5x5 screws. If you don't like hex screws you can find similar screws on amazon or mcmaster carr. Just make sure they are counter sunk screws so that the case can lay flat on the wall)
- Drill (Optional, if you plan on running your power cable on top of your wall you will need a drill to make a hole in the bottom of the case to run the power cable through)
Links to the parts I used:
- Raspberry Pi 4: https://www.amazon.com/Raspberry-Pi-Computer-Suitable-Workstation/dp/B0899VXM8F
- Waveshare 8DP-CAPLCD: https://www.amazon.com/gp/product/B0BPMCTQQ8
- USB C adapter: https://www.amazon.com/gp/product/B09ZHFWZR9
- 30mm fans: https://www.amazon.com/gp/product/B07X9Z19XN/
- M2.5x5 screws: https://store.bambulab.com/products/m2-5-flat-head-cap-machine-screws-fhcs-1?id=41796378722419
- Power supply: https://www.amazon.com/Raspberry-Pi-USB-C-Power-Supply/dp/B07W8XHMJZ
- Jumper wires for fan: https://www.amazon.com/Antrader-Breadboard-Jumper-Female-Dupont/dp/B07S1NGWZL
- Heatsink: Sorry, the ones I have I bought years and years ago, they're not made anymore, there are lots of alternatives around though but I can't recommend anything I haven't personally used.
Before you assemble it completely you will want to set up the pi as it will not be possible to plug in a keyboard or insert the micro SD card once assembled. Fortunately, it is also easy to disassemble if you do need to get inside the case again.
How I set up my pi:
(As of August 2024 these instructions work, as the OS evolves these things tend to change. I personally had a hard time figuring out how to get this to work originally, particularly how to rotate the display, this is what worked for me.)
- Use the Raspberry Pi Imager to install Raspberry Pi OS (64-bit) on your micro SD card
- I recommend using the OS customization options to set your username and password, wifi settings, and enable SSH
- Once the micro SD card is ready, insert it into the pi and mount the pi on the screen. You will need the 4 short standoffs, HDMI to micro HDMI adapter, and the USB A to USB C adapter that comes with the screen
- Plug power into the pi and wait for it to boot. Once it reaches the desktop it should show you its IP address in the top right corner, if you don't see it you'll have to find your IP or figure out why its not connected to the network which is out of scope for this tutorial.
- Using the IP of your pi, connect to it over SSH with your favorite terminal emulator (Putty will work fine)
- Once connected, type sudo -s and hit enter. (this prevents us from constantly having to supply credentials for the commands we will run)
- Make sure everything is up to date by running the commands apt-get update and apt-get upgrade
- Make sure you're running X11 not Wayfire. By default I believe it uses Wayfire, so you'll want to change this configuration by doing the following:
- Type raspi-config and hit enter.
- Use your arrow keys to select to 6 Advanced Options
- Select A6 Wayland and hit enter
- Select W1 X11 and hit OK. It will now take you back to the main setup screen. Select Finish and reboot.
- Once the Pi is booted again, use the touchscreen to go to the menu, go to Preferences, and click on Screen Configuration.
- If you don't already have a keyboard plugged into the Pi, now is the time to plug one in.
- Go to the Layout menu then go to Screens, HDMI-1, Orientation and select Left.
- At this point you're going to have a lot of difficulty navigating the screen since the above option only changes the display and not the touchscreen. You only have a few seconds to confirm your change before it will default back to the original setting. This is where the keyboard comes in handy. You can use Tab on the keyboard to select the OK button after you change the screen orientation, and hit enter on the keyboard.
- Go back to your terminal emulator and connect back to the pi. Make sure you do sudo -s again.
- Type nano /usr/share/X11/xorg.conf.d/40-libinput.conf and hit enter
- In the section where you see "Identifier "libinput touchscreen catchall"" add the line Option "TransformationMatrix" "0 -1 1 1 0 0 0 0 1"
- Save the file by pressing Ctrl and O, exit nano by pressing Ctrl and X
- Reboot the pi to confirm this setting worked. You can do this by typing reboot and hit enter. Once the pi boots back up to the desktop, make sure the touch screen works as expected.
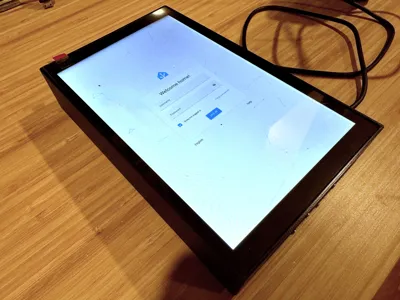
- I'm using my display as a Home Assistant dashboard. To make sure this is always running, you can do the following:
- In command line, type nano /home/USERNAME/.config/lxsession/LXDE-pi/autostart (replace USERNAME with the username you set earlier when you installed the OS)
- Once you have the autostart file open, make sure it has all of the following lines of code:
@lxpanel --profile LXDE-pi
@pcmanfm --desktop --profile LXDE-pi
@xscreensaver -no-splash@xset s off
@xset -dpms
@xset s noblank@firefox --kiosk homeassistant.local:8123/tablet-dash/0
- Make sure to replace my homeassistant URL with whatever you set up in home assistant. I will not be covering how to create a kiosk dashboard in this tutorial, there are many on the internet already.
- Save the file by typing Ctrl O and exit with Ctrl X
- Reboot the pi again and confirm that firefox automatically starts and loads the correct web page.
- While you still have your keyboard plugged in, log into home assistant.
Assembling the enclosure:
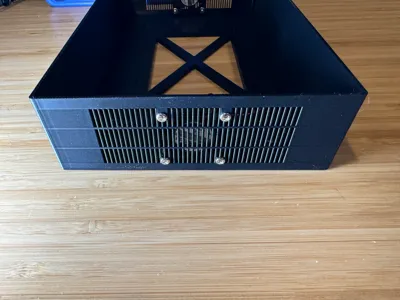
- Mount the top fan as shown in the picture (with the wires coming out of the top.) If you have the wires coming out any other direction they won't reach the GPIO pins on the Pi. You want to make sure the label side of the fan is facing the top of the case.
- Mount the bottom fan, doesn't really matter which direction since you're going to be extending these wires, but your best bet is to have the wires stick out to the left (the opposite of what I did, I just really didn't feel like mounting it again after I noticed what I did.) Make sure the label side of the fan is visible and pointing inside the case.
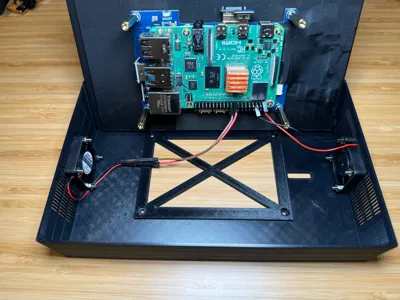
- Screw in the long standoffs that came with the screen to the mounting posts on the back of the screen.
- Place the screen in the case on its side like in my picture so you can connect the fans
- Connect the top fan:
- Red wire to pin 1
- Black wire to pin 6
- Connect the bottom fan:
- Take a red and black breadboard jump wire if you have them (I didn't have any more black so mine is brown in the pictures)
- Red wire to pin 17
- Black wire to pin 20
- Plug in your power supply and route it through whatever the most logical place is for your setup. I will be running my power through the wall so I didn't include a way to have the cable come out the bottom of the case. If you want to have your power cable running on top of the wall you might want to drill a hole in the bottom of the case to the side of the vent holes. I do have one of these temporarily mounted with the power on top of the wall without adding this hole, its not the worst thing in the world, but it does angle the whole case to the right a bit since the cable prevents it from sitting flush on the wall.
- Carefully lower the screen into the case making sure none of the wires inside are getting caught between the case and the standoffs.
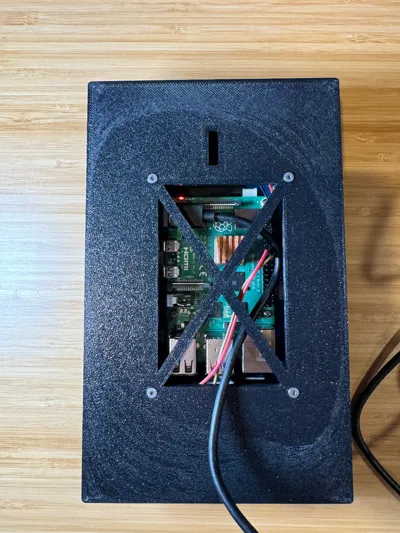
- Screw the case to the standoffs using the M2.5x5 screws.
- Power it on again and confirm the fans are spinning. That's it, you're done!
License
You shall not share, sub-license, sell, rent, host, transfer, or distribute in any way the digital or 3D printed versions of this object, nor any other derivative work of this object in its digital or physical format (including - but not limited to - remixes of this object, and hosting on other digital platforms). The objects may not be used without permission in any way whatsoever in which you charge money, or collect fees.
Comment & Rating (1)